Popular Woodworking 2005-11 № 151, страница 105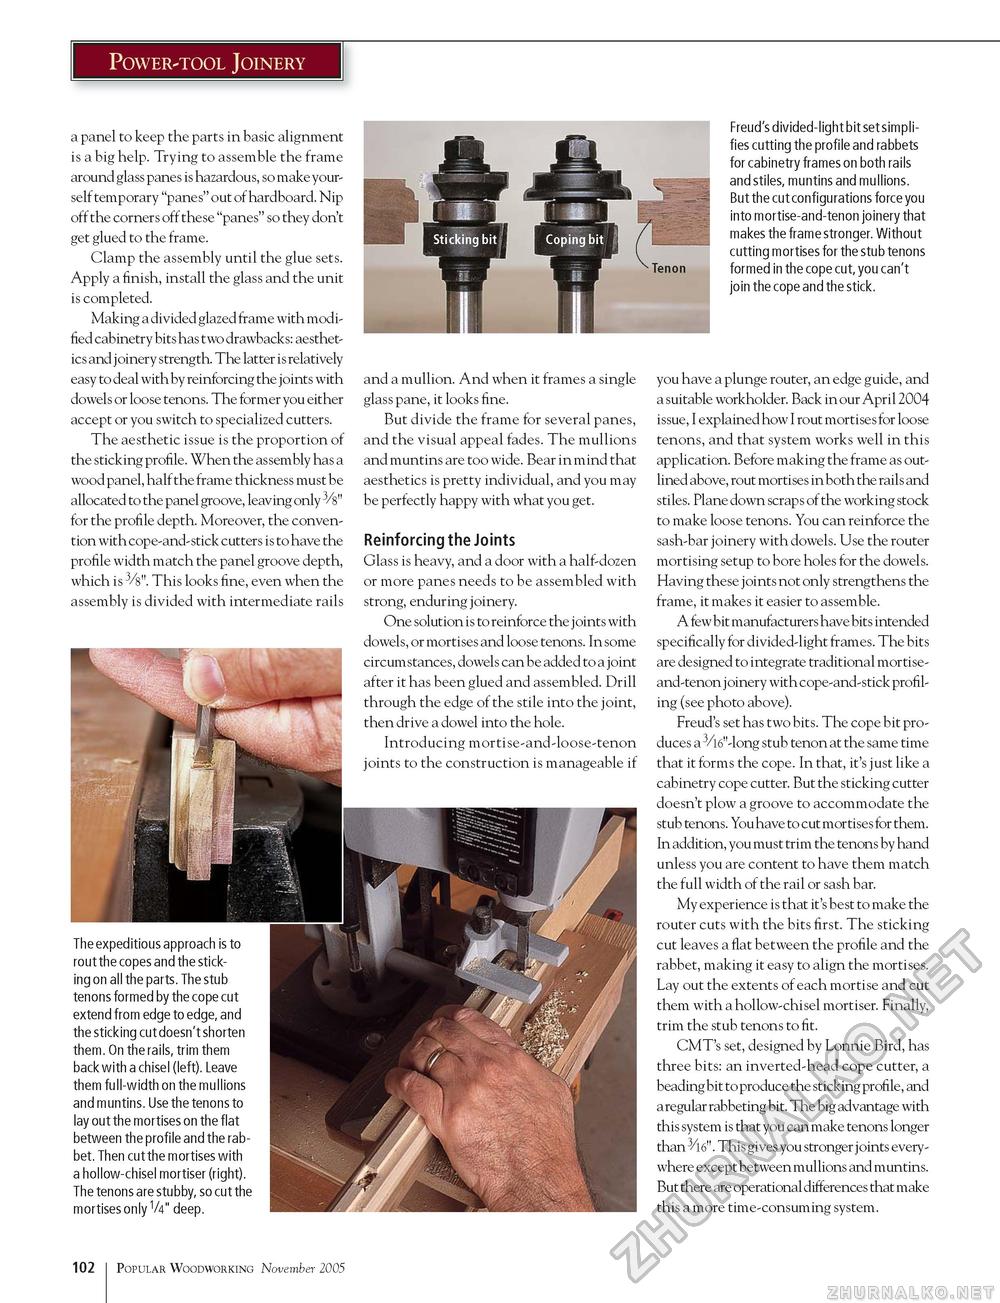
Power-tool Joinery a panel to keep the parts in basic alignment is a big help. Trying to assemble the frame around glass panes is hazardous, so make yourself temporary "panes" out of hardboard. Nip off the corners off these "panes" so they don't get glued to the frame. Clamp the assembly until the glue sets. Apply a finish, install the glass and the unit is completed. Making a divided glazed frame with modified cabinetry bits has two drawbacks: aesthetics and j oinery strength. The latter is relatively easy to deal with by reinforcing the joints with dowels or loose tenons. The former you either accept or you switch to specialized cutters. The aesthetic issue is the proportion of the sticking profile. When the assembly has a wood panel, half the frame thickness must be allocated to the panel groove, leaving only 3/s" for the profile depth. Moreover, the convention with cope-and-stick cutters is to have the profile width match the panel groove depth, which is 3/8". This looks fine, even when the assembly is divided with intermediate rails and a mullion. And when it frames a single glass pane, it looks fine. But divide the frame for several panes, and the visual appeal fades. The mullions and muntins are too wide. Bear in mind that aesthetics is pretty individual, and you may be perfectly happy with what you get. Reinforcing the Joints Glass is heavy, and a door with a half-dozen or more panes needs to be assembled with strong, enduring joinery. One solution is to reinforce the joints with dowels, or mortises and loose tenons. In some circumstances, dowels can be added to a joint after it has been glued and assembled. Drill through the edge of the stile into the joint, then drive a dowel into the hole. Introducing mortise-and-loose-tenon joints to the construction is manageable if The expeditious approach is to rout the copes and the sticking on all the parts. The stub tenons formed by the cope cut extend from edge to edge, and the sticking cut doesn't shorten them. On the rails, trim them back with a chisel (left). Leave them full-width on the mullions and muntins. Use the tenons to lay out the mortises on the flat between the profile and the rabbet. Then cut the mortises with a hollow-chisel mortiser (right). The tenons are stubby, so cut the mortises only V4" deep. Freud's divided-light bit set simplifies cutting the profile and rabbets for cabinetry frames on both rails and stiles, muntins and mullions. But the cut configurations force you into mortise-and-tenon joinery that makes the frame stronger. Without cutting mortises for the stub tenons formed in the cope cut, you can't join the cope and the stick. you have a plunge router, an edge guide, and a suitable workholder. Back in our April 2004 issue, I explained how I rout mortises for loose tenons, and that system works well in this application. Before making the frame as outlined above, rout mortises in both the rails and stiles. Plane down scraps of the working stock to make loose tenons. You can reinforce the sash-bar joinery with dowels. Use the router mortising setup to bore holes for the dowels. Having these joints not only strengthens the frame, it makes it easier to assemble. A few bit manufacturers have bits intended specifically for divided-light frames. The bits are designed to integrate traditional mortise-and-tenon j oinery with cope-and-stick profiling (see photo above). Freud's set has two bits. The cope bit produces a 3/l6"-long stub tenon at the same time that it forms the cope. In that, it's just like a cabinetry cope cutter. But the sticking cutter doesn't plow a groove to accommodate the stub tenons. You have to cut mortises for them. In addition, you must trim the tenons by hand unless you are content to have them match the full width of the rail or sash bar. My experience is that it's best to make the router cuts with the bits first. The sticking cut leaves a flat between the profile and the rabbet, making it easy to align the mortises. Lay out the extents of each mortise and cut them with a hollow-chisel mortiser. Finally, trim the stub tenons to fit. CMT's set, designed by Lonnie Bird, has three bits: an inverted-head cope cutter, a beading bit to produce the sticking profile, and a regular rabbeting bit. The big advantage with this system is that you can make tenons longer than 3/l6". This gives you stronger joints everywhere except between mullions and muntins. But there are operational differences that make this a more time-consuming system. 102 Popular Woodworking November 2005 |


