Popular Woodworking 2005-11 № 151, страница 64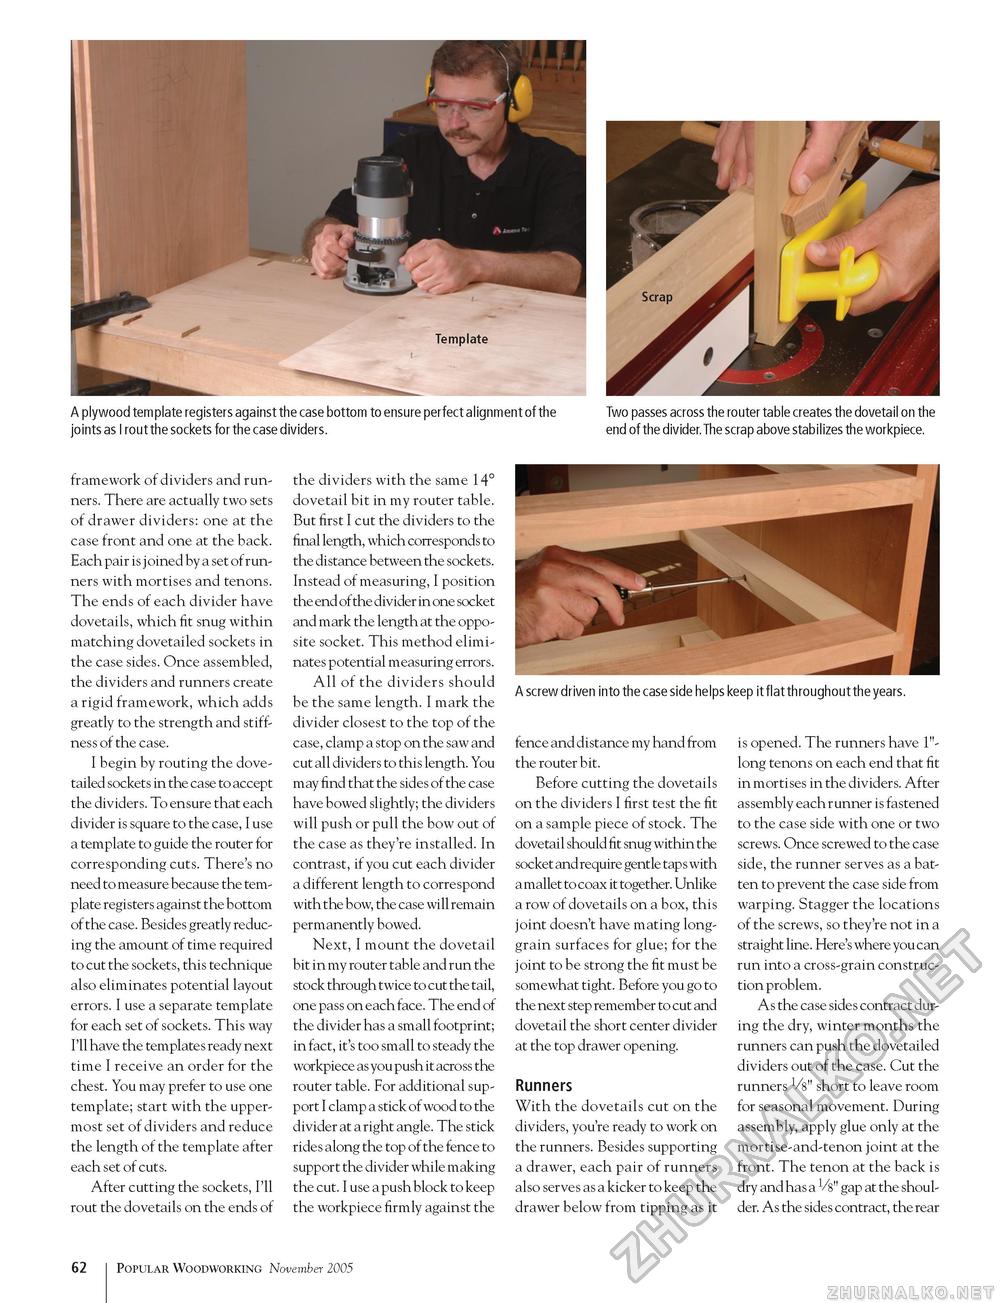
A plywood template registers against the case bottom to ensure perfect alignment of the joints as I rout the sockets for the case dividers. Two passes across the router table creates the dovetail on the end of the divider. The scrap above stabilizes the workpiece. A screw driven into the case side helps keep it flat throughout the years. framework of dividers and runners. There are actually two sets of drawer dividers: one at the case front and one at the back. Each pair is j oined by a set of runners with mortises and tenons. The ends of each divider have dovetails, which fit snug within matching dovetailed sockets in the case sides. Once assembled, the dividers and runners create a rigid framework, which adds greatly to the strength and stiffness of the case. I begin by routing the dovetailed sockets in the case to accept the dividers. To ensure that each divider is square to the case, I use a template to guide the router for corresponding cuts. There's no need to measure because the template registers against the bottom of the case. Besides greatly reducing the amount of time required to cut the sockets, this technique also eliminates potential layout errors. I use a separate template for each set of sockets. This way I'll have the templates ready next time I receive an order for the chest. You may prefer to use one template; start with the uppermost set of dividers and reduce the length of the template after each set of cuts. After cutting the sockets, I'll rout the dovetails on the ends of the dividers with the same 14° dovetail bit in my router table. But first I cut the dividers to the final length, which corresponds to the distance between the sockets. Instead of measuring, I position the end of the divider in one socket and mark the length at the opposite socket. This method eliminates potential measuring errors. All of the dividers should be the same length. I mark the divider closest to the top of the case, clamp a stop on the saw and cut all dividers to this length. You may find that the sides of the case have bowed slightly; the dividers will push or pull the bow out of the case as they're installed. In contrast, if you cut each divider a different length to correspond with the bow, the case will remain permanently bowed. Next, I mount the dovetail bit in my router table and run the stock through twice to cut the tail, one pass on each face. The end of the divider has a small footprint; in fact, it's too small to steady the workpiece as you push it across the router table. For additional support I clamp a stick of wood to the divider at a right angle. The stick rides along the top of the fence to support the divider while making the cut. I use a push block to keep the workpiece firmly against the fence and distance my hand from the router bit. Before cutting the dovetails on the dividers I first test the fit on a sample piece of stock. The dovetail should fit snug within the socket and require gentle tap s with a mallet to coax it together. Unlike a row of dovetails on a box, this joint doesn't have mating long-grain surfaces for glue; for the joint to be strong the fit must be somewhat tight. Before you go to the next step remember to cut and dovetail the short center divider at the top drawer opening. Runners With the dovetails cut on the dividers, you're ready to work on the runners. Besides supporting a drawer, each pair of runners also serves as a kicker to keep the drawer below from tipping as it is opened. The runners have 1"-long tenons on each end that fit in mortises in the dividers. After assembly each runner is fastened to the case side with one or two screws. Once screwed to the case side, the runner serves as a batten to prevent the case side from warping. Stagger the locations of the screws, so they're not in a straight line. Here's where you can run into a cross-grain construction problem. As the case sides contract during the dry, winter months the runners can push the dovetailed dividers out of the case. Cut the runners Vs" short to leave room for seasonal movement. During assembly, apply glue only at the mortise-and-tenon joint at the front. The tenon at the back is dry and has a Vs" gap at the shoulder. As the sides contract, the rear 62 Popular Woodworking November 2005 |


