Popular Woodworking 2005-12 № 152, страница 93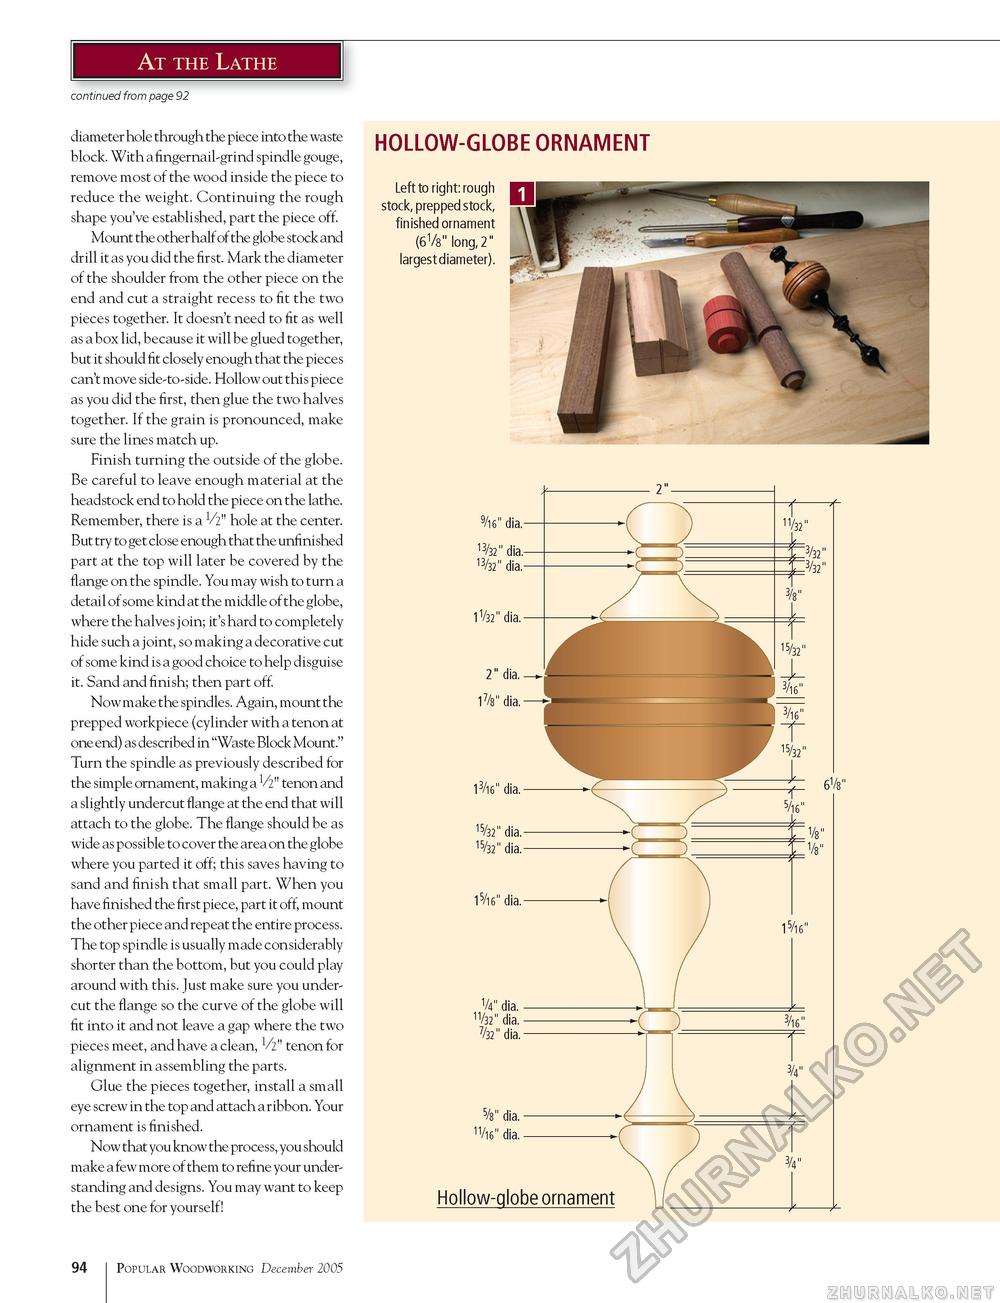
At the Lathe continued from page 92 diameter hole through the piece into the waste block. With a fingernail-grind spindle gouge, remove most of the wood inside the piece to reduce the weight. Continuing the rough shape you've established, part the piece off. Mount the other half of the globe stock and drill it as you did the first. Mark the diameter of the shoulder from the other piece on the end and cut a straight recess to fit the two pieces together. It doesn't need to fit as well as a box lid, because it will be glued together, but it should fit closely enough that the pieces can't move side-to-side. Hollow out this piece as you did the first, then glue the two halves together. If the grain is pronounced, make sure the lines match up. Finish turning the outside of the globe. Be careful to leave enough material at the headstock end to hold the piece on the lathe. Remember, there is a V2" hole at the center. But try to get close enough that the unfinished part at the top will later be covered by the flange on the spindle. You may wish to turn a detail of some kind at the middle of the globe, where the halve s j oin; it's hard to completely hide such a joint, so making a decorative cut of some kind is a good choice to help disguise it. Sand and finish; then part off. Now make the spindles. Again, mount the prepped workpiece (cylinder with a tenon at one end) as described in "Waste Block Mount." Turn the spindle as previously described for the simple ornament, making a V2" tenon and a slightly undercut flange at the end that will attach to the globe. The flange should be as wide as possible to cover the area on the globe where you parted it off; this saves having to sand and finish that small part. When you have finished the first piece, part it off, mount the other piece and repeat the entire process. The top spindle is usually made considerably shorter than the bottom, but you could play around with this. Just make sure you undercut the flange so the curve of the globe will fit into it and not leave a gap where the two pieces meet, and have a clean, V2" tenon for alignment in assembling the parts. Glue the pieces together, install a small eye screw in the top and attach a ribbon. Your ornament is finished. Now that you know the process, you should make a few more of them to refine your understanding and designs. You may want to keep the best one for yourself! HOLLOW-GLOBE ORNAMENT Left to right: rough stock, prepped stock, finished ornament (61/8" long, 2" largest diameter). 90 Popular Woodworking December 2005 |


