Popular Woodworking 2006-02 № 153, страница 91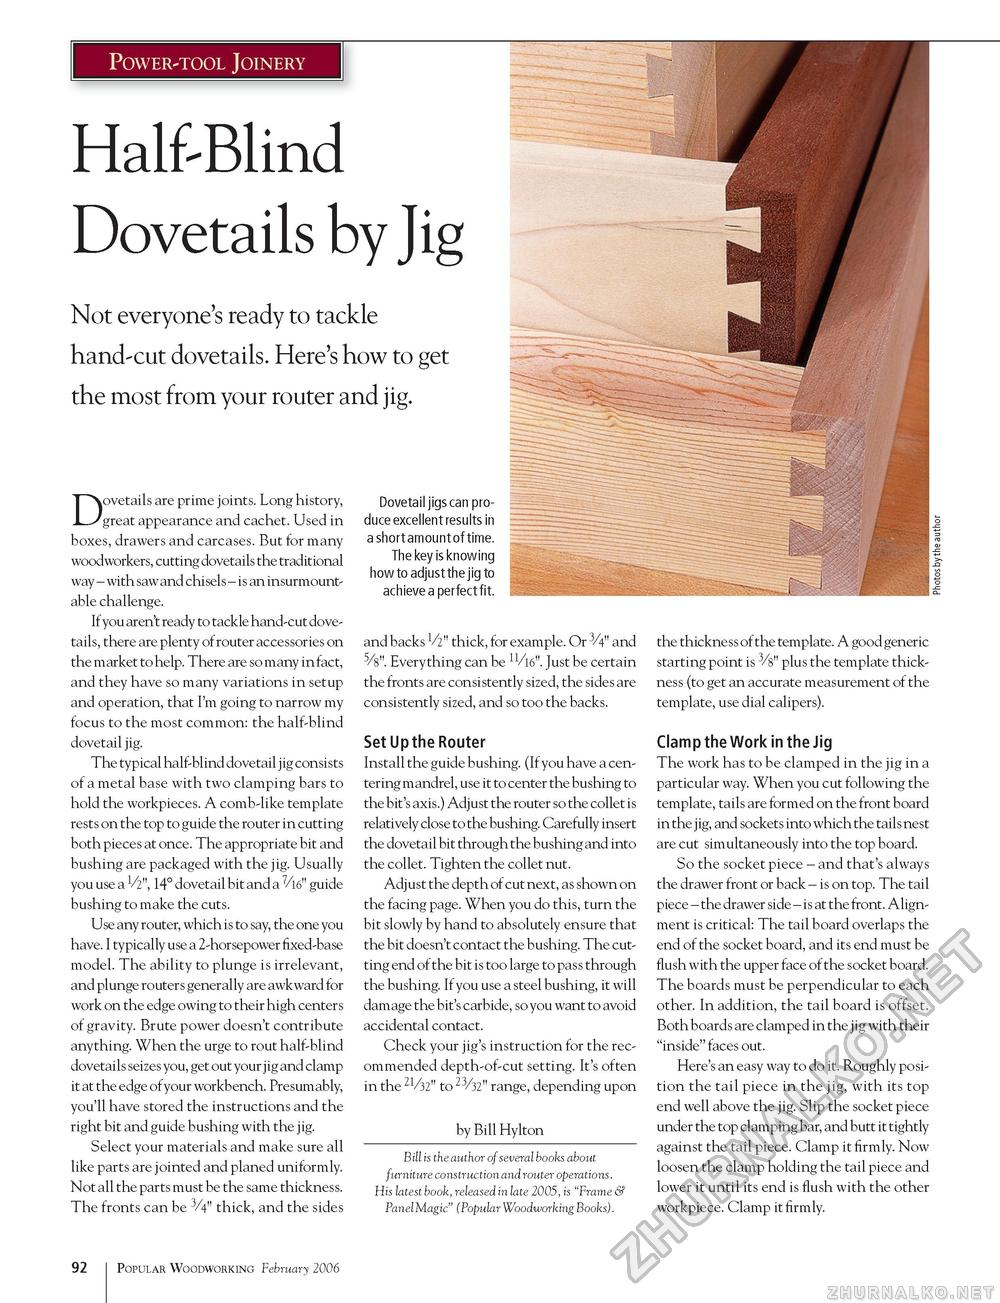
Power-tool Joinery Half-Blind Dovetails by Jig Not everyone's ready to tackle hand-cut dovetails. Here's how to get the most from your router and jig. Dovetails are prime joints. Long history, great appearance and cachet. Used in boxes, drawers and carcases. But for many woodworkers, cutting dovetails the traditional way - with saw and chisels - is an insurmountable challenge. If you aren't ready to tackle hand-cut dovetails, there are plenty of router accessories on the market to help. There are so many in fact, and they have so many variations in setup and operation, that I'm going to narrow my focus to the most common: the half-blind dovetail jig. The typical half-blind dovetail jig consists of a metal base with two clamping bars to hold the workpieces. A comb-like template rests on the top to guide the router in cutting both pieces at once. The appropriate bit and bushing are packaged with the jig. Usually you use a V2", 14° dovetail bit and a 7/l6" guide bushing to make the cuts. Use any router, which is to say, the one you have. I typically use a 2-horsepower fixed-base model. The ability to plunge is irrelevant, and plunge routers generally are awkward for work on the edge owing to their high centers of gravity. Brute power doesn't contribute anything. When the urge to rout half-blind dovetails seizes you, get out your jig and clamp it at the edge of your workbench. Presumably, you'll have stored the instructions and the right bit and guide bushing with the jig. Select your materials and make sure all like parts are jointed and planed uniformly. Not all the parts must be the same thickness. The fronts can be V4" thick, and the sides Dovetail jigs can produce excellent results in a short amount of time. The key is knowing how to adjust the jig to achieve a perfect fit. and backs V2" thick, for example. Or 3/4" and 5/8". Everything can be 1^//16". Just be certain the fronts are consistently sized, the sides are consistently sized, and so too the backs. Set Up the Router Install the guide bushing. (If you have a centering mandrel, use it to center the bushing to the bit's axis.) Adjust the router so the collet is relatively close to the bushing. Carefully insert the dovetail bit through the bushing and into the collet. Tighten the collet nut. Adjust the depth of cut next, as shown on the facing page. When you do this, turn the bit slowly by hand to absolutely ensure that the bit doesn't contact the bushing. The cutting end of the bit is too large to pass through the bushing. If you use a steel bushing, it will damage the bit's carbide, so you want to avoid accidental contact. Check your jig's instruction for the recommended depth-of-cut setting. It's often in the 21/32" to 23/32" range, depending upon by Bill Hylton Bill is the author of several books about furniture construction and router operations. His latest book, released in late 2005, is "Frame & Panel Magic" (Popular Woodworking Books). the thickness of the template. A good generic starting point is 3/8" plus the template thickness (to get an accurate measurement of the template, use dial calipers). Clamp the Work in the Jig The work has to be clamped in the jig in a particular way. When you cut following the template, tails are formed on the front board in the jig, and sockets into which the tails nest are cut simultaneously into the top board. So the socket piece - and that's always the drawer front or back - is on top. The tail piece - the drawer side - is at the front. Alignment is critical: The tail board overlaps the end of the socket board, and its end must be flush with the upper face of the socket board. The boards must be perpendicular to each other. In addition, the tail board is offset. Both boards are clamped in the jig with their "inside" faces out. Here's an easy way to do it. Roughly position the tail piece in the jig, with its top end well above the jig. Slip the socket piece under the top clamping bar, and butt it tightly against the tail piece. Clamp it firmly. Now loosen the clamp holding the tail piece and lower it until its end is flush with the other workpiece. Clamp it firmly. 92 Popular Woodworking February 2006 |


