Popular Woodworking 2006-02 № 153, страница 92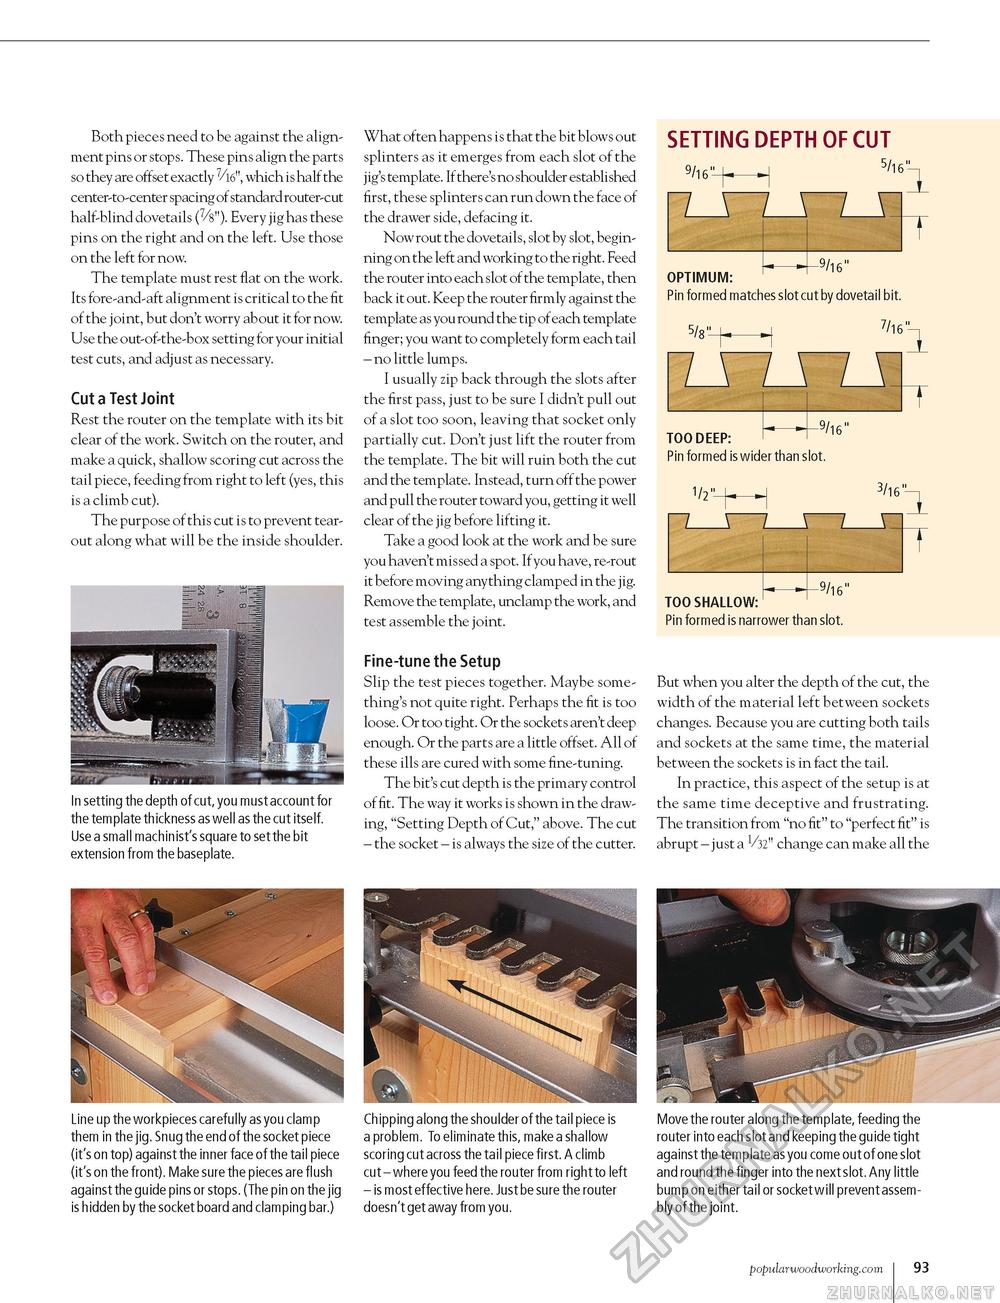
Both pieces need to be against the alignment pins or stops. These pins align the parts so they are offset exactly 7/16", which is half the center-to-center spacing of standard router-cut half-blind dovetails (%"). Every jig has these pins on the right and on the left. Use those on the left for now. The template must rest flat on the work. Its fore-and-aft alignment is critical to the fit of the joint, but don't worry about it for now. Use the out-of-the-box setting for your initial test cuts, and adjust as necessary. Cut a Test Joint Rest the router on the template with its bit clear of the work. Switch on the router, and make a quick, shallow scoring cut across the tail piece, feeding from right to left (yes, this is a climb cut). The purpose of this cut is to prevent tear-out along what will be the inside shoulder. In setting the depth of cut, you must account for the template thickness as well as the cut itself. Use a small machinist's square to set the bit extension from the baseplate. What often happens is that the bit blows out splinters as it emerges from each slot of the jig's template. If there's no shoulder established first, these splinters can run down the face of the drawer side, defacing it. Now rout the dovetails, slot by slot, beginning on the left and working to the right. Feed the router into each slot of the template, then back it out. Keep the router firmly against the template as you round the tip of each template finger; you want to completely form each tail - no little lumps. I usually zip back through the slots after the first pass, just to be sure I didn't pull out of a slot too soon, leaving that socket only partially cut. Don't just lift the router from the template. The bit will ruin both the cut and the template. Instead, turn off the power and pull the router toward you, getting it well clear of the jig before lifting it. Take a good look at the work and be sure you haven't missed a spot. If you have, re-rout it before moving anything clamped in the jig. Remove the template, unclamp the work, and test assemble the joint. Fine-tune the Setup Slip the test pieces together. Maybe something's not quite right. Perhaps the fit is too loose. Or too tight. Or the sockets aren't deep enough. Or the parts are a little offset. All of these ills are cured with some fine-tuning. The bit's cut depth is the primary control of fit. The way it works is shown in the drawing, "Setting Depth of Cut," above. The cut - the socket - is always the size of the cutter. SETTING DEPTH OF CUT OPTIMUM: Pin formed matches slot cut by dovetail bit. 7/l6- TOO DEEP: Pin formed is wider than slot. 3/l6- TOO SHALLOW: Pin formed is narrower than slot. But when you alter the depth of the cut, the width of the material left between sockets changes. Because you are cutting both tails and sockets at the same time, the material between the sockets is in fact the tail. In practice, this aspect of the setup is at the same time deceptive and frustrating. The transition from "no fit" to "perfect fit" is abrupt - just a V32" change can make all the Line up the workpieces carefully as you clamp them in the jig. Snug the end of the socket piece (it's on top) against the inner face of the tail piece (it's on the front). Make sure the pieces are flush against the guide pins or stops. (The pin on the jig is hidden by the socket board and clamping bar.) Chipping along the shoulder of the tail piece is a problem. To eliminate this, make a shallow scoring cut across the tail piece first. A climb cut - where you feed the router from right to left - is most effective here. Just be sure the router doesn't get away from you. Move the router along the template, feeding the router into each slot and keeping the guide tight against the template as you come out of one slot and round the finger into the next slot. Any little bump on either tail or socket will prevent assembly of the joint. popularwoodworking.com I 10 3 |


