Popular Woodworking 2006-02 № 153, страница 93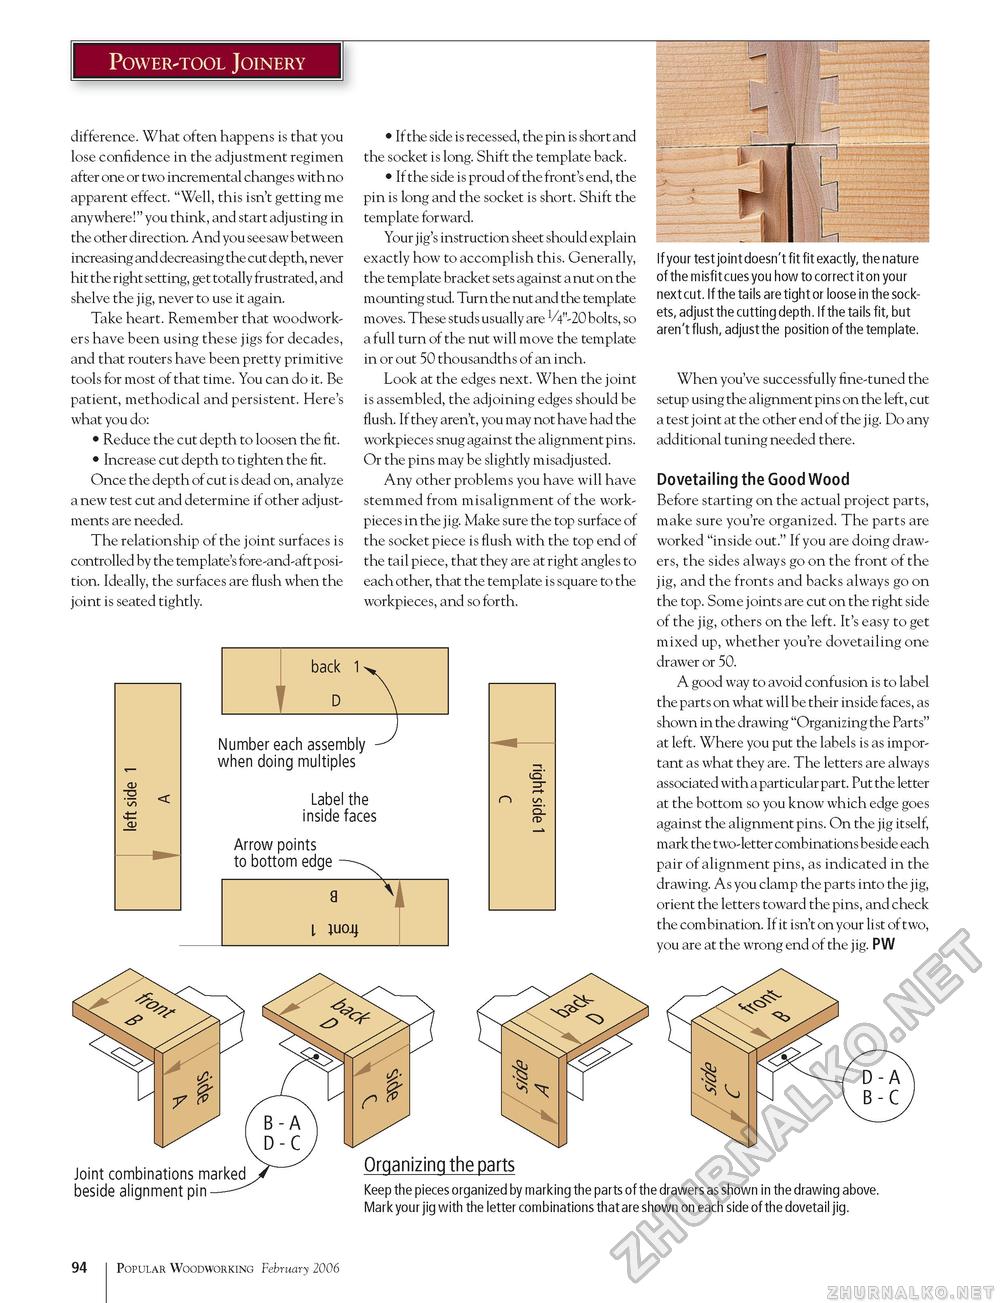
Power-tool Joinery difference. What often happens is that you lose confidence in the adjustment regimen after one or two incremental changes with no apparent effect. "Well, this isn't getting me anywhere!" you think, and start adjusting in the other direction. And you seesaw between increasing and decreasing the cut depth, never hit the right setting, get totally frustrated, and shelve the jig, never to use it again. Take heart. Remember that woodworkers have been using these jigs for decades, and that routers have been pretty primitive tools for most of that time. You can do it. Be patient, methodical and persistent. Here's what you do: • Reduce the cut depth to loosen the fit. • Increase cut depth to tighten the fit. Once the depth of cut is dead on, analyze a new test cut and determine if other adjustments are needed. The relationship of the joint surfaces is controlled by the template's fore-and-aft position. Ideally, the surfaces are flush when the joint is seated tightly. • If the side is recessed, the pin is short and the socket is long. Shift the template back. • If the side is proud of the front's end, the pin is long and the socket is short. Shift the template forward. Your jig's instruction sheet should explain exactly how to accomplish this. Generally, the template bracket sets against a nut on the mounting stud. Turn the nut and the template moves. These studs usually are VV-20 bolts, so a full turn of the nut will move the template in or out 50 thousandths of an inch. Look at the edges next. When the joint is assembled, the adjoining edges should be flush. If they aren't, you may not have had the workpieces snug against the alignment pins. Or the pins may be slightly misadjusted. Any other problems you have will have stemmed from misalignment of the work-pieces in the jig. Make sure the top surface of the socket piece is flush with the top end of the tail piece, that they are at right angles to each other, that the template is square to the workpieces, and so forth.
Number each assembly when doing multiples Label the inside faces Arrow points to bottom edge If your test joint doesn't fit fit exactly, the nature of the misfit cues you how to correct it on your next cut. If the tails are tight or loose in the sockets, adjust the cutting depth. If the tails fit, but aren't flush, adjust the position of the template. When you've successfully fine-tuned the setup using the alignment pins on the left, cut a te st j oint at the other end of the j ig. Do any additional tuning needed there. Dovetailing the Good Wood Before starting on the actual project parts, make sure you're organized. The parts are worked "inside out." If you are doing drawers, the sides always go on the front of the jig, and the fronts and backs always go on the top. Some joints are cut on the right side of the jig, others on the left. It's easy to get mixed up, whether you're dovetailing one drawer or 50. A good way to avoid confusion is to label the parts on what will be their inside faces, as shown in the drawing "Organizing the Parts" at left. Where you put the labels is as important as what they are. The letters are always associated with a particular part. Put the letter at the bottom so you know which edge goes against the alignment pins. On the jig itself, mark the two-letter combinations beside each pair of alignment pins, as indicated in the drawing. As you clamp the parts into the jig, orient the letters toward the pins, and check the combination. If it isn't on your list of two, you are at the wrong end of the jig. PW Joint combinations marked beside alignment pin- Organizing the parts Keep the pieces organized by marking the parts of the drawers as shown in the drawing above. Mark your jig with the letter combinations that are shown on each side of the dovetail jig. 94 102 Popular Woodworking February 2006 |


