Popular Woodworking 2006-04 № 154, страница 54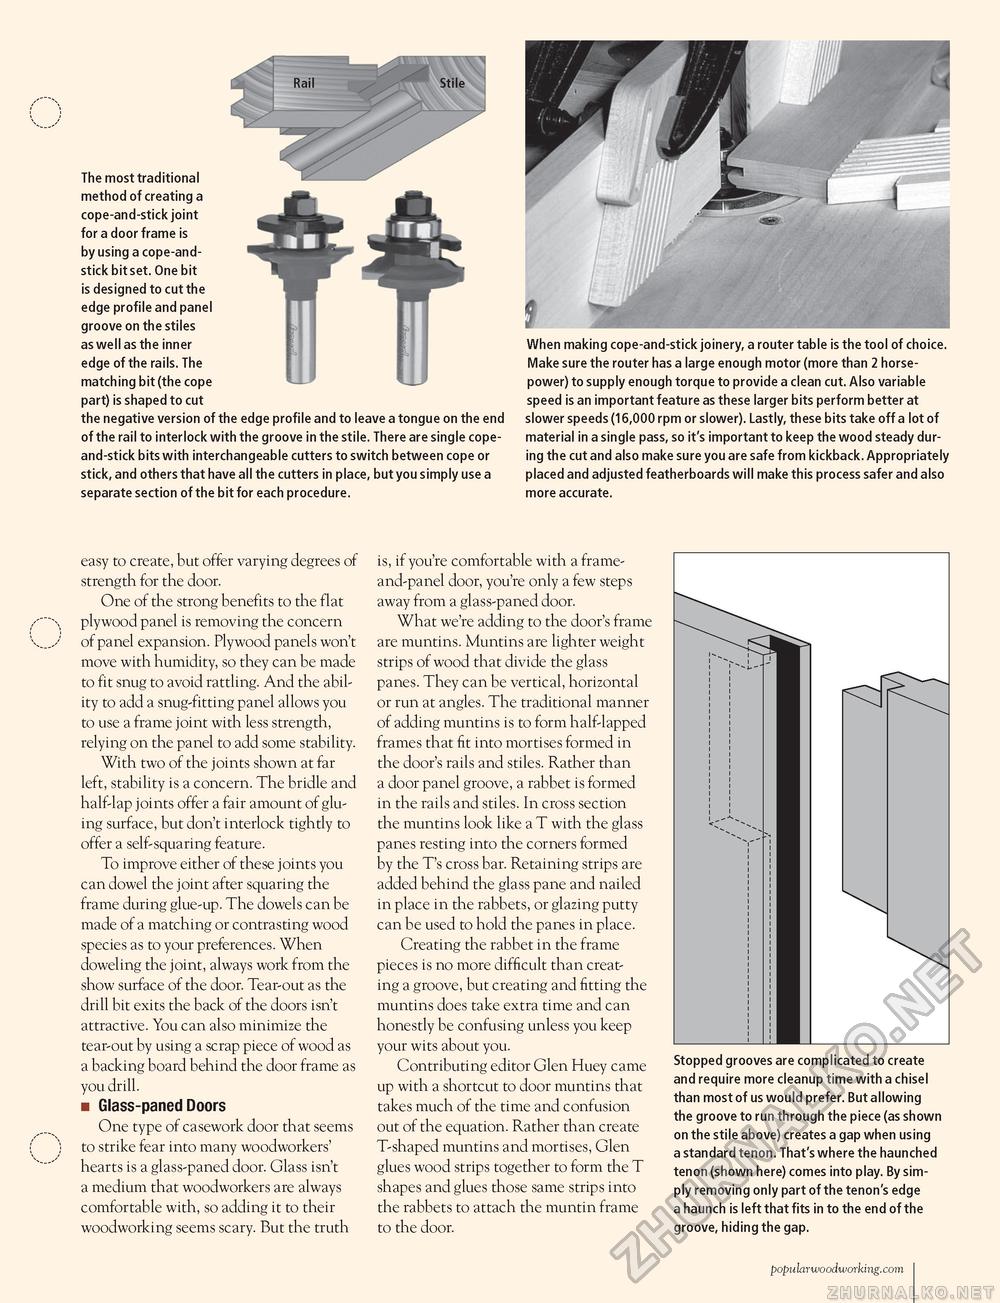
The most traditional method of creating a cope-and-stick joint for a door frame is by using a cope-and-stick bit set. One bit is designed to cut the edge profile and panel groove on the stiles as well as the inner edge of the rails. The matching bit (the cope part) is shaped to cut the negative version of the edge profile and to leave a tongue on the end of the rail to interlock with the groove in the stile. There are single cope-and-stick bits with interchangeable cutters to switch between cope or stick, and others that have all the cutters in place, but you simply use a separate section of the bit for each procedure. When making cope-and-stick joinery, a router table is the tool of choice. Make sure the router has a large enough motor (more than 2 horsepower) to supply enough torque to provide a clean cut. Also variable speed is an important feature as these larger bits perform better at slower speeds (16,000 rpm or slower). Lastly, these bits take off a lot of material in a single pass, so it's important to keep the wood steady during the cut and also make sure you are safe from kickback. Appropriately placed and adjusted featherboards will make this process safer and also more accurate. easy to create, but offer varying degrees of strength for the door. One of the strong benefits to the flat plywood panel is removing the concern of panel expansion. Plywood panels won't move with humidity, so they can be made to fit snug to avoid rattling. And the ability to add a snug-fitting panel allows you to use a frame joint with less strength, relying on the panel to add some stability. With two of the joints shown at far left, stability is a concern. The bridle and half-lap joints offer a fair amount of gluing surface, but don't interlock tightly to offer a self-squaring feature. To improve either of these joints you can dowel the joint after squaring the frame during glue-up. The dowels can be made of a matching or contrasting wood species as to your preferences. When doweling the joint, always work from the show surface of the door. Tear-out as the drill bit exits the back of the doors isn't attractive. You can also minimize the tear-out by using a scrap piece of wood as a backing board behind the door frame as you drill. ■ Glass-paned Doors One type of casework door that seems to strike fear into many woodworkers' hearts is a glass-paned door. Glass isn't a medium that woodworkers are always comfortable with, so adding it to their woodworking seems scary. But the truth is, if you're comfortable with a frame-and-panel door, you're only a few steps away from a glass-paned door. What we're adding to the door's frame are muntins. Muntins are lighter weight strips of wood that divide the glass panes. They can be vertical, horizontal or run at angles. The traditional manner of adding muntins is to form half-lapped frames that fit into mortises formed in the door's rails and stiles. Rather than a door panel groove, a rabbet is formed in the rails and stiles. In cross section the muntins look like a T with the glass panes resting into the corners formed by the T's cross bar. Retaining strips are added behind the glass pane and nailed in place in the rabbets, or glazing putty can be used to hold the panes in place. Creating the rabbet in the frame pieces is no more difficult than creating a groove, but creating and fitting the muntins does take extra time and can honestly be confusing unless you keep your wits about you. Contributing editor Glen Huey came up with a shortcut to door muntins that takes much of the time and confusion out of the equation. Rather than create T-shaped muntins and mortises, Glen glues wood strips together to form the T shapes and glues those same strips into the rabbets to attach the muntin frame to the door. Stopped grooves are complicated to create and require more cleanup time with a chisel than most of us would prefer. But allowing the groove to run through the piece (as shown on the stile above) creates a gap when using a standard tenon. That's where the haunched tenon (shown here) comes into play. By simply removing only part of the tenon's edge a haunch is left that fits in to the end of the groove, hiding the gap. popularwoodworking.com i 54 |


