Popular Woodworking 2006-04 № 154, страница 57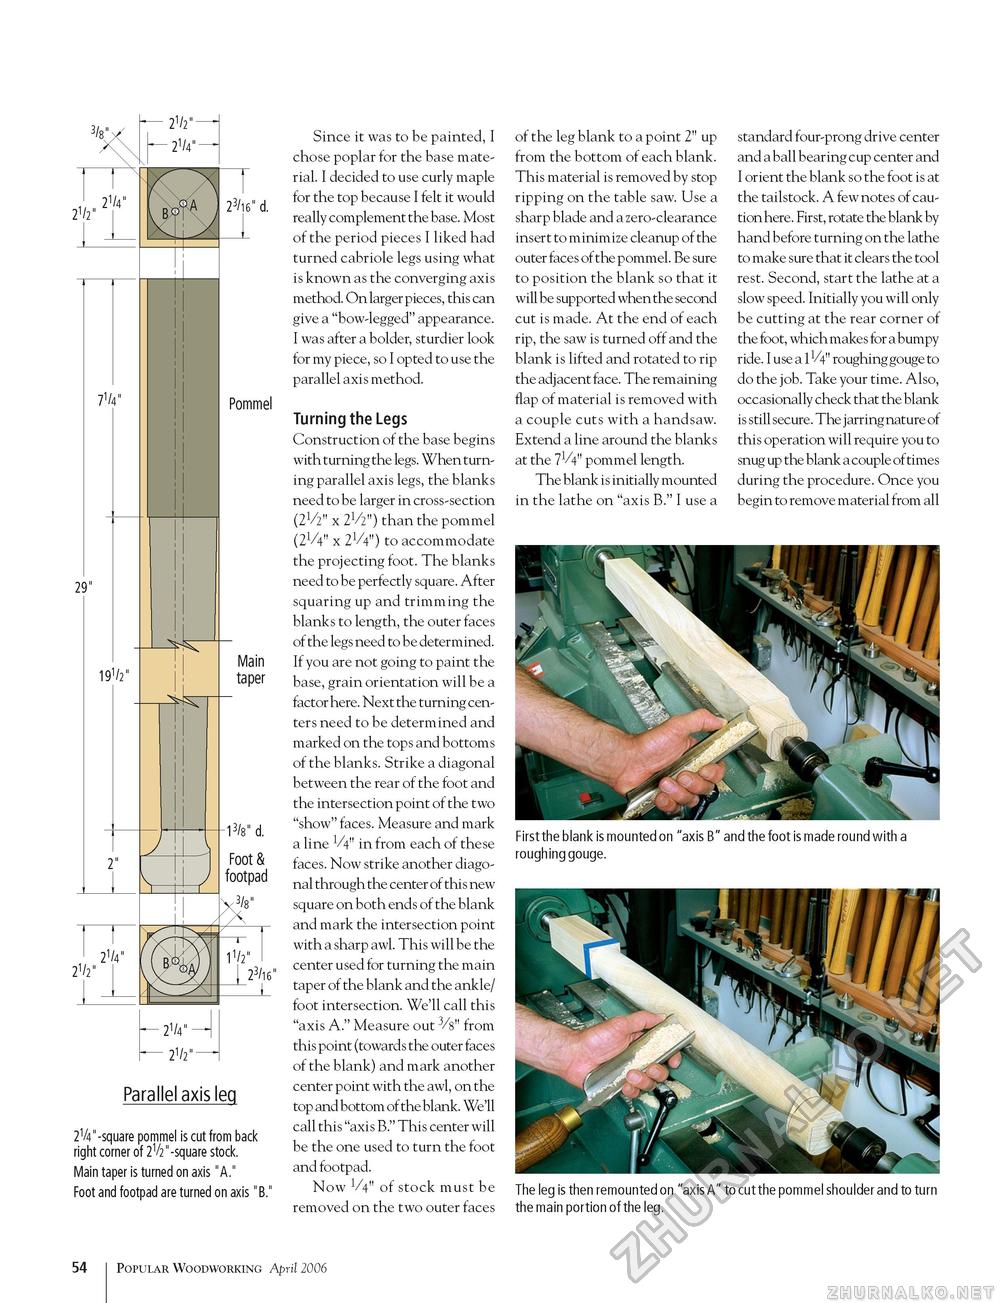
Parallel axis leg 2V4"-square pommel is cut from back right corner of 2V2"-square stock. Main taper is turned on axis "A." Foot and footpad are turned on axis "B." Since it was to be painted, I chose poplar for the base material. I decided to use curly maple for the top because I felt it would really complement the base. Most of the period pieces I liked had turned cabriole legs using what is known as the converging axis method. On larger pieces, this can give a "bow-legged" appearance. I was after a bolder, sturdier look for my piece, so I opted to use the parallel axis method. Turning the Legs Construction of the base begins with turning the legs. When turning parallel axis legs, the blanks need to be larger in cross-section (2V2" x 2V2") than the pommel (Z1/^" x 2V4") to accommodate the projecting foot. The blanks need to be perfectly square. After squaring up and trimming the blanks to length, the outer faces of the legs need to be determined. If you are not going to paint the base, grain orientation will be a factor here. Next the turning centers need to be determined and marked on the tops and bottoms of the blanks. Strike a diagonal between the rear of the foot and the intersection point of the two "show" faces. Measure and mark a line V4" in from each of these faces. Now strike another diagonal through the center of this new square on both ends of the blank and mark the intersection point with a sharp awl. This will be the center used for turning the main taper of the blank and the ankle/ foot intersection. We'll call this "axis A." Measure out 3/s" from this point (towards the outer faces of the blank) and mark another center point with the awl, on the top and bottom of the blank. We'll call this "axis B." This center will be the one used to turn the foot and footpad. Now V4" of stock must be removed on the two outer faces of the leg blank to a point 2" up from the bottom of each blank. This material is removed by stop ripping on the table saw. Use a sharp blade and a zero-clearance insert to minimize cleanup of the outer faces of the pommel. Be sure to position the blank so that it will be supported when the second cut is made. At the end of each rip, the saw is turned off and the blank is lifted and rotated to rip the adjacent face. The remaining flap of material is removed with a couple cuts with a handsaw. Extend a line around the blanks at the 7V4" pommel length. The blank is initially mounted in the lathe on "axis B." I use a standard four-prong drive center and a ball bearing cup center and I orient the blank so the foot is at the tailstock. A few notes of caution here. First, rotate the blank by hand before turning on the lathe to make sure that it clears the tool rest. Second, start the lathe at a slow speed. Initially you will only be cutting at the rear corner of the foot, which makes for a bumpy ride. I use a1 V4" roughing gouge to do the job. Take your time. Also, occasionally check that the blank is still secure. The jarring nature of this operation will require you to snug up the blank a couple of times during the procedure. Once you begin to remove material from all First the blank is mounted on "axis B" and the foot is made round with a roughing gouge. The leg is then remounted on "axis A" to cut the pommel shoulder and to turn the main portion of the leg. 54 Popular Woodworking April 2006 |


