Popular Woodworking 2006-04 № 154, страница 58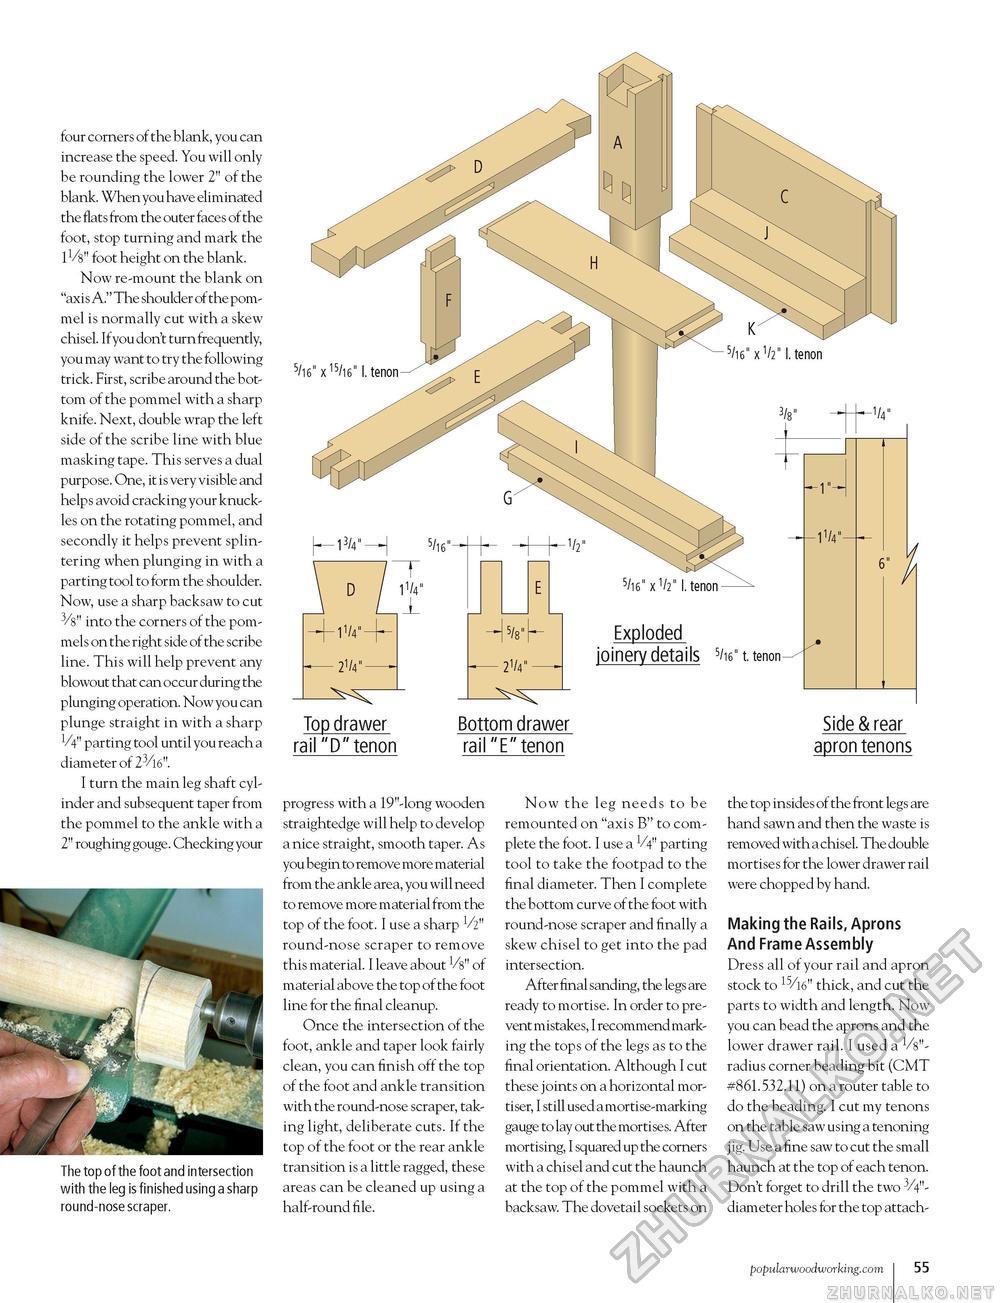
four corners of the blank, you can increase the speed. You will only be rounding the lower 2" of the blank. When you have eliminated the flats from the outer faces of the foot, stop turning and mark the lMs" foot height on the blank. Now re-mount the blank on "axis A." The shoulder of the pommel is normally cut with a skew chisel. If you don't turn frequently, you may want to try the following trick. First, scribe around the bottom of the pommel with a sharp knife. Next, double wrap the left side of the scribe line with blue masking tape. This serves a dual purpose. One, it is very visible and helps avoid cracking your knuckles on the rotating pommel, and secondly it helps prevent splintering when plunging in with a parting tool to form the shoulder. Now, use a sharp backsaw to cut 3/8" into the corners of the pommels on the right side of the scribe line. This will help prevent any blowout that can occur during the plunging operation. Now you can plunge straight in with a sharp 14" parting tool until you reach a diameter of 23/16". I turn the main leg shaft cylinder and subsequent taper from the pommel to the ankle with a 2" roughing gouge. Checking your Top drawer rail "D" tenon Bottom drawer rail "E" tenon The top of the foot and intersection with the leg is finished using a sharp round-nose scraper. progress with a 19"-long wooden straightedge will help to develop a nice straight, smooth taper. As you begin to remove more material from the ankle area, you will need to remove more material from the top of the foot. I use a sharp V2" round-nose scraper to remove this material. I leave about Vs" of material above the top of the foot line for the final cleanup. Once the intersection of the foot, ankle and taper look fairly clean, you can finish off the top of the foot and ankle transition with the round-nose scraper, taking light, deliberate cuts. If the top of the foot or the rear ankle transition is a little ragged, these areas can be cleaned up using a half-round file. Now the leg needs to be remounted on "axis B" to complete the foot. I use a V4" parting tool to take the footpad to the final diameter. Then I complete the bottom curve of the foot with round-nose scraper and finally a skew chisel to get into the pad intersection. After final sanding, the legs are ready to mortise. In order to prevent mistakes, I recommend marking the tops of the legs as to the final orientation. Although I cut these joints on a horizontal mor-tiser, I still used a mortise-marking gauge to lay out the mortises. After mortising, I squared up the corners with a chisel and cut the haunch at the top of the pommel with a backsaw. The dovetail sockets on Side & rear apron tenons the top insides of the front legs are hand sawn and then the waste is removed with a chisel. The double mortises for the lower drawer rail were chopped by hand. Making the Rails, Aprons And Frame Assembly Dress all of your rail and apron stock to 15/l6" thick, and cut the parts to width and length. Now you can bead the aprons and the lower drawer rail. I used a Vs"-radius corner beading bit (CMT #861.532.11) on a router table to do the beading. I cut my tenons on the table saw using a tenoning jig. Use a fine saw to cut the small haunch at the top of each tenon. Don't forget to drill the two 3/4"-diameter holes for the top attach- popularwoodworking.com i 55 |


