Popular Woodworking 2006-10 № 157, страница 50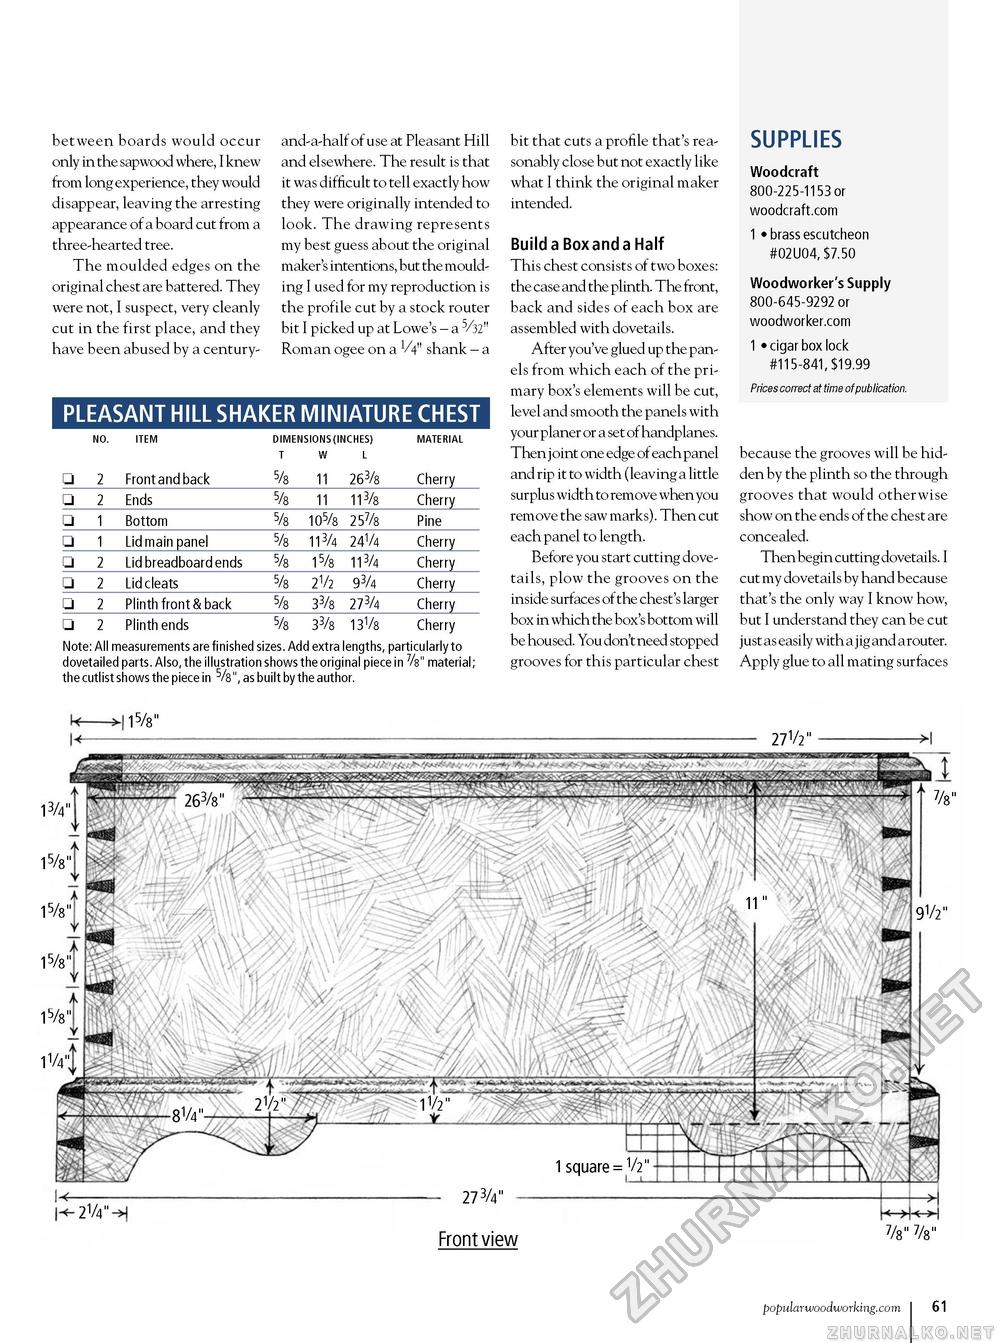
between boards would occur only in the sapwood where, I knew from long experience, they would disappear, leaving the arresting appearance of a board cut from a three-hearted tree. The moulded edges on the original chest are battered. They were not, I suspect, very cleanly cut in the first place, and they have been abused by a century- and-a-half of use at Pleasant Hill and elsewhere. The result is that it was difficult to tell exactly how they were originally intended to look. The drawing represents my best guess about the original maker's intentions, but the moulding I used for my reproduction is the profile cut by a stock router bit I picked up at Lowe's - a 5/32" Roman ogee on a 4" shank - a PLEASANT HILL SHAKER MINIATURE CHEST
Note: All measurements are finished sizes. Add extra lengths, particularly to dovetailed parts. Also, the illustration shows the original piece in 7/s" material; the cutlist shows the piece in 5/8" , as built by the author. Note: All measurements are finished sizes. Add extra lengths, particularly to dovetailed parts. Also, the illustration shows the original piece in 7/s" material; the cutlist shows the piece in 5/8" , as built by the author. bit that cuts a profile that's reasonably close but not exactly like what I think the original maker intended. Build a Box and a Half This chest consists of two boxes: the case and the plinth. The front, back and sides of each box are assembled with dovetails. After you've glued up the panels from which each of the primary box's elements will be cut, level and smooth the panels with your planer or a set of handplanes. Then joint one edge of each panel and rip it to width (leaving a little surplus width to remove when you remove the saw marks). Then cut each panel to length. Before you start cutting dovetails, plow the grooves on the inside surfaces of the chest's larger box in which the box's bottom will be housed. You don't need stopped grooves for this particular chest SUPPLIES Woodcraft 800-225-1153 or woodcraft.com 1 • brass escutcheon #02U04, $7.50 Woodworker's Supply 800-645-9292 or woodworker.com 1 • cigar box lock #115-841, $19.99 Prices correct at time of publication. because the grooves will be hidden by the plinth so the through grooves that would otherwise show on the ends of the chest are concealed. Then begin cutting dovetails. I cut my dovetails by hand because that's the only way I know how, but I understand they can be cut just as easily with a jig and a router. Apply glue to all mating surfaces popularwoodworking.com i 61 |
|||||||||||||||||||||||||||||||||||||||||||||||||||||||||||||||


