Popular Woodworking 2007-02 № 160, страница 29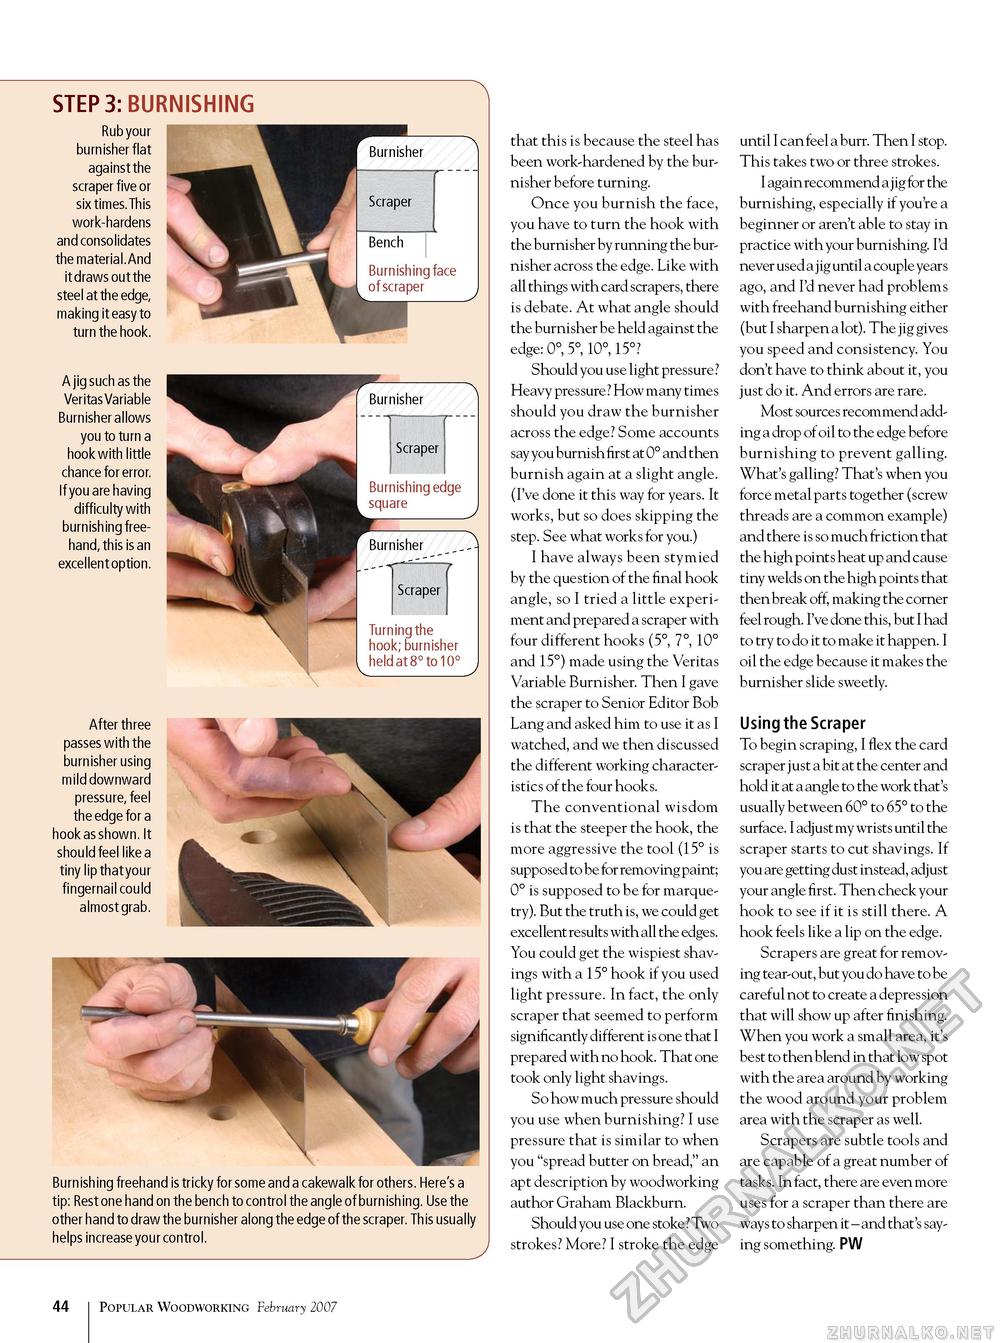
STEP 3: BURNISHING Rub your burnisher flat against the scraper five or six times. This work-hardens and consolidates the material. And it draws out the steel at the edge, making it easy to turn the hook. A jig such as the Veritas Variable Burnisher allows you to turn a hook with little chance for error. If you are having difficulty with burnishing freehand, this is an excellent option. After three passes with the burnisher using mild downward pressure, feel the edge for a hook as shown. It should feel like a tiny lip that your fingernail could almost grab. Turning the hook; burnisher held at 8° to 10° Burnishing freehand is tricky for some and a cakewalk for others. Here's a tip: Rest one hand on the bench to control the angle of burnishing. Use the other hand to draw the burnisher along the edge of the scraper. This usually helps increase your control. that this is because the steel has been work-hardened by the burnisher before turning. Once you burnish the face, you have to turn the hook with the burnisher by running the burnisher across the edge. Like with all things with card scrapers, there is debate. At what angle should the burnisher be held against the edge: 0°, 5°, 10°, 15°? Should you use light pressure ? Heavy pressure? How many times should you draw the burnisher across the edge? Some accounts say you burnish first at 0° and then burnish again at a slight angle. (I've done it this way for years. It works, but so does skipping the step. See what works for you.) I have always been stymied by the question of the final hook angle, so I tried a little experiment and prepared a scraper with four different hooks (5°, 7°, 10° and 15°) made using the Veritas Variable Burnisher. Then I gave the scraper to Senior Editor Bob Lang and asked him to use it as I watched, and we then discussed the different working characteristics of the four hooks. The conventional wisdom is that the steeper the hook, the more aggressive the tool (15° is supposed to be for removing paint; 0° is supposed to be for marquetry). But the truth is, we could get excellent results with all the edges. You could get the wispiest shavings with a 15° hook if you used light pressure. In fact, the only scraper that seemed to perform significantly different is one that I prepared with no hook. That one took only light shavings. So how much pressure should you use when burnishing? I use pressure that is similar to when you "spread butter on bread," an apt description by woodworking author Graham Blackburn. Should you use one stoke ? Two strokes? More? I stroke the edge until I can feel a burr. Then I stop. This takes two or three strokes. I again recommend a jig for the burnishing, especially if you're a beginner or aren't able to stay in practice with your burnishing. I'd never used a j ig until a couple years ago, and I'd never had problems with freehand burnishing either (but I sharpen a lot). The jig gives you speed and consistency. You don't have to think about it, you just do it. And errors are rare. Most sources recommend adding a drop of oil to the edge before burnishing to prevent galling. What's galling? That's when you force metal parts together (screw threads are a common example) and there is so much friction that the high points heat up and cause tiny welds on the high points that then break off, making the corner feel rough. I've done this, but I had to try to do it to make it happen. I oil the edge because it makes the burnisher slide sweetly. using the Scraper To begin scraping, I flex the card scraper just a bit at the center and hold it at a angle to the work that's usually between 60° to 65° to the surface. I adjust my wrists until the scraper starts to cut shavings. If you are getting dust instead, adjust your angle first. Then check your hook to see if it is still there. A hook feels like a lip on the edge. Scrapers are great for removing tear-out, but you do have to be careful not to create a depression that will show up after finishing. When you work a small area, it's best to then blend in that low spot with the area around by working the wood around your problem area with the scraper as well. Scrapers are subtle tools and are capable of a great number of tasks. In fact, there are even more uses for a scraper than there are ways to sharpen it - and that's saying something. PW 10 Popular Woodworking February 2007 |


