Popular Woodworking 2007-04 № 161, страница 41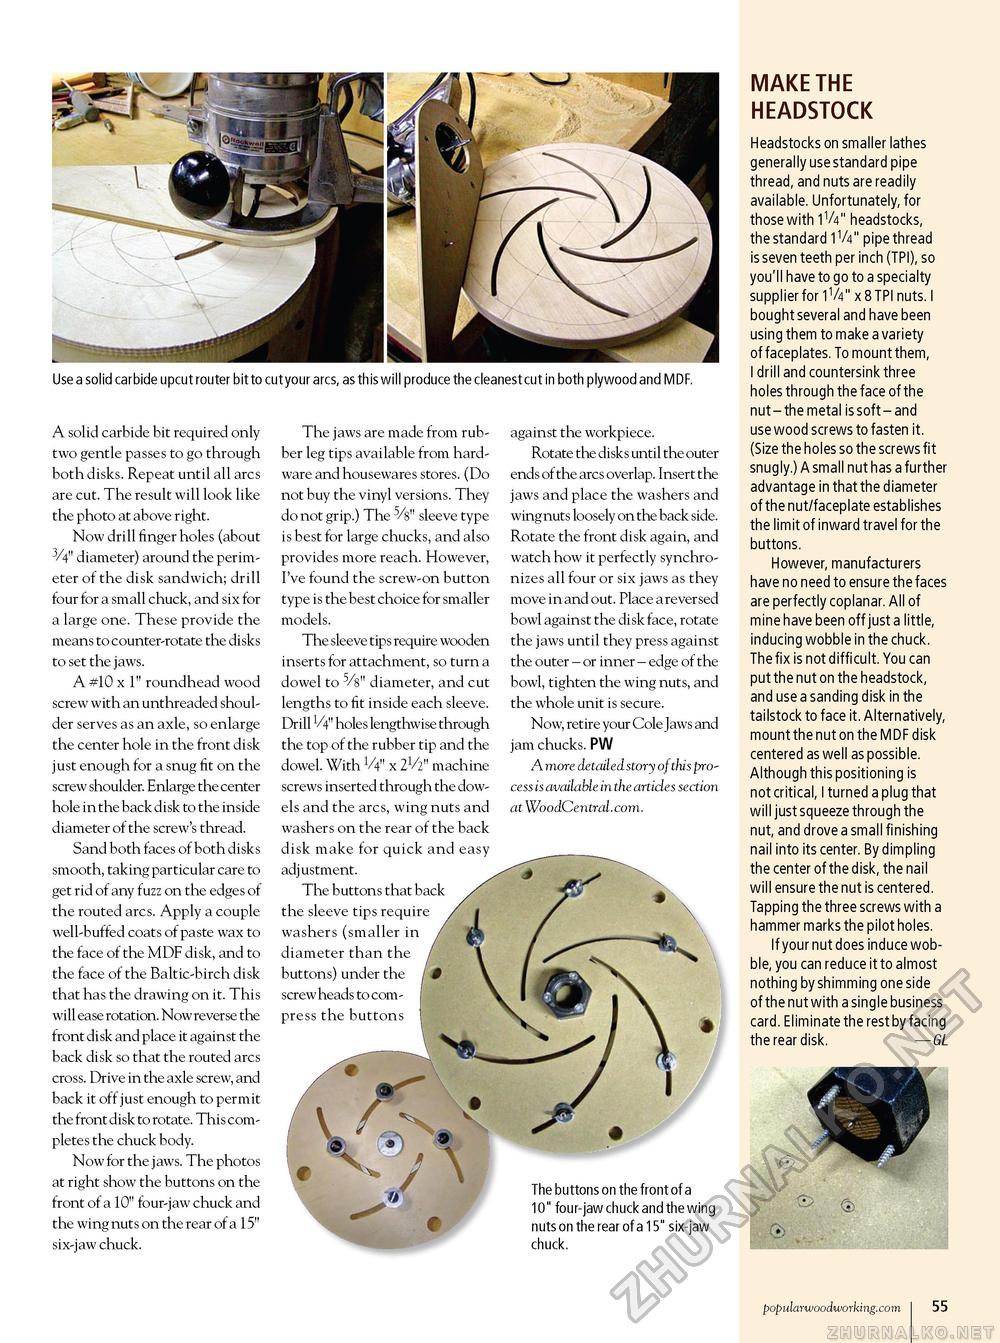
Use a solid carbide upcut router bit to cut your arcs, as this will produce the cleanest cut in both plywood and MDF. A solid carbide bit required only two gentle passes to go through both disks. Repeat until all arcs are cut. The result will look like the photo at above right. Now drill finger holes (about 3/4" diameter) around the perimeter of the disk sandwich; drill four for a small chuck, and six for a large one. These provide the means to counter-rotate the disks to set the jaws. A #10 x 1" roundhead wood screw with an unthreaded shoulder serves as an axle, so enlarge the center hole in the front disk just enough for a snug fit on the screw shoulder. Enlarge the center hole in the back disk to the inside diameter of the screw's thread. Sand both faces of both disks smooth, taking particular care to get rid of any fuzz on the edges of the routed arcs. Apply a couple well-buffed coats of paste wax to the face of the MDF disk, and to the face of the Baltic-birch disk that has the drawing on it. This will ease rotation. Now reverse the front disk and place it against the back disk so that the routed arcs cross. Drive in the axle screw, and back it off just enough to permit the front disk to rotate. This completes the chuck body. Now for the j aws. The photos at right show the buttons on the front of a 10" four-jaw chuck and the wing nuts on the rear of a 15" six-jaw chuck. The jaws are made from rubber leg tips available from hardware and housewares stores. (Do not buy the vinyl versions. They do not grip.) The 5/8" sleeve type is best for large chucks, and also provides more reach. However, I've found the screw-on button type is the best choice for smaller models. The sleeve tips require wooden inserts for attachment, so turn a dowel to 5/8" diameter, and cut lengths to fit inside each sleeve. Drill 1/4" holes lengthwise through the top of the rubber tip and the dowel. With V4" x 21/2" machine screws inserted through the dowels and the arcs, wing nuts and washers on the rear of the back disk make for quick and easy adjustment. The buttons that back the sleeve tips require washers (smaller in diameter than the buttons) under the screw heads to compress the buttons against the workpiece. Rotate the disks until the outer ends of the arcs overlap. Insert the jaws and place the washers and wing nuts loosely on the back side. Rotate the front disk again, and watch how it perfectly synchronizes all four or six jaws as they move in and out. Place a reversed bowl against the disk face, rotate the jaws until they press against the outer - or inner - edge of the bowl, tighten the wing nuts, and the whole unit is secure. Now, retire your Cole Jaws and jam chucks. PW A more detailed story of this process is available in the articles section at WoodCentral.com. The buttons on the front of a 10" four-jaw chuck and the wing nuts on the rear of a 15" six-jaw chuck. MAKE THE HEADSTOCK Headstocks on smaller lathes generally use standard pipe thread, and nuts are readily available. Unfortunately, for those with 1V4" headstocks, the standard 1V4" pipe thread is seven teeth per inch (TPI), so you'll have to go to a specialty supplier for 1V4" x 8 TPI nuts. I bought several and have been using them to make a variety of faceplates. To mount them, I drill and countersink three holes through the face of the nut - the metal is soft - and use wood screws to fasten it. (Size the holes so the screws fit snugly.) A small nut has a further advantage in that the diameter of the nut/faceplate establishes the limit of inward travel for the buttons. However, manufacturers have no need to ensure the faces are perfectly coplanar. All of mine have been off just a little, inducing wobble in the chuck. The fix is not difficult. You can put the nut on the headstock, and use a sanding disk in the tailstock to face it. Alternatively, mount the nut on the MDF disk centered as well as possible. Although this positioning is not critical, I turned a plug that will just squeeze through the nut, and drove a small finishing nail into its center. By dimpling the center of the disk, the nail will ensure the nut is centered. Tapping the three screws with a hammer marks the pilot holes. If your nut does induce wobble, you can reduce it to almost nothing by shimming one side of the nut with a single business card. Eliminate the rest by facing the rear disk. — GL & ■ © popularwoodworking.com I 55 |


