Popular Woodworking 2007-08 № 163, страница 17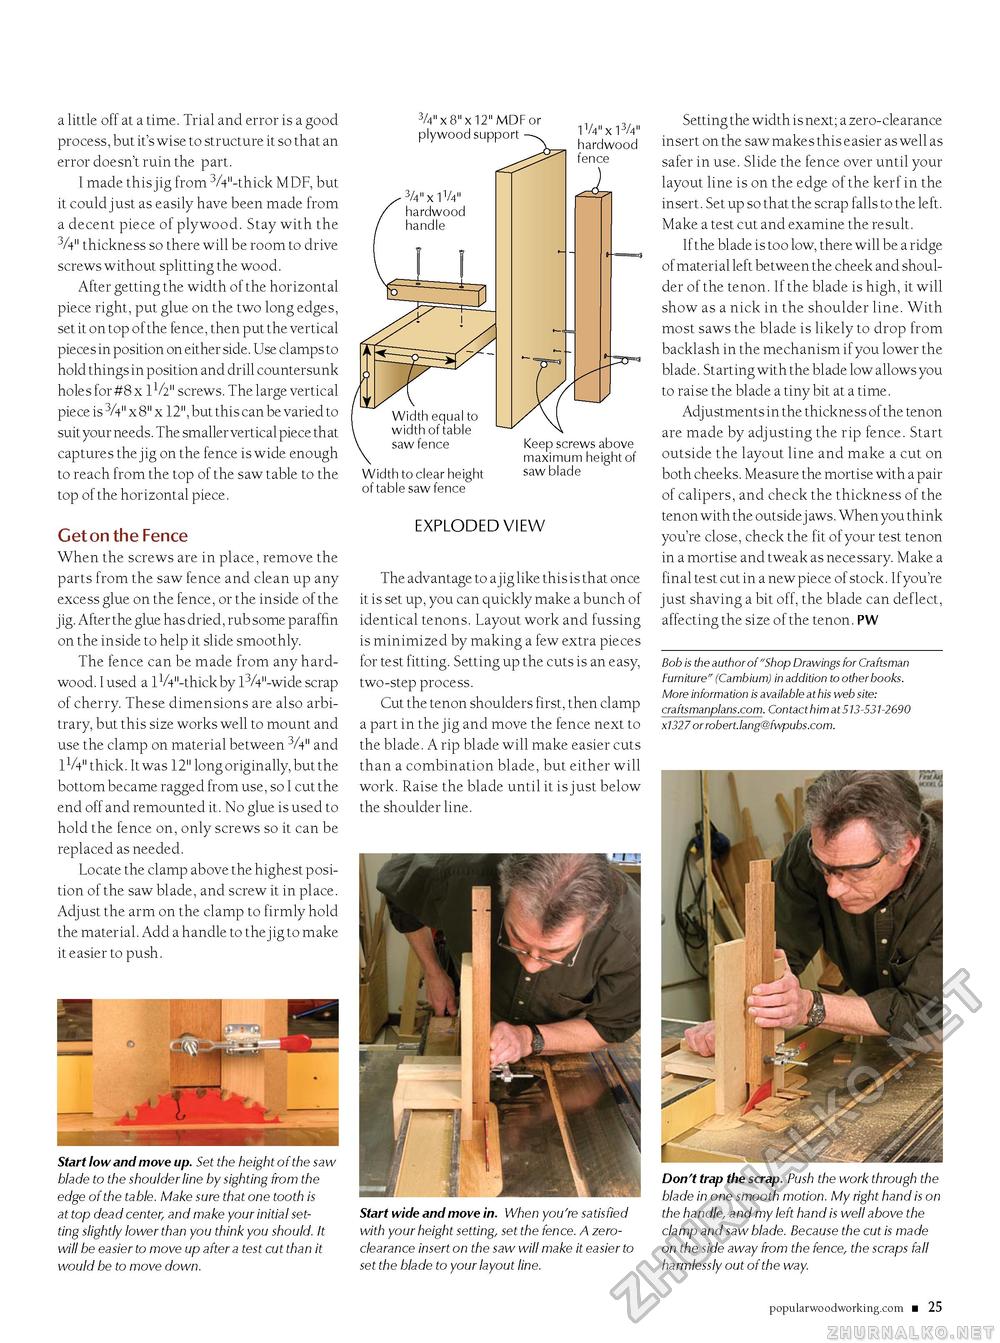
a little off at a time. Trial and error is a good process, but it's wise to structure it so that an error doesn't ruin the part. I made this jig from 3A"-thick MDF, but it could just as easily have been made from a decent piece of plywood. Stay with the 3A" thickness so there will be room to drive screws without splitting the wood. After getting the width of the horizontal piece right, put glue on the two long edges, set it on top of the fence, then put the vertical pieces in position on either side. Use clamps to hold things in position and drill countersunk holes for #8 x 1V2" screws. The large vertical piece is 3A" x 8" x 12", but this can be varied to suit your needs. The smaller vertical piece that captures the jig on the fence is wide enough to reach from the top of the saw table to the top of the horizontal piece. Get on the Fence When the screws are in place, remove the parts from the saw fence and clean up any excess glue on the fence, or the inside of the jig. After the glue has dried, rub some paraffin on the inside to help it slide smoothly. The fence can be made from any hardwood. I used a lVV'-thick by 13A"-wide scrap of cherry. These dimensions are also arbitrary, but this size works well to mount and use the clamp on material between 3A" and IV4" thick. It was 12" long originally, but the bottom became ragged from use, so I cut the end off and remounted it. No glue is used to hold the fence on, only screws so it can be replaced as needed. Locate the clamp above the highest position of the saw blade, and screw it in place. Adjust the arm on the clamp to firmly hold the material. Add a handle to the jig to make it easier to push. 3/4" x 8" x 12" MDF or plywood support - Start low and move up. Set the height of the saw blade to the shoulder line by sighting from the edge of the table. Make sure that one tooth is at top dead center, and make your initial setting slightly lower than you think you should. It will be easier to move up after a test cut than it would be to move down. IV4" x 13/4" hardwood fence Width equal to width of table saw fence Width to clear height of table saw fence Keep screws above maximum height of saw blade exploded yiew The advantage to a jig like this is that once it is set up, you can quickly make a bunch of identical tenons. Layout work and fussing is minimized by making a few extra pieces for test fitting. Setting up the cuts is an easy, two-step process. Cut the tenon shoulders first, then clamp a part in the jig and move the fence next to the blade. A rip blade will make easier cuts than a combination blade, but either will work. Raise the blade until it is just below the shoulder line Setting the width is next; a zero-clearance insert on the saw makes this e asier as well as safer in use. Slide the fence over until your layout line is on the edge of the kerf in the insert. Set up so that the scrap falls to the left. Make a test cut and examine the result. If the blade is too low, there will be a ridge of material left between the cheek and shoulder of the tenon. If the blade is high, it will show as a nick in the shoulder line. With most saws the blade is likely to drop from backlash in the mechanism if you lower the blade. Starting with the blade low allows you to raise the blade a tiny bit at a time. Adjustments in the thickness of the tenon are made by adjusting the rip fence. Start outside the layout line and make a cut on both cheeks. Measure the mortise with a pair of calipers, and check the thickness of the tenon with the outside j aws. When you think you're close, check the fit of your test tenon in a mortise and tweak as necessary. Make a final test cut in a new piece of stock. If you're just shaving a bit off, the blade can deflect, affecting the size of the tenon. PW Bob is the author of "Shop Drawings for Craftsman Furniture" (Cambium) in addition to other books. More information is available at his web site: craftsmanplans.com. Contact him at 513-531-2690 x1327 or robert.lang@fwpubs.com. Start wide and move in. When you're satisfied with your height setting, set the fence. A zero-clearance insert on the saw will make it easier to set the blade to your layout line. Don't trap the scrap. Push the work through the blade in one smooth motion. My right hand is on the handle, and my left hand is well above the clamp and saw blade. Because the cut is made on the side away from the fence, the scraps fall harmlessly out of the way. popularwoodworking.com ■ 25 |


