Popular Woodworking 2007-10 № 164, страница 19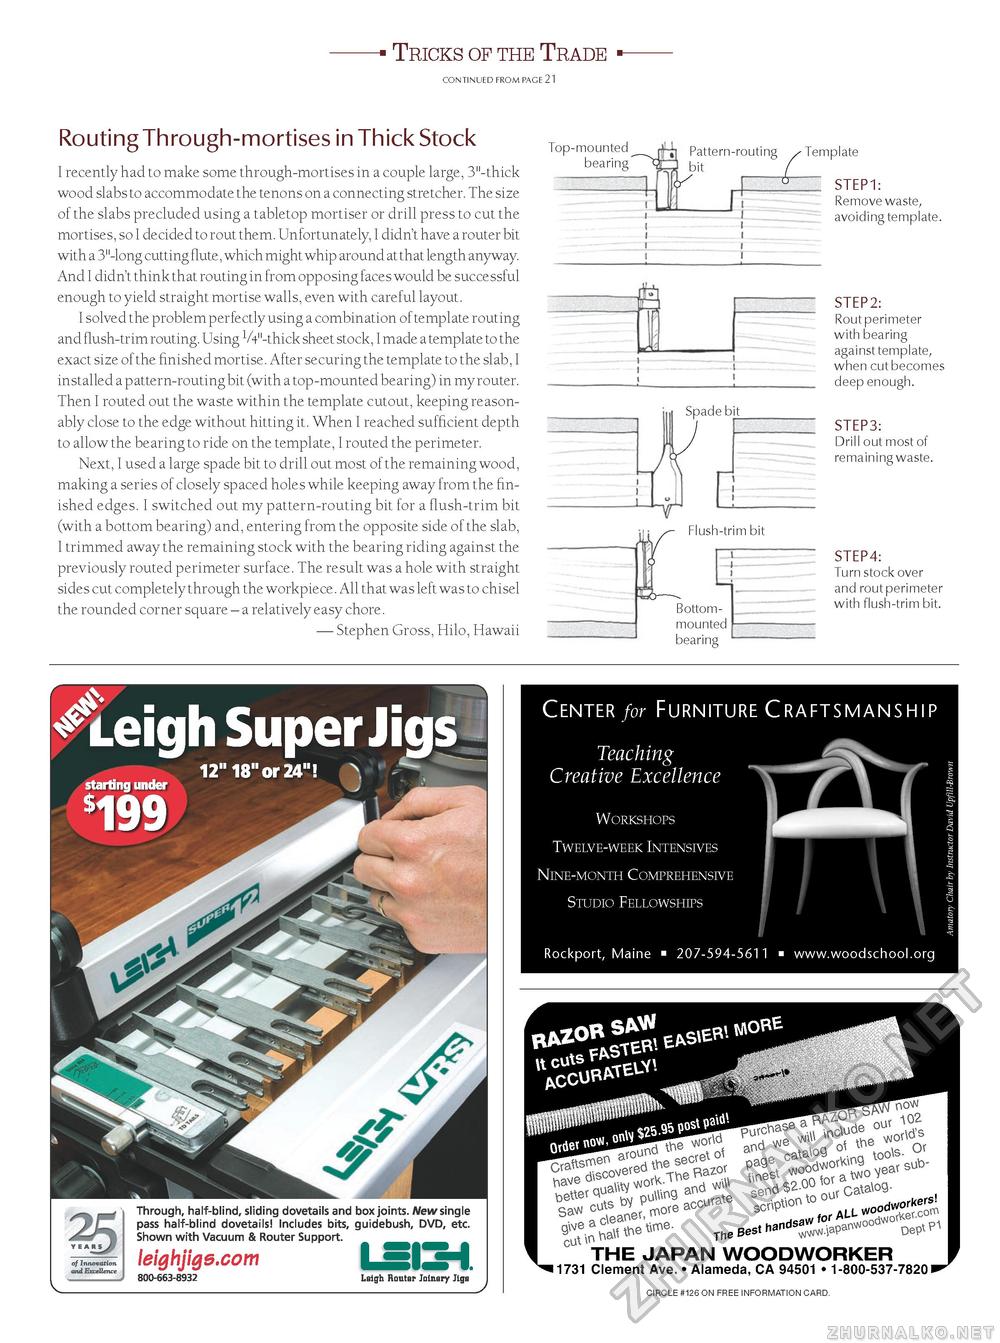
Tricks of the Trade CONTINUED FROM PAGE 21 Routing Through-mortises in Thick Stock I recently had to make some through-mortises in a couple large, 3"-thick wood slabs to accommodate the tenons on a connecting stretcher. The size ot the slabs precluded using a tabletop mortiser or drill press to cut the mortises, so I decided to rout them. Unfortunately, I didn't have a router bit with a 3"-long cutting flute, which might whip around at that length anyway. And I didn't think that routing in from opposing faces would be successful enough to yield straight mortise walls, even with careful layout. I solved the problem perfectly using a combination ot template routing and flush-trim routing. Using 1/4ll-thick sheet stock, I made a template to the exact size ot the finished mortise. After securing the template to the slab, I installed a pattern-routing bit (with a top-mounted bearing) in my router. Then I routed out the waste within the template cutout, keeping reasonably close to the edge without hitting it. When I reached sufficient depth to allow the bearing to ride on the template, I routed the perimeter. Next, I used a large spade bit to drill out most ot the remaining wood, making a series ot closely spaced holes while keeping away from the finished edges. I switched out my pattern-routing bit tor a flush-trim bit (with a bottom bearing) and, entering from the opposite side ot the slab, I trimmed away the remaining stock with the bearing riding against the previously routed perimeter surface. The result was a hole with straight sides cut completely through the workpiece. All that was left was to chisel the rounded corner square - a relatively easy chore. — Stephen Gross, Hilo, Hawaii Top-mounted bearing at Pattern-routing bit - Template M Spade bit L Flush-trim bit Bottom-mounted bearing STEP1: Remove waste, avoiding template. STEP2: Rout perimeter with bearing againsttemplate, when cut becomes deep enough. STEP3: Drill out most of remaining waste. STEP4: Turn stock over and rout perimeter with flush-trim bit.
Through, half-blind, sliding dovetails and box joints. New single pass half-blind dovetails! Includes bits, guidebush, DVD, etc. Shown with Vacuum & Router Support. Ieighjigs.com BAZOB It cuts oMN postpaW TheBeSthandSaw^ood.o^pA | CU THE JAPAN WOODWORKER 11731 Clement Ave. • Alameda, CA 94501 • 1-800-537-7820 ■ CIRCLE #126 ON FREE INFORMATION CARD. |
||||||||||||||||||||||||


