Popular Woodworking 2007-10 № 164, страница 16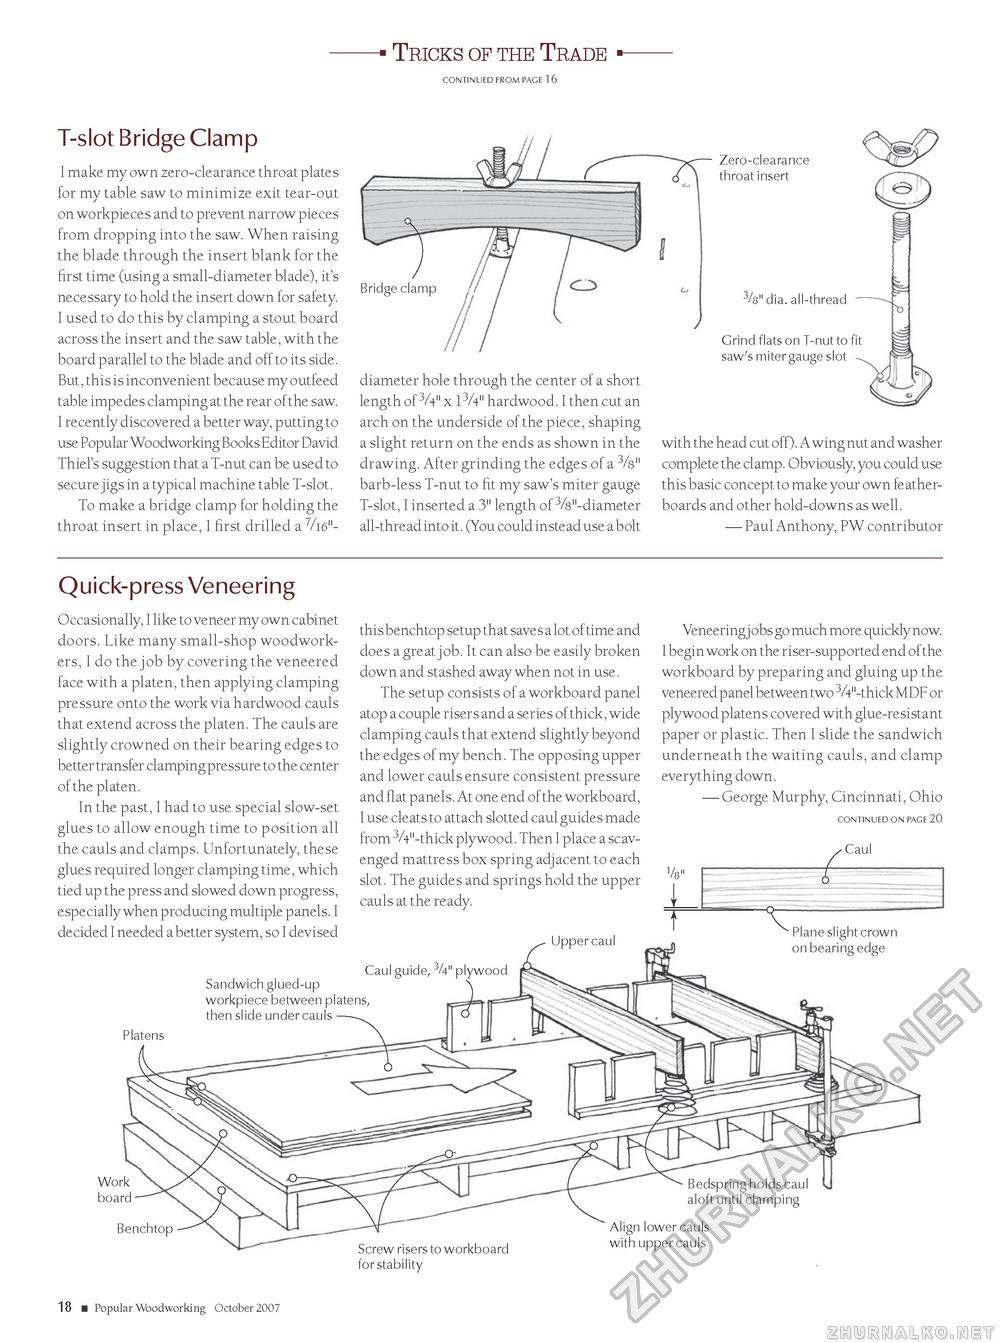
Tricks of the Trade CONTINUED FROM PAGE 1 6 T-slot Bridge Clamp I make my own zero-clearance throat plates tor my table saw to minimize exit tear-out on workpieces and to prevent narrow pieces trom dropping into the saw. When raising the blade through the insert blank tor the first time (using a small-diameter blade), it's necessary to hold the insert down tor satety. I used to do this by clamping a stout board across the insert and the saw table, with the board parallel to the blade and ott to its side. But, this is inconvenient because my outleed table impedes clamping at the rear ot the saw. I recently discovered a better way, putting to use Popular Woodworking Books Editor David Thiel's suggestion that a T-nut can be used to secure jigs in a typical machine table T-slot. To make a bridge clamp for holding the throat insert in place, I first drilled a diameter hole through the center of a short length of 3A" x 13A" hardwood. I then cut an arch on the underside of the piece, shaping a slight return on the ends as shown in the drawing. After grinding the edges of a 3/8" barb-less T-nut to fit my saw's miter gauge T-slot, I inserted a 3" length of 3/8"-diameter all-thread into it. (You could instead use a bolt Zero-clearance throat insert 3/8" dia. all-thread — Grind flats on T-nut to fit saw's miter gauge slot with the head cut off). A wing nut and washer complete the clamp. Obviously, you could use this basic concept to make your own feather-boards and other hold-downs as well. — Paul Anthony, PW contributor Quick-press Veneering Occasionally, I like to veneer my own cabinet doors. Like many small-shop woodworkers, I do the j ob by covering the veneered face with a platen, then applying clamping pressure onto the work via hardwood cauls that extend across the platen. The cauls are slightly crowned on their bearing edges to better transfer clamping pressure to the center of the platen. In the past, I had to use special slow-set glues to allow enough time to position all the cauls and clamps. Unfortunately, these glues required longer clamping time, which tied up the press and slowed down progress, especially when producing multiple panels. I decided I needed a better system, so I devised this benchtop setup that saves a lot of time and does a great job. It can also be easily broken down and stashed away when not in use. The setup consists of a workboard panel atop a couple risers and a series of thick, wide clamping cauls that extend slightly beyond the edges of my bench. The opposing upper and lower cauls ensure consistent pressure and flat panels. At one end of the workboard, I use cleats to attach slotted caul guides made from 3A"-thick plywood. Then I place a scavenged mattress box spring adjacent to each slot. The guides and springs hold the upper cauls at the ready. Veneering j obs go much more quickly now. I begin work on the riser-supported end of the workboard by preparing and gluing up the veneered panel between two 3/4"-thick MDF or plywood platens covered with glue-resistant paper or plastic. Then I slide the sandwich underneath the waiting cauls, and clamp everything down. — George Murphy, Cincinnati, Ohio CONTINUED ON PAGE 20 I Innfir^aiil ' Plane slight crown on bearing edge Sandwich glued-up workpiece between platens, then slide under cauls Caul guide, 3</4" plywood Platens Work board Bedspring holds caul aloft until clamping Benchtop Screw risers to workboard for stability Align lower cauls with upper cauls 18 ■ Popular Woodworking October 2007 |


