Popular Woodworking 2007-10 № 164, страница 54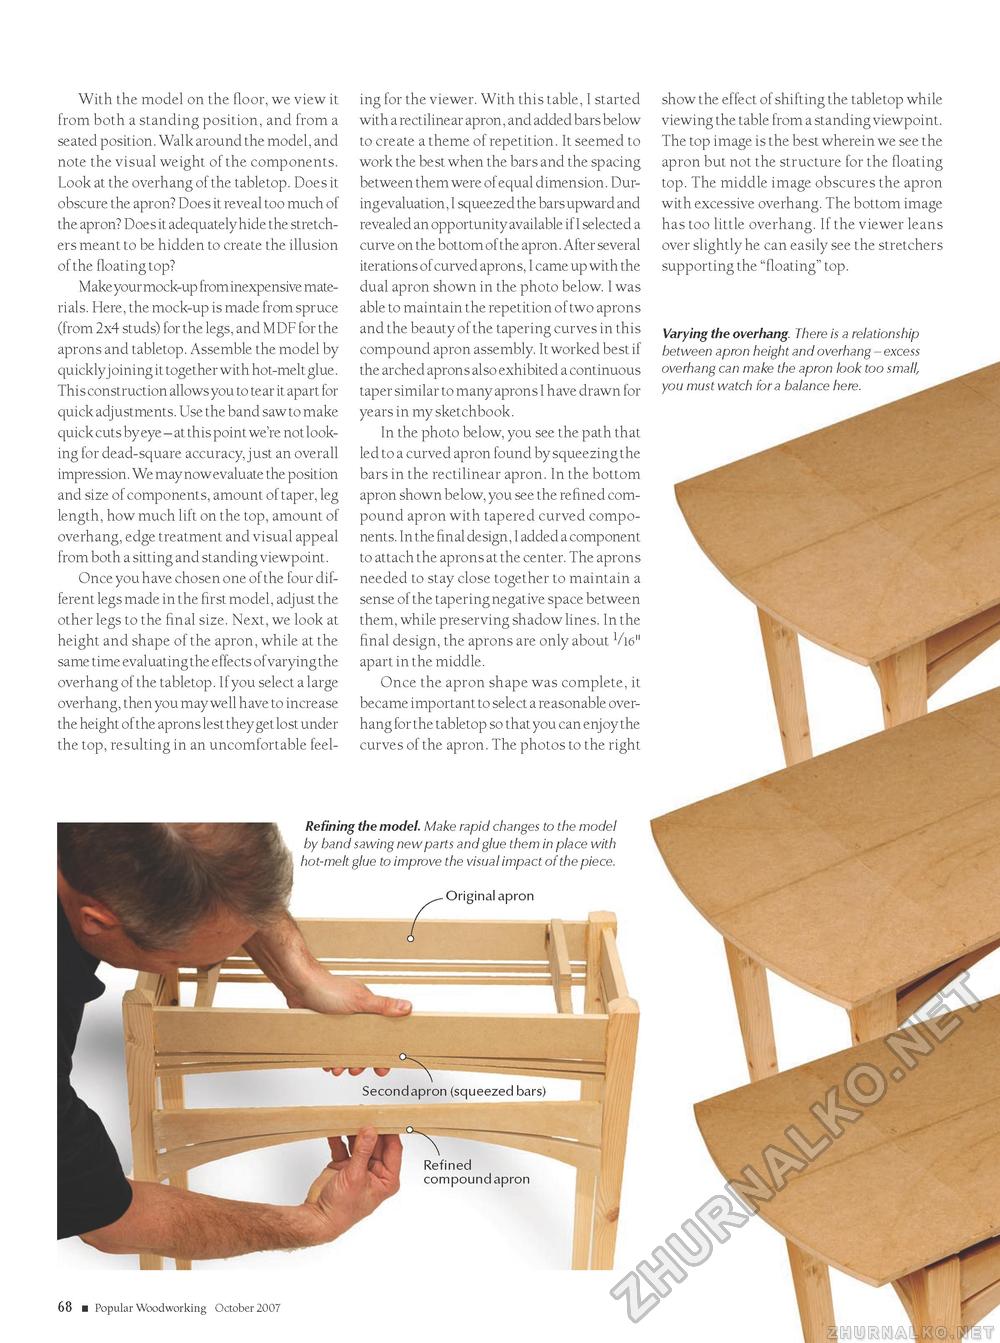
With the model on the floor, we view it from both a standing position, and from a seated position. Walk around the model, and note the visual weight of the components. Look at the overhang of the tabletop. Does it obscure the apron? Does it reveal too much of the apron? Does it adequately hide the stretchers meant to be hidden to create the illusion of the floating top? Make your mock-up from inexpensive materials. Here, the mock-up is made from spruce (from 2x4 studs) for the legs, and MDF for the aprons and tabletop. Assemble the model by quicklyj oining it together with hot-melt glue. This construction allows you to tear it apart for quick adjustments. Use the band saw to make quick cuts by eye - at this point we're not looking for dead-square accuracy, just an overall impression. We may now evaluate the position and size of components, amount of taper, leg length, how much lift on the top, amount of overhang, edge treatment and visual appeal from both a sitting and standing viewpoint. Once you have chosen one of the four different legs made in the first model, adjust the other legs to the final size. Next, we look at height and shape of the apron, while at the same time evaluating the effects ofvarying the overhang of the tabletop. If you select a large overhang, then you may well have to increase the height of the aprons lest they get lost under the top, resulting in an uncomfortable feel ing for the viewer. With this table, I started with a rectilinear apron, and added bars below to create a theme of repetition. It seemed to work the best when the bars and the spacing between them were of equal dimension. During evaluation, I squeezed the bars upward and revealed an opportunity available if I selected a curve on the bottom of the apron. After several iterations of curved aprons, I came up with the dual apron shown in the photo below. I was able to maintain the repetition of two aprons and the beauty of the tapering curves in this compound apron assembly. It worked best if the arched aprons also exhibited a continuous taper similar to many aprons I have drawn for years in my sketchbook. In the photo below, you see the path that led to a curved apron found by squeezing the bars in the rectilinear apron. In the bottom apron shown below, you see the refined compound apron with tapered curved components. In the final design, I added a component to attach the aprons at the center. The aprons needed to stay close together to maintain a sense of the tapering negative space between them, while preserving shadow lines. In the final design, the aprons are only about Vl6" apart in the middle. Once the apron shape was complete, it became important to select a reasonable overhang for the tabletop so that you can enj oy the curves of the apron. The photos to the right 68 ■ Popular Woodworking October 2007 show the effect of shifting the tabletop while viewing the table from a standing viewpoint. The top image is the best wherein we see the apron but not the structure for the floating top. The middle image obscures the apron with excessive overhang. The bottom image has too little overhang. If the viewer leans over slightly he can easily see the stretchers supporting the "floating" top. Varying the overhang. There is a relationship between apron height and overhang - excess overhang can make the apron look too small, you must watch for a balance here. |


