Popular Woodworking 2007-10 № 164, страница 73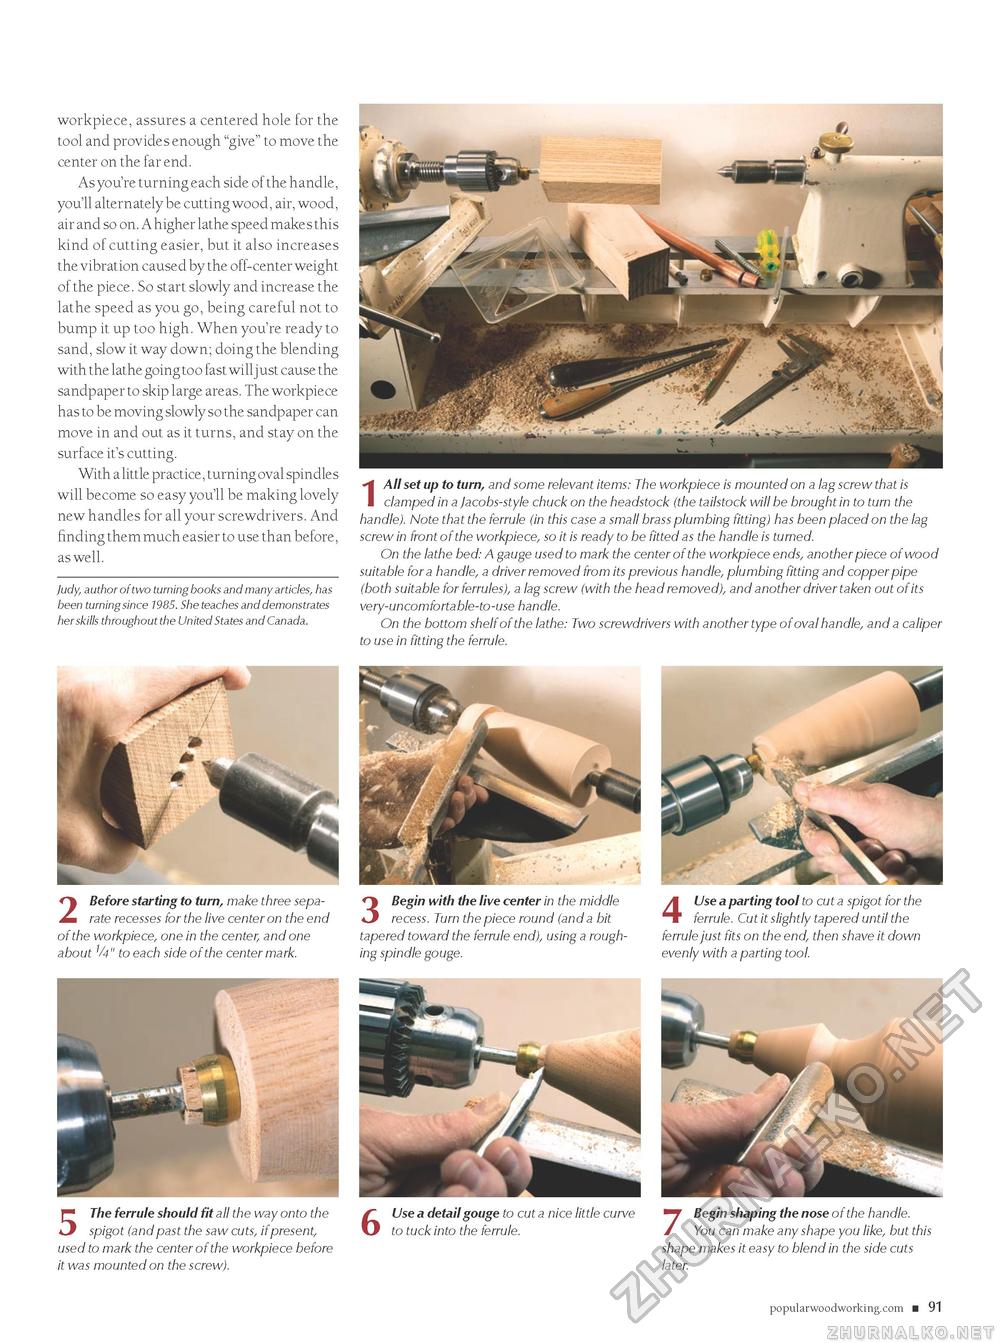
workpiece, assures a centered hole for the tool and provides enough "give" to move the center on the far end. As you're turning each side of the handle, you'll alternately be cutting wood, air, wood, air and so on. A higher lathe speed makes this kind of cutting easier, but it also increases the vibration caused by the off-center weight of the piece. So start slowly and increase the lathe speed as you go, being careful not to bump it up too high. When you're ready to sand, slow it way down; doing the blending with the lathe going too fast willjust cause the sandpaper to skip large areas. The workpiece has to be moving slowly so the sandpaper can move in and out as it turns, and stay on the surface it's cutting. With a little practice, turning oval spindles will become so easy you'll be making lovely new handles for all your screwdrivers. And finding them much easier to use than before, as well. Judy, author of two turning books and many articles, has been turning since 1985. She teaches and demonstrates her skills throughout the United States and Canada. IAllset up to turn, and some relevant items: The workpiece is mounted on a lag screw that is clamped in a Jacobs-style chuck on the headstock (the tailstock will be brought in to turn the handle). Note that the ferrule (in this case a small brass plumbing fitting) has been placed on the lag screw in front of the workpiece, so it is ready to be fitted as the handle is turned. On the lathe bed: A gauge used to mark the center of the workpiece ends, another piece of wood suitable for a handle, a driver removed from its previous handle, plumbing fitting and copper pipe (both suitable for ferrules), a lag screw (with the head removed), and another driver taken out of its very-uncomfortable-to-use handle. On the bottom shelf of the lathe: Two screwdrivers with another type of oval handle, and a caliper to use in fitting the ferrule. 2 Before starting to turn, make three separate recesses for the live center on the end of the workpiece, one in the center, and one about 1/4" to each side of the center mark. 3 Begin with the live center in the middle recess. Turn the piece round (and a bit tapered toward the ferrule end), using a roughing spindle gouge. 4 Use a parting tool to cut a spigot for the ferrule. Cut it slightly tapered until the ferrule just fits on the end, then shave it down evenly with a parting tool. 5 The ferrule should fit all the way onto the spigot (andpast the saw cuts, if present, used to mark the center of the workpiece before it was mounted on the screw). 6 Use a detail gouge to cut a nice little curve to tuck into the ferrule. 7 Begin shaping the nose of the handle. You can make any shape you like, but this shape makes it easy to blend in the side cuts later. popularwoodworking.com ■ 91 CIRCLE #152 ON FREE INFORMATION CARD. |


