Popular Woodworking 2007-10 № 164, страница 74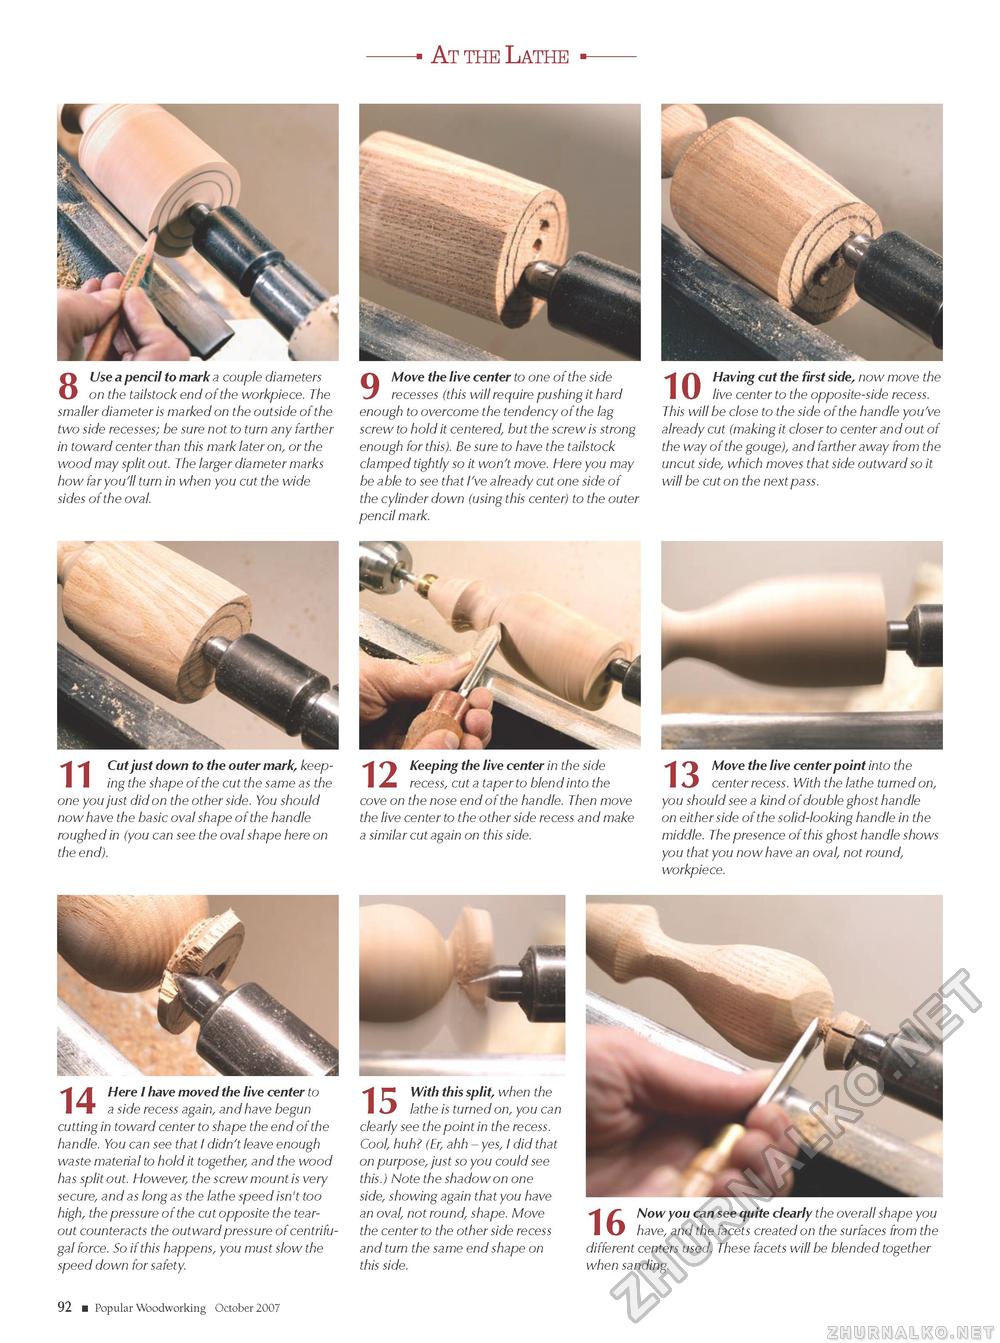
At the Lathe 8 Use a pencil to mark a couple diameters on the tailstock end of the workpiece. The smaller diameter is marked on the outside of the two side recesses; be sure not to turn any farther in toward center than this mark later on, or the wood may split out. The larger diameter marks how far you'll turn in when you cut the wide sides of the oval. 9 Move the live center to one of the side recesses (this will require pushing it hard enough to overcome the tendency of the lag screw to hold it centered, but the screw is strong enough for this). Be sure to have the tailstock clamped tightly so it won't move. Here you may be able to see that I've already cut one side of the cylinder down (using this center) to the outer pencil mark. /"fc Having cut the first side, now move the live center to the opposite-side recess. This will be close to the side of the handle you've already cut (making it closer to center and out of the way of the gouge), and farther away from the uncut side, which moves that side outward so it will be cut on the next pass. Cut just down to the outer mark, keep-I I ing the shape of the cut the same as the one you just did on the other side. You should now have the basic oval shape of the handle roughed in (you can see the oval shape here on the end). Keeping the live center in the side I ^ recess, cut a taper to blend into the cove on the nose end of the handle. Then move the live center to the other side recess and make a similar cut again on this side. Move the live center point into the I <J center recess. With the lathe turned on, you should see a kind of double ghost handle on either side of the solid-looking handle in the middle. The presence of this ghost handle shows you that you now have an oval, not round, workpiece. "t /\ Here I have moved the live center to I ^w a side recess again, and have begun cutting in toward center to shape the end of the handle. You can see that I didn't leave enough waste material to hold it together, and the wood has split out. However, the screw mount is very secure, and as long as the lathe speed isn't too high, the pressure of the cut opposite the tear-out counteracts the outward pressure of centrifugal force. So if this happens, you must slow the speed down for safety. H With this split, when the lathe is turned on, you can clearly see the point in the recess. Cool, huh? (Er, ahh - yes, I did that on purpose, just so you could see this.) Note the shadow on one side, showing again that you have an oval, not round, shape. Move the center to the other side recess and turn the same end shape on this side. £~ Now you can see quite clearly the overall shape you have, and the facets created on the surfaces from the different centers used. These facets will be blended together when sanding. 92 ■ Popular Woodworking October 2007 |


