Popular Woodworking 2008-04 № 168, страница 44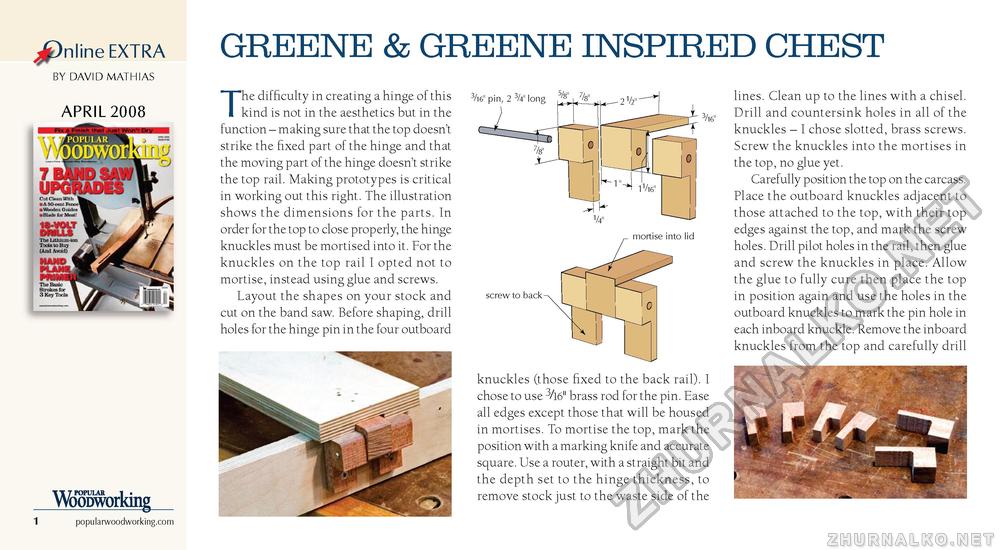
dpnline EXTRA BY DAVID MATH IAS APRIL 2008 TT T POPULAR I • Woopworking 1 popularwoodworking.com GREENE & GREENE INSPIRED CHEST The difficulty in creating a hinge of this kind is not in the aesthetics but in the function - making sure that the top doesn't strike the fixed part of the hinge and that the moving part of the hinge doesn't strike the top rail. Making prototypes is critical in working out this right. The illustration shows the dimensions for the parts. In order for the top to close properly, the hinge knuckles must be mortised into it. For the knuckles on the top rail I opted not to mortise, instead using glue and screws. Layout the shapes on your stock and cut on the band saw. Before shaping, drill holes for the hinge pin in the four outboard 3/i6" pin, 2 3/4" long screw to back knuckles (those fixed to the back rail). I chose to use 3/16" brass rod for the pin. Ease all edges except those that will be housed in mortises. To mortise the top, mark the position with a marking knife and accurate square. Use a router, with a straight bit and the depth set to the hinge thickness, to remove stock just to the waste side of the lines. Clean up to the lines with a chisel. Drill and countersink holes in all of the knuckles - I chose slotted, brass screws. Screw the knuckles into the mortises in the top, no glue yet. Carefully position the top on the carcass. Place the outboard knuckles adjacent to those attached to the top, with their top edges against the top, and mark the screw holes. Drill pilot holes in the rail, then glue and screw the knuckles in place. Allow the glue to fully cure then place the top in position again and use the holes in the outboard knuckles to mark the pin hole in each inboard knuckle. Remove the inboard knuckles from the top and carefully drill |


