Popular Woodworking 2008-04 № 168, страница 42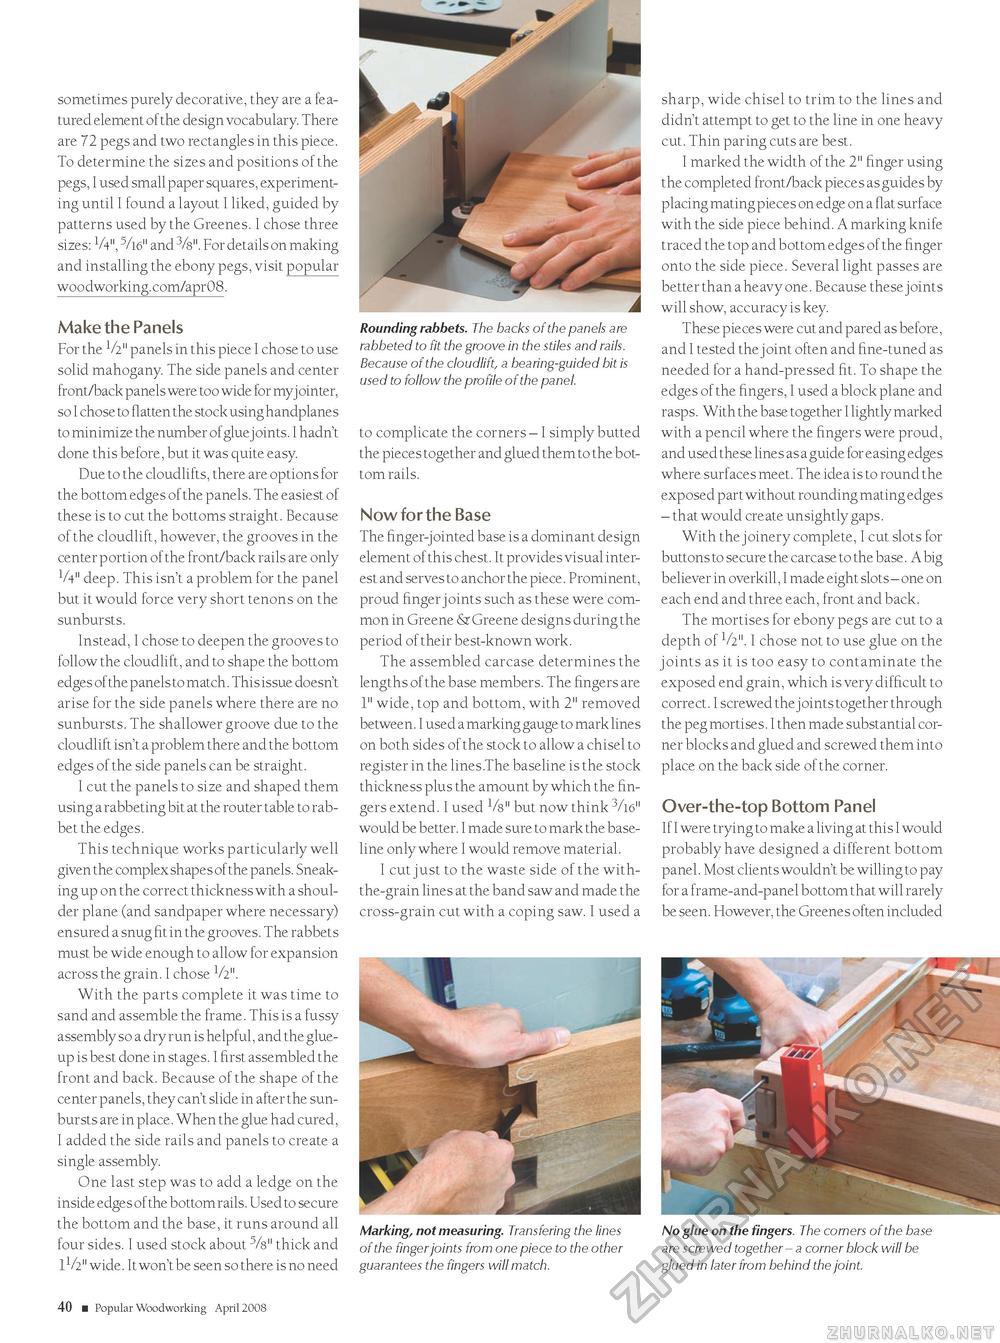
sometimes purely decorative, they are a featured element of the design vocabulary. There are 72 pegs and two rectangles in this piece. To determine the sizes and positions of the pegs, I used small paper squares, experimenting until I found a layout I liked, guided by patterns used by the Greenes. I chose three sizes: V4", 5/16" and 3/8". For details on making and installing the ebony pegs, visit popular woodworking.com/apr08. Make the Panels For the 1/2" panels in this piece I chose to use solid mahogany. The side panels and center front/back panels were too wide for myj ointer, so I chose to flatten the stock using handplanes to minimize the number of gluejoints. I hadn't done this before, but it was quite easy. Due to the cloudlifts, there are options for the bottom edges of the panels. The easiest of these is to cut the bottoms straight. Because of the cloudlift, however, the grooves in the center portion of the front/back rails are only V4" deep. This isn't a problem for the panel but it would force very short tenons on the sunbursts. Instead, I chose to deepen the grooves to follow the cloudlift, and to shape the bottom edges of the panels to match. This issue doesn't arise for the side panels where there are no sunbursts. The shallower groove due to the cloudlift isn't a problem there and the bottom edges of the side panels can be straight. I cut the panels to size and shaped them using a rabbeting bit at the router table to rabbet the edges. This technique works particularly well given the complex shapes of the panels. Sneaking up on the correct thickness with a shoulder plane (and sandpaper where necessary) ensured a snug fit in the grooves. The rabbets must be wide enough to allow for expansion across the grain. I chose V2". With the parts complete it was time to sand and assemble the frame. This is a fussy assembly so a dry run is helpful, and the glue-up is best done in stages. I first assembled the front and back. Because of the shape of the center panels, they can't slide in after the sunbursts are in place. When the glue had cured, I added the side rails and panels to create a single assembly. One last step was to add a ledge on the inside edges of the bottom rails. Used to secure the bottom and the base, it runs around all four sides. I used stock about 5/8" thick and 11/2" wide. It won't be seen so there is no need A Rounding rabbets. The backs of the panels are rabbeted to fit the groove in the stiles and rails. Because of the cloudlift, a bearing-guided bit is used to follow the profile of the panel. to complicate the corners - I simply butted the pieces together and glued them to the bottom rails. Now for the Base The finger-jointed base is a dominant design element of this chest. It provides visual interest and serves to anchor the piece. Prominent, proud finger joints such as these were common in Greene & Greene designs during the period of their best-known work. The assembled carcase determines the lengths of the base members. The fingers are 1" wide, top and bottom, with 2" removed between. I used a marking gauge to mark lines on both sides of the stock to allow a chisel to register in the lines.The baseline is the stock thickness plus the amount by which the fingers extend. I used 1/8" but now think 3/16" would be better. I made sure to mark the baseline only where I would remove material. I cut just to the waste side of the with-the-grain lines at the band saw and made the cross-grain cut with a coping saw. I used a sharp, wide chisel to trim to the lines and didn't attempt to get to the line in one heavy cut. Thin paring cuts are best. I marked the width of the 2" finger using the completed front/back pieces as guides by placing mating pieces on edge on a flat surface with the side piece behind. A marking knife traced the top and bottom edges of the finger onto the side piece. Several light passes are better than a heavy one. Because these joints will show, accuracy is key. These pieces were cut and pared as before, and I tested the joint often and fine-tuned as needed for a hand-pressed fit. To shape the edges of the fingers, I used a block plane and rasps. With the base together I lightly marked with a pencil where the fingers were proud, and used these lines as a guide for easing edges where surfaces meet. The idea is to round the exposed part without rounding mating edges - that would create unsightly gaps. With the joinery complete, I cut slots for buttons to secure the carcase to the base. A big believer in overkill, I made eight slots - one on each end and three each, front and back. The mortises for ebony pegs are cut to a depth of V2". I chose not to use glue on the joints as it is too easy to contaminate the exposed end grain, which is very difficult to correct. I screwed the joints together through the peg mortises. I then made substantial corner blocks and glued and screwed them into place on the back side of the corner. Over-the-top Bottom Panel If I were trying to make a living at this I would probably have designed a different bottom panel. Most clients wouldn't be willing to pay for a frame-and-panel bottom that will rarely be seen. However, the Greenes often included Marking, not measuring. Transfering the lines No glue on the fingers. The corners of the base of the finger joints from one piece to the other are screwed together - a corner block will be guarantees the fingers will match. glued in later from behind the joint. 40 ■ Popular Woodworking April 2008 MX |


