Popular Woodworking 2008-08 № 170, страница 50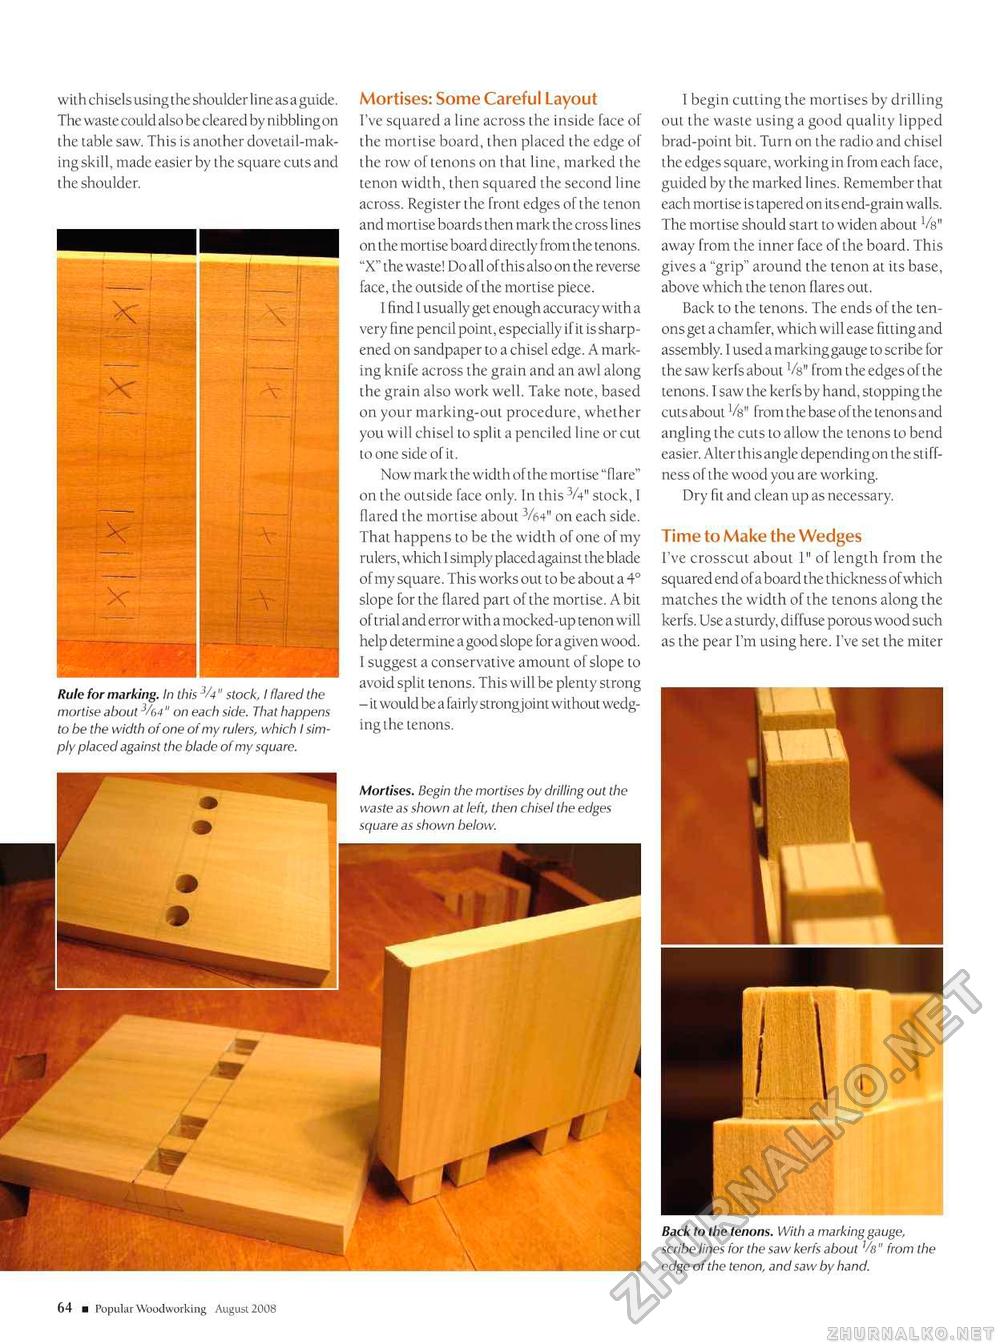
with chisels using the shoulder line as a guide. The waste could also be cleared by nibblingon the table saw. This is another dovetail-making skill, made easier by the square cuts and the shoulder.
Rule for marking. In this %" stock, I flared the mortise about 3/64" on each side. That happens to be the width of one of my rulers, which I simply placed against the blade of my square. Rule for marking. In this %" stock, I flared the mortise about 3/64" on each side. That happens to be the width of one of my rulers, which I simply placed against the blade of my square. Mortises: Some Careful Layout I've squared a line across the inside face of the mortise board, then placed the edge of the row of tenons on that line, marked the tenon width, then squared the second line across. Register the front edges of the tenon and mortise boards then mark the cross lines on the mortise board directly from the tenons. "X" the waste! Do all of this also on the reverse face, the outside of the mortise piece. I find 1 usually get enough accuracy with a very fine pencil point, especially if it is sharpened on sandpaper to a chisel edge. A marking knife across the grain and an awl along the grain also work well. Take note, based on your marking-out procedure, whether you will chisel to split a penciled line or cut to one side of it. Now mark the width of the mortise "flare" on the outside face only. In this 3a" stock, I flared the mortise about 3/6V on each side. That happens to be the width of one of my rulers, which I simply placed against the blade of my square. This works out to be about a 4° slope for the flared part of the mortise. A bit of trial and error with a mocked-up tenon will help determine a good slope for a given wood. I suggest a conservative amount of slope to avoid split tenons. This will be plenty strong -it would be a fairly strongjoint without wedging the tenons. Mortises. Begin the mortises by drilling out th waste as shown at left, then chisel the edges square as shown below. I begin cutting the mortises by drilling out the waste using a good quality lipped brad-point bit. Turn on the radio and chisel the edges square, working in from each face, guided by the marked lines. Remember that each mortise is tapered on its end-grain walls. The mortise should start to widen about Vs" away from the inner face of the board. This gives a "grip" around the tenon at its base, above which the tenon Hares out. Back to the tenons. The ends of the tenons get a chamfer, which will ease fitting and assembly. 1 used a markinggauge to scribe for the saw kerfs about Vs" from the edges of the tenons. I saw the kerfs by hand, stopping the cutsabout Vs" from the base ofthe tenons and angling the cuts to allow the tenons to bend easier. Alter this angle depending on the stiffness of the wood you are working. Dry fit and clean up as necessary. Time to Make the Wedges I've crosscut about 1" of length from the squared end of a board the thickness of which matches the width ofthe tenons along the kerfs. Use a sturdy, diffuse porous wood such as the pear I'm using here. I've set the miter Back to the tenons. With a marking gauge, scribe lines for the saw kerfs about /«" from the edge of the tenon, and saw by hand. |


