Popular Woodworking 2008-12 № 173, страница 8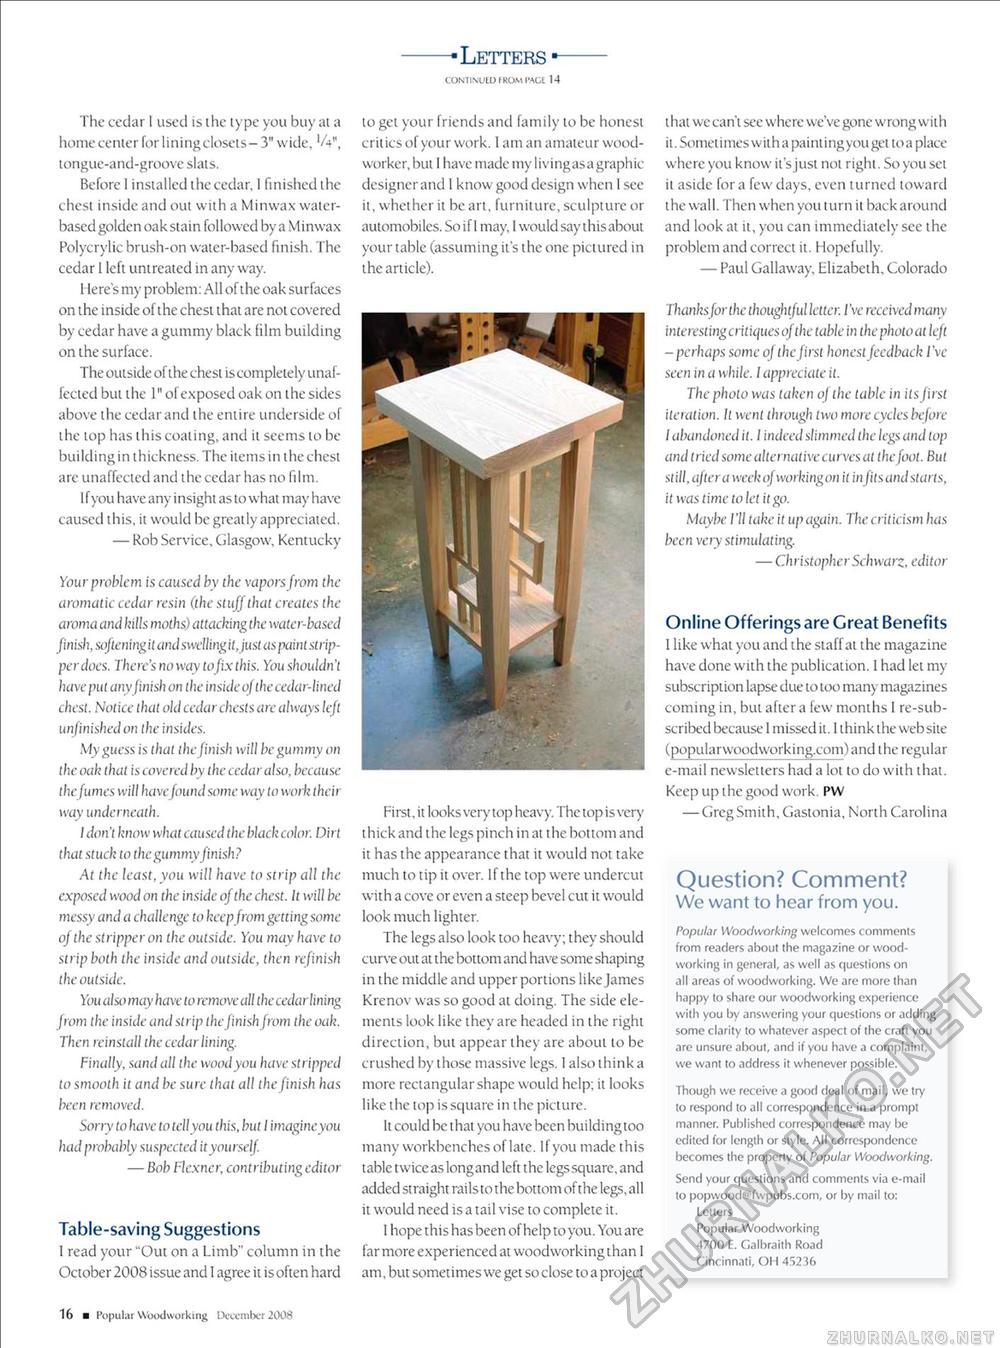
-Letters- continued from pace 14 The cedar I used is ihe type you buy at a home center for lining closets- 3" wide, 'A", tongue-and-groove slats. Before 1 installed the cedar, 1 finished the chest inside and out with a Minwax water-based golden oak stain followed by a Minwax Polycrylic brush-on water-based finish. The cedar 1 left untreated in any way. 1 lere's my problem: All of the oak surfaces on the inside of the chest that are not covered by cedar have a gummy black lilm building on the surface. The outside of the chest is completely unaffected but the 1" of exposed oak on the sides above the cedar and the entire underside of the lop has this coaling, and it seems to be buildingin thickness. The items in the chest are unaffected and the cedar has no film. I f you have any insight as to what may have caused this, it would be greatly appreciated. — Rob Service, Glasgow, Kentucky Your problem is caused by the vapors from the aromatic cedar resin (the stuff that creates the aroma and hills moths) attacking the water-based finish, softening it and swelling it, just as paint st ripper does. There's noway tofixthis. You shouldn't have put any finish on the inside of the cedar-lined chest. Notice that old cedar chests are always left unfinished on the insides. My guess is that the finish will be gummv on the oak (hat is covered by the cedar also, because the fumes will have found some way to work their way underneath. I don't know what caused the black color. Dirt that stuck to the gummy finish? At the least, you will have to strip all the exposed wood on the inside of the chest. It will be messy and a challenge to keep from getting some of the stripper on the outside. You may have to strip both the inside and outside, then refinish the outside. You also may have to remove all the cedar lining from the inside and strip the finish from the oak. Then reinstall the cedar lining. Finally, sand all the wood you have stripped to smooth it and be sure that all the finish has been removed. Sorry to have to tellyou this, but I imagineyou had probably suspected it yourself. — Bob Tlexner, contributing editor Table-saving Suggestions I read your "Out on a Limb" column in the October 2008 issue and I agree it is often hard to get your friends and family to be honest critics of your work. 1 am an amateur woodworker, but I have made my livingasagraphic designer and I know good design when I see it, whether it be art, furniture, sculpture or automobiles. So if I may. I would say this about your table (assuming it's the one pictured in the article). Hirst, it looks very top heavy. The top is very thick and the legs pinch in at the bottom and it has the appearance that it would not take much to tip it over. If the top were undercut with a cove or even a steep bevel cut it would look much lighter. The legs also look too heavy; they should curve out at the bottom and have some shaping in the middle and upper portions like James Krenov was so good at doing. The side elements look like they are headed in the right direction, but appear they are about to be crushed by those massive legs. 1 also think a more rectangular shape would help; it looks like the top is square in the picture. It could be that you have been building too many workbenches of late. If you made this table twice as long and left the legs square, and added straight rails to the bottom of the legs, all it would need is a tail vise to complete it. 1 hope this has been of help to you. You are far more experienced at woodworking than 1 am. but sometimes we get so close to a project that we can't see where we've gone wrong with it. Sometimes with a painting you get to a place where you know it's just not right. So you set it aside for a few days, even turned toward the wall. Then when you turn it back around and look at it, you can immediately see the problem and correct it. Hopefully. — Paul Gallaway, Elizabeth, Colorado Thanks for the thoughtful letter. I've received many intereslingcritiques of the table in the photo at left - perhaps some of the first honest feedback I've seen in a while. I apprec iate it. The photo was taken of the table in its first iteration. Il went through two more cycles before I abandoned it. I indeed slimmed the legs and top and t t ied some alternative curves at the foot. Bu t still, after a week of workingon it in fitsandstarts, it was time to let it go. Maybe I'll take it up again. The criticism has been very stimulating. — ChristopherSchwarz, editor Online Offerings are Great Benefits 1 like what you and the staff at the magazine have done with the publication. 1 had let my subscription lapse due to too many magazines coming in, but after a few months I re-subscribed because 1 missed it. 1 think the website (popularwoodworking.com)and the regular e-mail newsletters had a lot to do with that. Keep up the good work. PW — Greg Smith, Gastonia, North Carolina Question? Comment? We want to hear from you. Popular Woodworking welcomes comments from readers about the magazine or woodworking in general, as well as questions on all areas of woodworking. We are more than happy to share our woodworking experience with you by answering your questions or adding some clarity to whatever aspect of the craft you are unsure about, and if you have a complaint, we want to address it whenever possible. Though we receive a gcxxl deal of mail, we try to respond to all correspondence in a prompt manner. Published correspondence may be edited for length or style. All correspondence becomes the property of Popular Woodworking. Send your questions and comments via e-mail to popwood@fwpubs.com, or by mail to: Letters Popular Woodworking 4700 E. Galbraith Road Cincinnati, OH 45236 16 ■ Popul ar Woodworking December 2008 |


