Popular Woodworking 2009-06 № 176, страница 16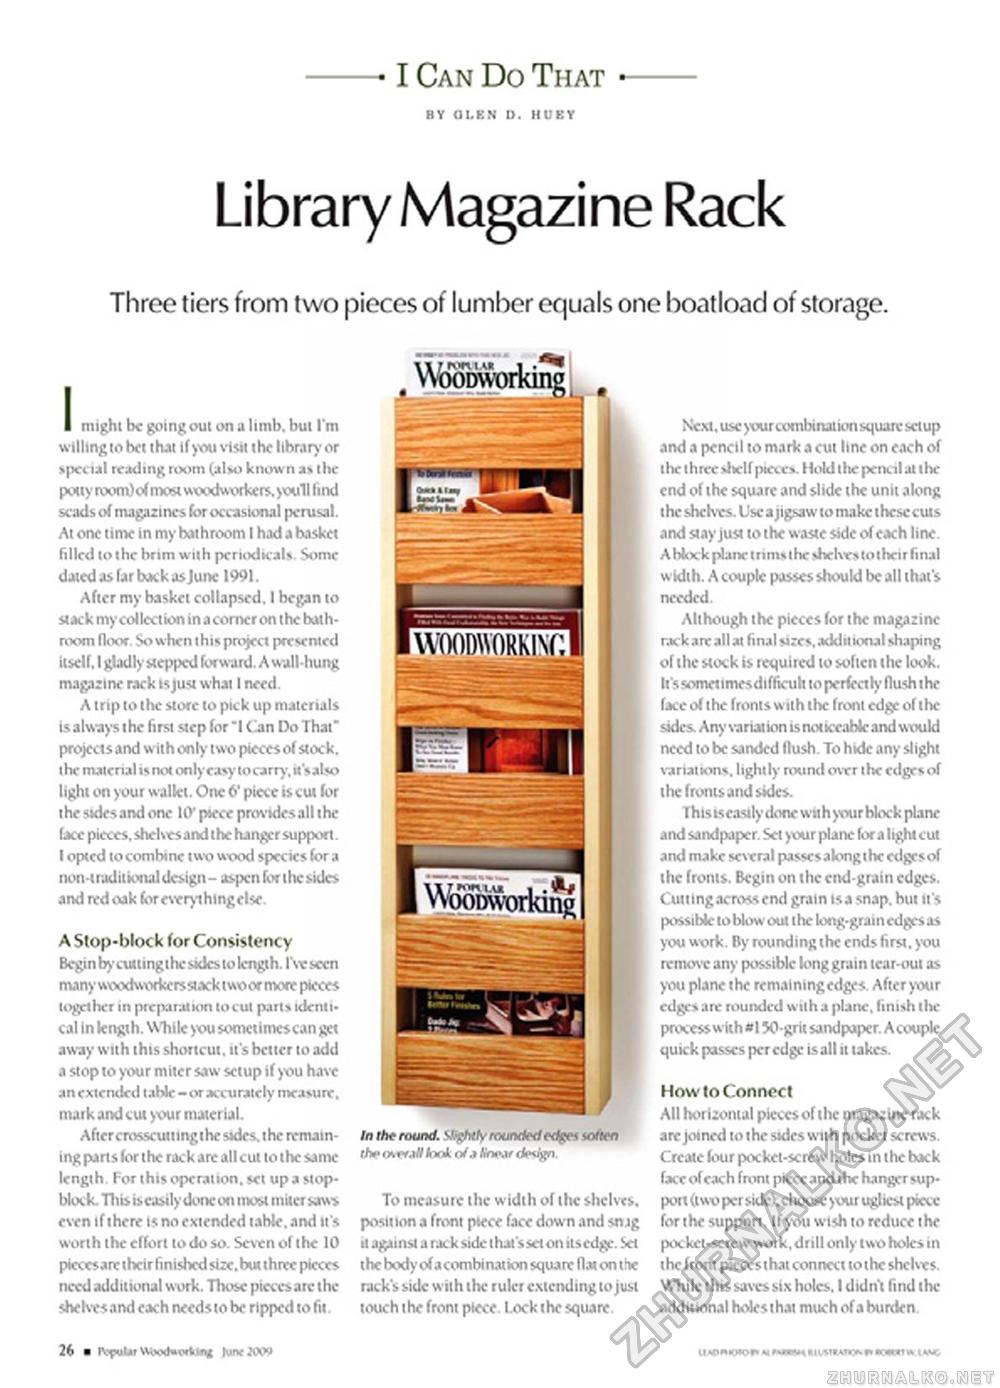
I Can Do That — Library Magazine RackThroe tiers from two pieces of lumber equals one boatload of storage. I mightbcgoingoutonalimb.bul I'm willing to bet that if you visit the library or special reading room (also known a* the potty rcom)cf most woodworkers, youll find scads of magazines for occasional perusal. At one time in my bathroom I had a basket filled tothe brim with periodicals. Some dated as far back as June 1991. After my basket collapsed. I began to stack my collection in a comer on the bathroom floor. So when t his project presented itself. I gladly stepped forward. A wall-hung magazine rack is just what I need. A trip to the store to pick up materials is always the first step for "I Can Do That" projects and with only two pieces of stock, the material isnot only easy tocarry, MsaUo light on your wallet. One 6' piece is cut for the sides and one llV piece provides all the (ice pieces, shelves and the hanger support. I opted to combine two wood species for a non-traditional design- aspen for the sides and red oak foreverythingelse. A Stop-bloc k for Consistency Begin bycuttingthe sides to length. I've seen many woodwtHkcrsstack two or more pieces together in preparation tocul parts identical In length. While you sometimescangct away with this shortcut, it's better to add a stop to your miter saw setup if you have an extended table -or accurately measure, mark and cut your material. Aftercrosscuiungihc sides, the remaining pans for the rack are all cut to the same length. For this operation, set up a stop-block. This is easily done on most miter saws even if there is no extended table.and it's worth the effort to do so. Seven of the 10 piccesarc their finished size, but three pieces need addil ional work. Those pieces arc the shelves and each needs to be ripped to fit. To measure the width of the shelves, position a front piece face down and snjg it agiinst a rack side that sset on its edge. Set the body of acombinat ion square flat on iIk nick's side with the rukr extending to just touch the front piece. Lock the square Next, use your combination square setup and a pencil to mark a cut line on each of the three shelf pieces. Hold the pencil at the end of the square and slide the unit along the shelves. Use a jigsaw to make these cuts and stay just to the waste side of each line. A hkxk plane trims the shelves to their final width. A couple passes should be all that's Although the pieces for the magazine rack arc all at final sizes.additional shaping of the stock is required to soften the look. It'ssomeiimesdifficuh to perfectly flush the face of the fronts with the front edge of the sides. Any variat ion is noticeable and would need to be sanded flush. To hide any slight variations, lightly round over the edges of the fronts and sides. This tseasily done wit h your block plane and sandpaper. Set your plane for a light cut and make several passes along the edges of the fronts. Begin on the end-grain edges. Cuttingacrossend grain tsa snap.hut it's possibktobktwout thefong-grainedgesas you work. By rounding the ends first, you remove any possible long grain tear-out as you plane the remaining edges. After your edges are rounded w ith a plane, finish i lie process with »l 50-grit sandpaper. Acouple quick passes per edge is all it takes. How to Connect All horizontal pieces of the ma$izine rack are joined to the sides with pocket screws. Create four pocket-screw holes in the back face of each front piece and the hanger support (two per side).choose your ugliest piece forthesuppon. Ifyou wish to reduce the pocket-screw work, drill only two holes in the front pieces that connect to the shelves. While this saves six holes, I didn't find the additional holes that much of a burden 26 ■ tvpuljr wood-ortw* |uik.w> |


