Popular Woodworking 2009-06 № 176, страница 62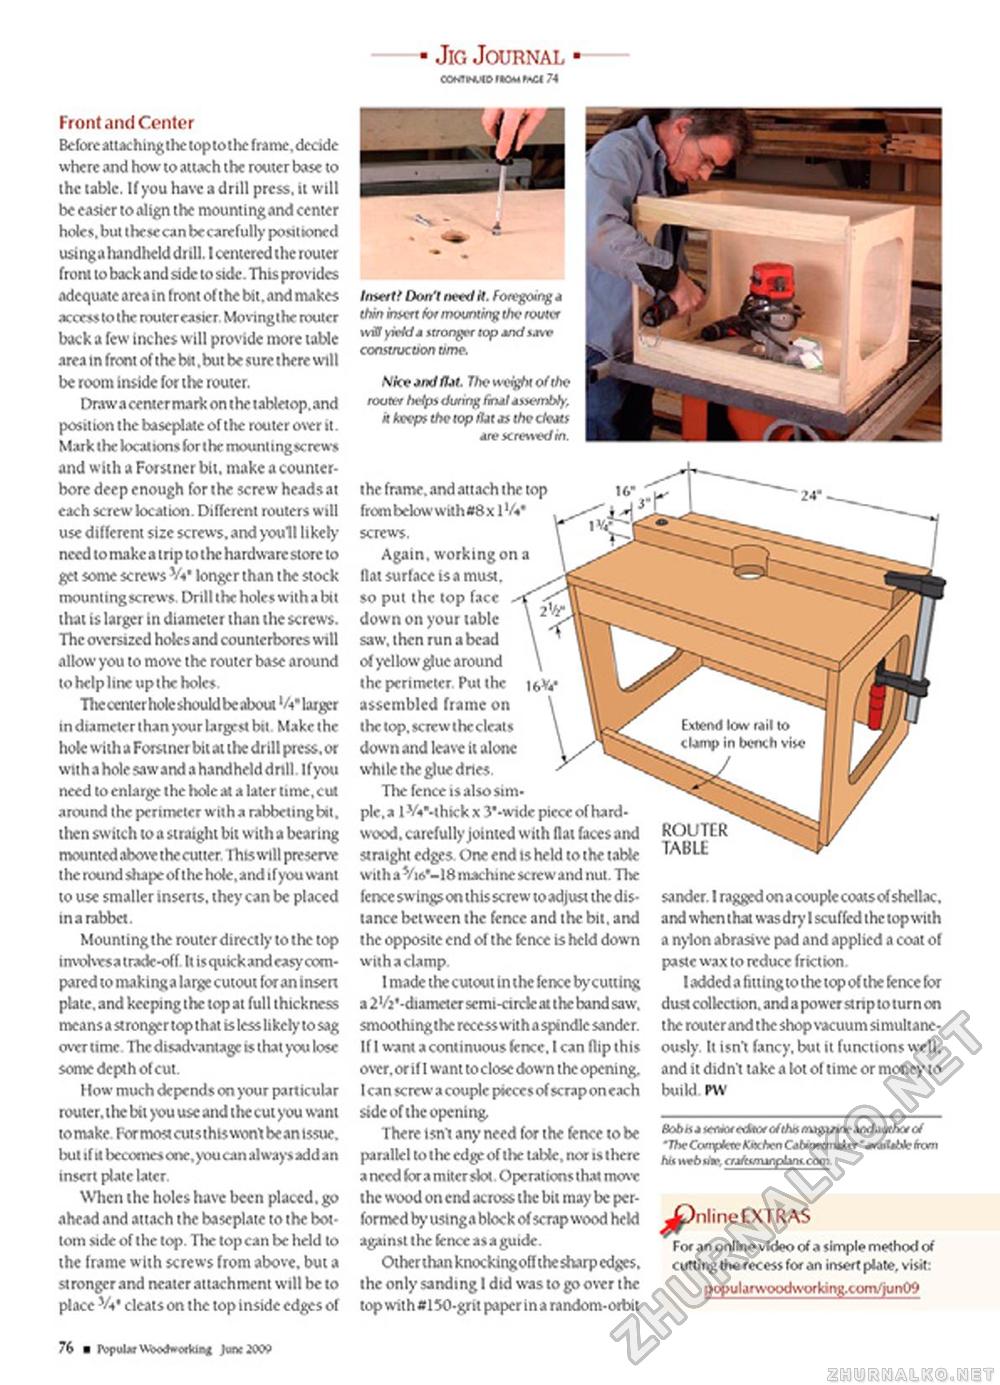
• Jig Journal • cominuwrtowrngi 74 Front and Center Before attaching the tcp to the frame, dccide where and how to attach the router base to the tabic. If you have a drill press, it will be easier to align the mounting and center holes, but these can be carefully positioned usingaliandhelddrill. I centered the router front to back and side to side. This provides adequate area in front of the bit. and makes access to the router easier Movinglhe router back a few inches will provide more table area in front of the btt .but be sure there will be room inside for the router. Draws center mark on t he tahletop. and position the baseplate of the router over it. Mark the locations forlhemounlingscrews and with a Foist ner bit, make a counter-bore deep enough for the screw heads at each screw location. Different routers will use different size screws, and youll likely need to make a trip to the hardware store to get some screws W longer than the stock mounting screws. Drill the holes with a bit that is larger in diameter than the screws. The oversized holes and countcrborcs will allow you to mow the router base around to help line up the holes. Tlie center hole should be about 'A" larger in diameter than your largest bit Make the hole with a Forstner bit at the drill press, or with a hole sawand a handheld drill. If you need to enlarge the hole at a later time, cut around the perimeter with a rabbeting bit. then switch to a straight bit with a bearing mounted abwethe cutterThis will preserve the rou nd shape of the hole, and ifyou want to use smaller inserts, they can be placed tnarabbct. Mounting the router directly to the top imohrsatrade-off Itisqukrkandcasvcompared to makinga large cutout for an insert plate, and keeping the top at full thickness means a stronger top that is less likely to sag overtime The disadvantage is that you lose some depth of cut. How much depends on your particular rouicr. the bit you use and the cut you want tomake FormostaitsthiswMrtbeanissue, hut if it becomes cne.you can always add an insert plate later. When the holes have been placed, gp ahead and attach the baseplate to the bottom side of the top. The top can be held to the frame with screws from above, but a si ronger and neaier attachment will be to place 'A* cleats on the top inside edges of hnert' Don't need H. foregoing a thin inert hi mounting the router »wff yield* monger top mdunv Ske jnd fUt. The weight of the rooter helps during firul tssembty, it keep* the top rtat jsthe c leMi *re screwed in. the frame, and attach the top from below with *8 x 1 'A* Again, working on a flat surface isa must, so put the top face down on your table saw. then run a bead of yellow glue around the perimeter Put the tbV assembled frame on the top, screwthecleats down and leave it alone while the glue dries. The fence is also simple, a 1 V«"-thick x 3"-wide piece of hard-wood, carefully jointed with flat faces and straight edges One end ts held to the table with a Vi6*-18 machine screw and nut. The lence swings on this sere w to adjust the distance between the fence and the bit, and the opposite end of the fence is held down with a clamp. I made the cutout In the fence bycutting a 2'/i,-diameter semi-circle at the band saw. smoothing the recess with a spindle sander. If I want a continuous fence, I can flip this over, or if I want to close down the opening, I can screw a couple pieces of scrap on each side of the opening There isnt any need for the fence to be parallel to the edge of the table, nor is there a need for a miter slot. Operations that move the wood on end across tlie bit may be performed by usinga block of scrap wood held against the fence as a guide. Otherthanknockingoffthe sharp edges, the only sanding I did was to go over the lop with »150-grit paper in a random-otbit BobHuemortdMtafthamtp/ineindMXhotcf 'ThcCotvfjmKwbenCibvirtmjixr'+raUbicimni hit h*6 nr. CTjfammplmt.com. ^pnline EXTRAS For an online video of a simple method of cutting the recess for an insert plate, visit: popularwoodworking.conVjun09 sander. I raggedonacouplecoatsof shellac, and when thai wasdry I scuffed the top with a nylon abrasive pad and applied a coat of paste wax to reduce friction. I added a fitting to the top of the knee for dust collection, and a power st np to turn on the route rand the shop vacuum simultaneously. It isnt fancy, but it functions well, and it didn't take a lot of time or money to build PW ROUTER TABLE 76 ■ ropulwWWw^tui* joncXW |


