Popular Woodworking 2009-08 № 177, страница 45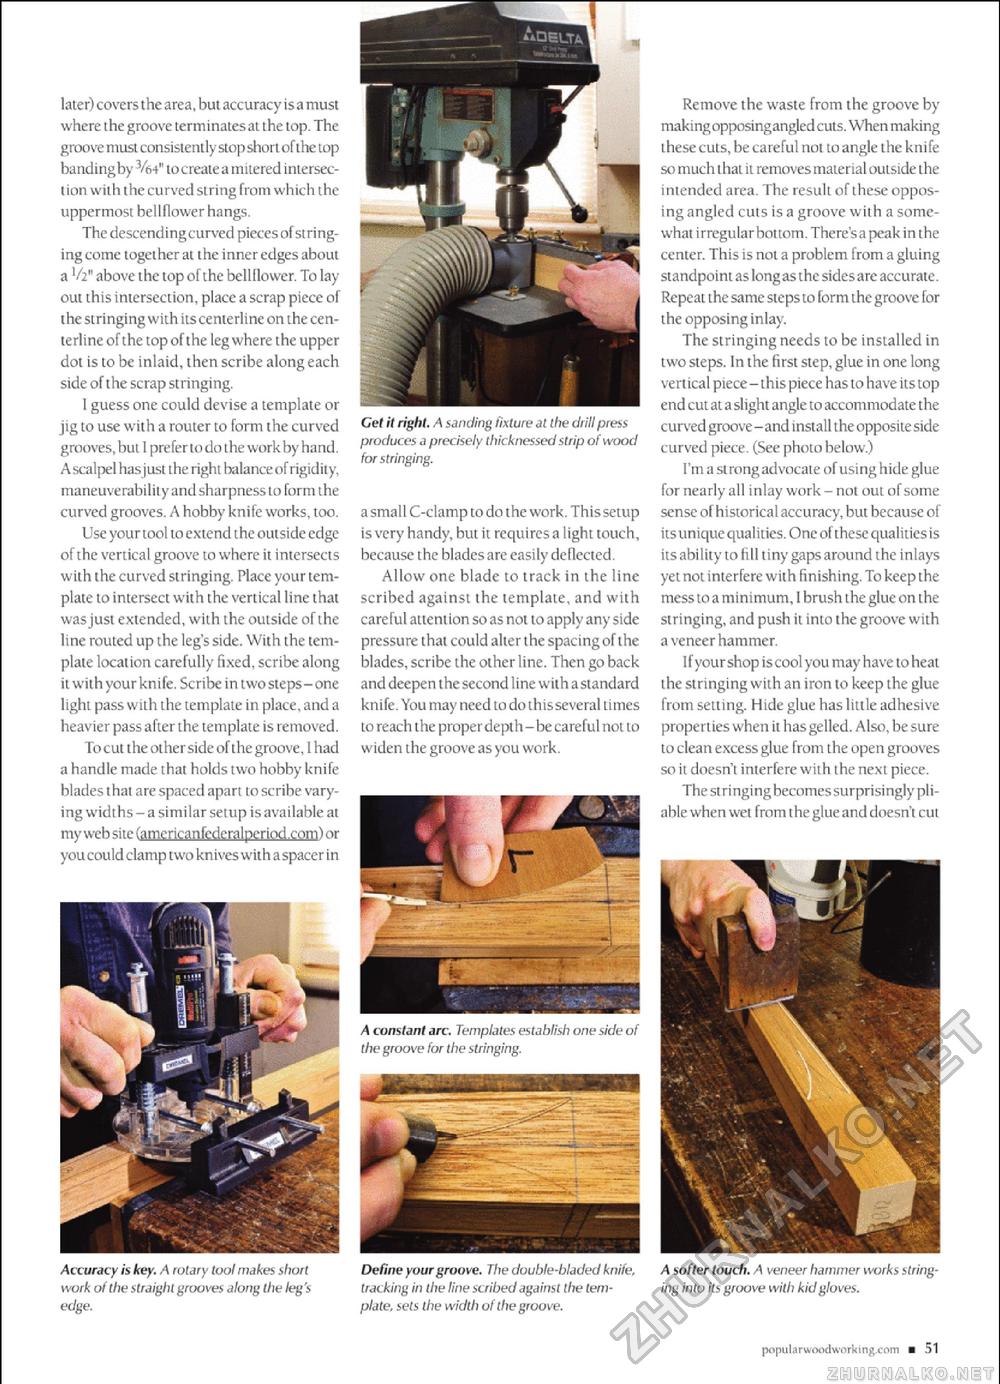
later) covers the area, but accuracy is a must where the groove terminates at the top. The groove must consistently stop short of the top bandingby %4" to create a mitered intersection with the curved string from which the uppermost bellflower hangs. The descending curved pieces of stringing come together at the inner edges about a Vi" above the top ofthe bellHower. To lay out this intersection, place a scrap piece of the stringing with itscenterline onthecen-terline ofthe top ofthe leg where the upper dot is to be inlaid, then scribe along each side ofthe scrap stringing. 1 guess one could devise a template or jig to use with a router to form the curved grooves, but 1 pre fer to do the work by ha nd. A scalpel has just the right balance of rigidily, maneuverabilityand sharpnessto form the curved grooves. A hobby knife works, too. Use your tool to extend the outside edge ofthe vertical groove to where it intersects with the curved stringing. Place your template to intersect with the vertical line that was just extended, with the outside ofthe line routed up the leg's side. With the template location carefully fixed, scribe along it with your knife. Scribe in two steps-one light pass with the template in place, and a heavier pass after the template is removed. Tocul the otherside of the groove, Ihad a handle made that holds two hobby knife blades that are spaced apart to scribe varying widths - a similar setup is available at my web site Camericanfederalperiod.com) or you could clamp two knives with a spacer in Accuracy is key. A rotary tool makes short work of the straight grooves along the leg's edge. Drill": your groove. The double-bladed knife, tracking in the line scribed against the template, sets the width of the groove. Remove the waste from the groove by making opposingangled cuts. When making these cuts, be careful not to angle the knife so much that it removes material outside the intended area The result of these opposing angled cuts is a groove with a somewhat irregular bottom. There'sapeak in the center. This is not a problem from a gluing standpoimas long as the sides are accurate. Repeat the same steps to form the groove for the opposing inlay. The stringing needs to be installed in two steps. In the first step, glue in one long verticalptece-thispiecehastohaveitstop end cut at a slight angle to accommodate the curved groove-and install the opposite side curved piece. (See photo below.) Tin a strong advocate ofusinghide glue for nearly all inlay work - not out of some sense of historical accuracy, but because of i ts uni que qual i ties. One of these qual ities is its ability to fill tiny gaps around the inlays yet not interfere with finishing. To keep the mess to a minimum, I brush the glue on the stringing, and push it into the groove with a veneer hammer. Ifyourshop iscool youmayhave to heal the stringing with an iron to keep the glue from setting. Hide glue has little adhesive properties when it has gelled. Also, be sure to clean excess glue from the open grooves so it doesn't interfere wiLh the next piece. The stringing becomes surprisingly pliable when wet from the glue and doesn't cut A softer touch. A veneer hammer works stringing into its groove with kid gloves. A constant arc. Templates establish one side of the groove for the stringing. asmall C-clamp to do the work. This setup is very handy, but it requires a light touch, because the blades are easily deflected. Allow one blade to track in the line scribed against the template, and with careful attention so as not to apply any side pressure that could alter the spacing of the blades, scribe the other line. Then go back and deepen the second line with astandard knife. You may need to do thisseveral times to reach the prope r depth - be careful not to widen the groove as you work. Cet it right. A sanding fixture at the drill press produces a precisely thicknessed strip of wood for stringing. popul a rwoodwork ing.com ■ 51 |


