Popular Woodworking 2009-12 № 180, страница 8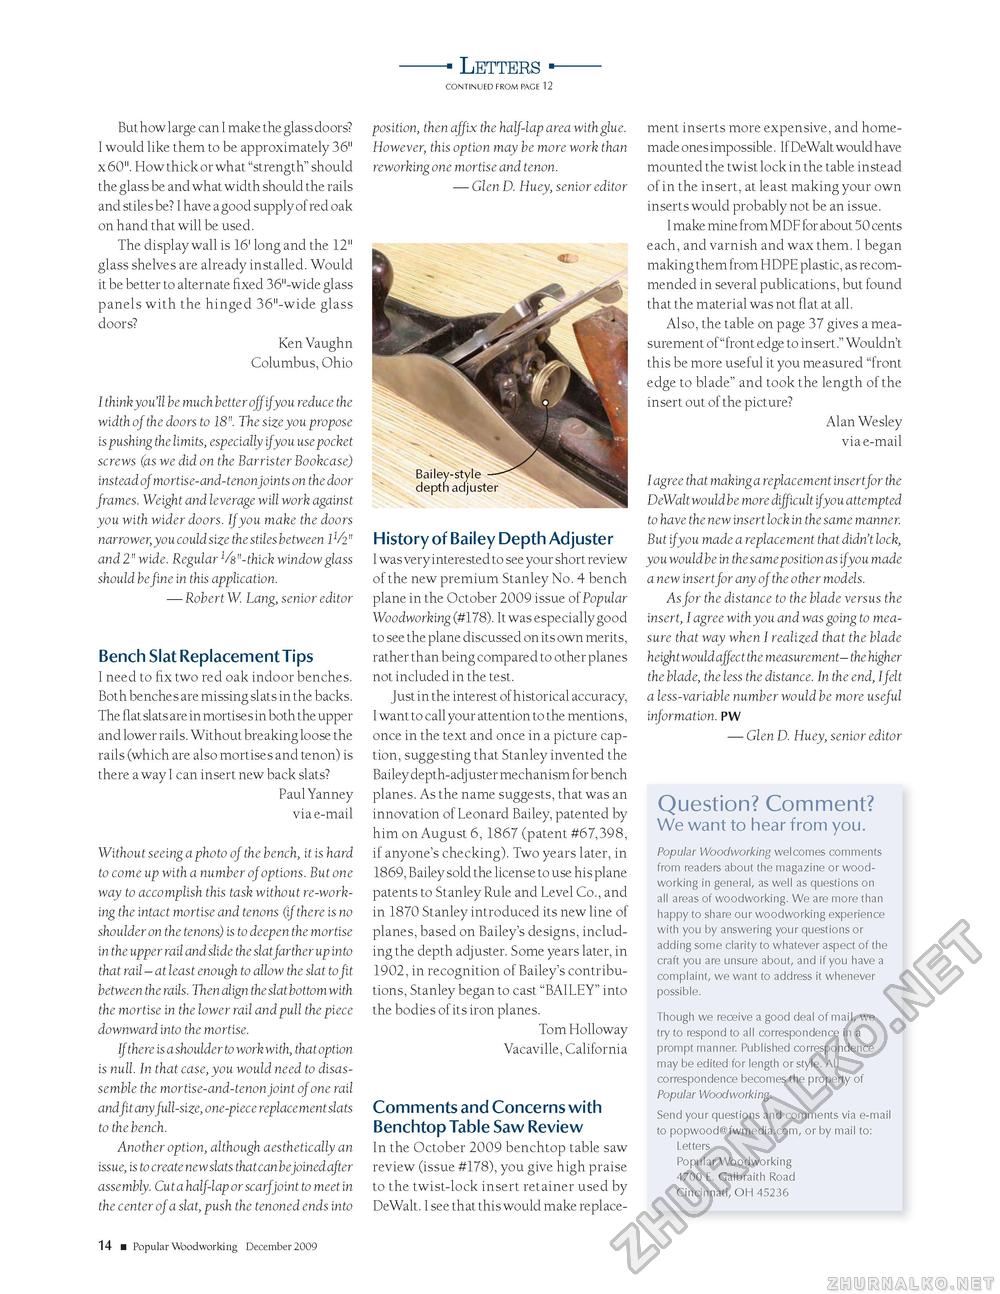
- Letters ■ CONTINUED FROM PAGE 12 But how large can I make the glass doors? I would like them to be approximately 36" x 60". How thick or what "strength" should the glass be and what width should the rails and stiles be? I have a good supply of red oak on hand that will be used. The display wall is 16' long and the 12" glass shelves are already installed. Would it be better to alternate fixed 36"-wide glass panels with the hinged 36"-wide glass doors? Ken Vaughn Columbus, Ohio I think you'll be much better off if you reduce the width of the doors to 18". The size you propose is pushing the limits, especially if you use pocket screws (as we did on the Barrister Bookcase) instead of mortise-and-tenonjoints on the door frames. Weight and leverage will work against you with wider doors. If you make the doors narrower, you could size the stiles between 1l/i" and 2" wide. Regular 1/s "-thick window glass should be fine in this application. — Robert W. Lang, senior editor Bench Slat Replacement TipsI need to fix two red oak indoor benches. Both benches are missing slats in the backs. The flat slats are in mortises in both the upper and lower rails. Without breaking loose the rails (which are also mortises and tenon) is there a way I can insert new back slats? Paul Yanney via e-mail Without seeing a photo of the bench, it is hard to come up with a number of options. But one way to accomplish this task without re-working the intact mortise and tenons (if there is no shoulder on the tenons) is to deepen the mortise in the upper rail and slide the slat farther up into that rail — at leas t enough to allow the slat to fit between the rails. Then align the slat bottom with the mortise in the lower rail and pull the piece downward into the mortise. If there is a shoulder to work with, that option is null. In that case, you would need to disassemble the mortise-and-tenon joint of one rail andfit any full-size, one-piece replacement slats to the bench. Another option, although aesthetically an issue, is to create new slats that can be joined after assembly. Cut a half-lap or scarf joint to meet in the center of a slat, push the tenoned ends into position, then affix the half-lap area with glue. However, this option may be more work than reworking one mortise and tenon. — Glen D. Huey, senior editor History of Bailey Depth AdjusterI was very interested to see your short review of the new premium Stanley No. 4 bench plane in the October 2009 issue of Popular Woodworking (#178). It was especially good to see the plane discussed on its own merits, rather than being compared to other planes not included in the test. Just in the interest of historical accuracy, I want to call your attention to the mentions, once in the text and once in a picture caption, suggesting that Stanley invented the Bailey depth-adjuster mechanism for bench planes. As the name suggests, that was an innovation of Leonard Bailey, patented by him on August 6, 1867 (patent #67,398, if anyone's checking). Two years later, in 1869, Bailey sold the license to use his plane patents to Stanley Rule and Level Co., and in 1870 Stanley introduced its new line of planes, based on Bailey's designs, including the depth adjuster. Some years later, in 1902, in recognition of Bailey's contributions, Stanley began to cast "BAILEY" into the bodies of its iron planes. Tom Holloway Vacaville, California Comments and Concerns with Benchtop Table Saw ReviewIn the October 2009 benchtop table saw review (issue #178), you give high praise to the twist-lock insert retainer used by DeWalt. I see that this would make replace ment inserts more expensive, and homemade ones impossible. If DeWalt would have mounted the twist lock in the table instead of in the insert, at least making your own inserts would probably not be an issue. I make mine from MDF for about 50 cents each, and varnish and wax them. I began making them from HDPE plastic, as recommended in several publications, but found that the material was not flat at all. Also, the table on page 37 gives a measurement of "front edge to insert." Wouldn't this be more useful it you measured "front edge to blade" and took the length of the insert out of the picture? Alan Wesley via e-mail I agree that making a replacement insert for the DeWalt would be more difficult if you attempted to have the new insert lock in the same manner. But if you made a replacement that didn't lock, you would be in the same position as if you made a new insert for any of the other models. As for the distance to the blade versus the insert, I agree with you and was going to measure that way when I realized that the blade height would affect the measurement— the higher the blade, the less the distance. In the end, I felt a less-variable number would be more useful information. PW — Glen D. Huey, senior editor Question? Comment? We want to hear from you.Popular Woodworking welcomes comments from readers about the magazine or woodworking in general, as well as questions on all areas of woodworking. We are more than happy to share our woodworking experience with you by answering your questions or adding some clarity to whatever aspect of the craft you are unsure about, and if you have a complaint, we want to address it whenever possible. Though we receive a good deal of mail, we try to respond to all correspondence in a prompt manner. Published correspondence may be edited for length or style. All correspondence becomes the property of Popular Woodworking. Send your questions and comments via e-mail to popwood®fwmedia.com, or by mail to: Letters Popular Woodworking 4700 E. Galbraith Road Cincinnati, OH 45236 14 ■ Popular Woodworking December 2009 |


