Popular Woodworking 2009-12 № 180, страница 10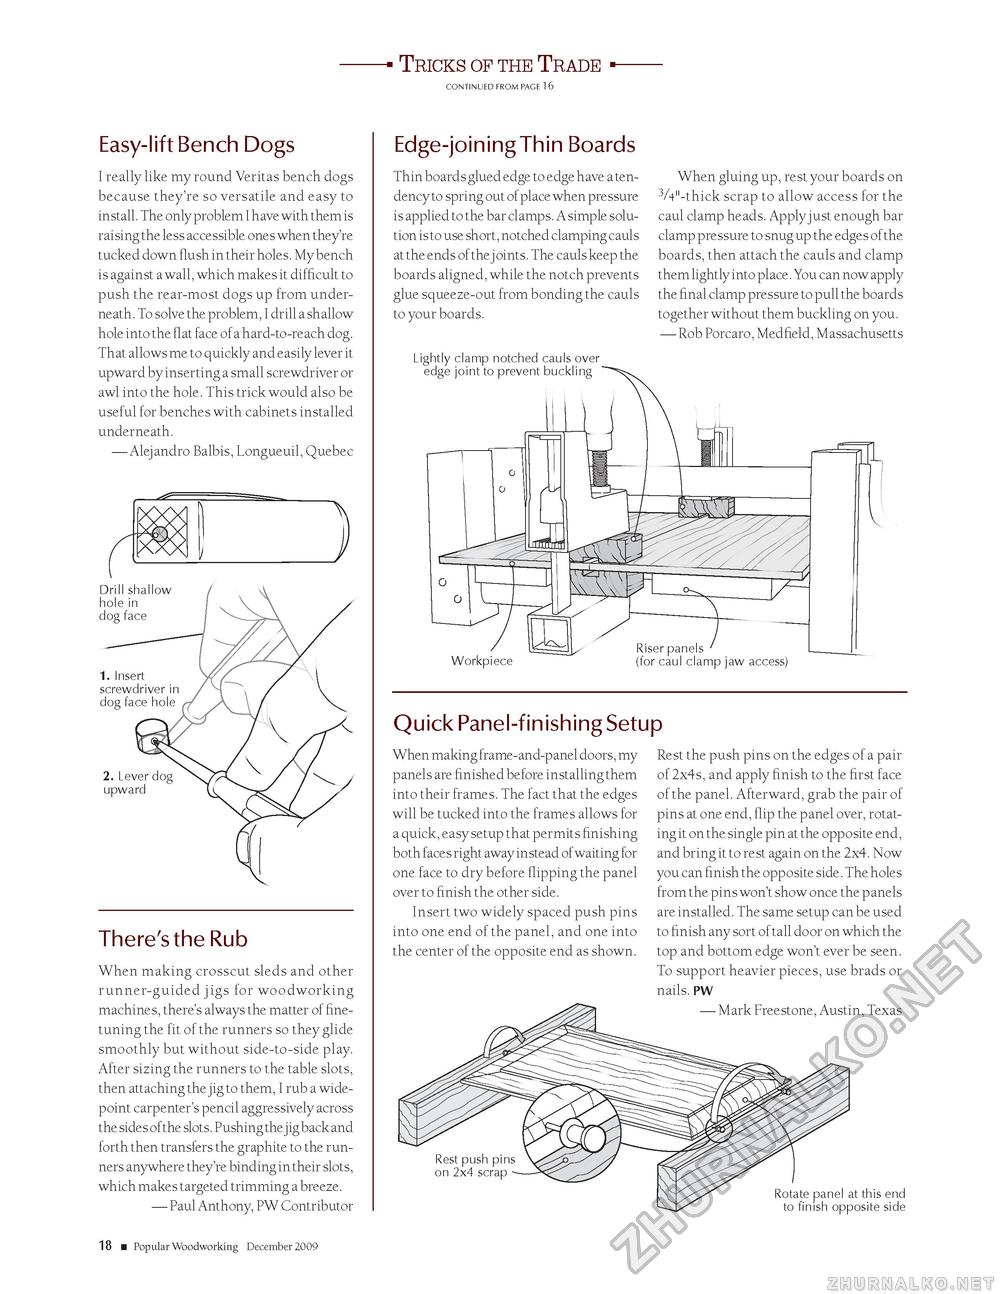
Tricks of the Trade CONTINUED FROM PAGE 16 Easy-lift Bench Dogs I really like my round Veritas bench dogs because they're so versatile and easy to install. The only problem I have with them is raising the less accessible ones when they're tucked down flush in their holes. My bench is against a wall, which makes it difficult to push the rear-most dogs up from underneath. To solve the problem, I drill a shallow hole into the flat face of a hard-to-reach dog. That allows me to quickly and easily lever it upward by inserting a small screwdriver or awl into the hole. This trick would also be useful for benches with cabinets installed underneath. — Alejandro Balbis, Longueuil, Quebec There's the Rub When making crosscut sleds and other runner-guided jigs for woodworking machines, there's always the matter of fine-tuning the fit of the runners so they glide smoothly but without side-to-side play. After sizing the runners to the table slots, then attaching the jig to them, I rub a wide-point carpenter's pencil aggressively across the sides of the slots. Pushing the jig back and forth then transfers the graphite to the runners anywhere they're binding in their slots, which makes targeted trimming a breeze. — Paul Anthony, PW Contributor 14 ■ Popular Woodworking December 2009 Edge-joining Thin Boards Thin boards glued edge to edge have a tendency to spring out of place when pressure is applied to the bar clamps. A simple solution is to use short, notched clamping cauls at the ends of the joints. The cauls keep the boards aligned, while the notch prevents glue squeeze-out from bonding the cauls to your boards. Lightly clamp notched cauls over edge joint to prevent buckling When gluing up, rest your boards on 3A"-thick scrap to allow access for the caul clamp heads. Apply just enough bar clamp pressure to snug up the edges of the boards, then attach the cauls and clamp them lightly into place. You can now apply the final clamp pressure to pull the boards together without them buckling on you. — Rob Porcaro, Medfield, Massachusetts Workpiece Riser panels (for caul clamp jaw access) Quick Panel-finishing Setup When making frame-and-panel doors, my panels are finished before installing them into their frames. The fact that the edges will be tucked into the frames allows for a quick, easy setup that permits finishing both faces right away instead of waiting for one face to dry before flipping the panel over to finish the other side. Insert two widely spaced push pins into one end of the panel, and one into the center of the opposite end as shown. Rest the push pins on the edges of a pair of 2x4s, and apply finish to the first face of the panel. Afterward, grab the pair of pins at one end, flip the panel over, rotating it on the single pin at the opposite end, and bring it to rest again on the 2x4. Now you can finish the opposite side. The holes from the pins won't show once the p anels are installed. The same setup can be used to finish any sort of tall door on which the top and bottom edge won't ever be seen. To support heavier pieces, use brads or nails. PW — Mark Freestone, Austin, Texas Rest push pins on 2x4 scrap Rotate panel at this end to finish opposite side |


