15 - Sliding Table, страница 26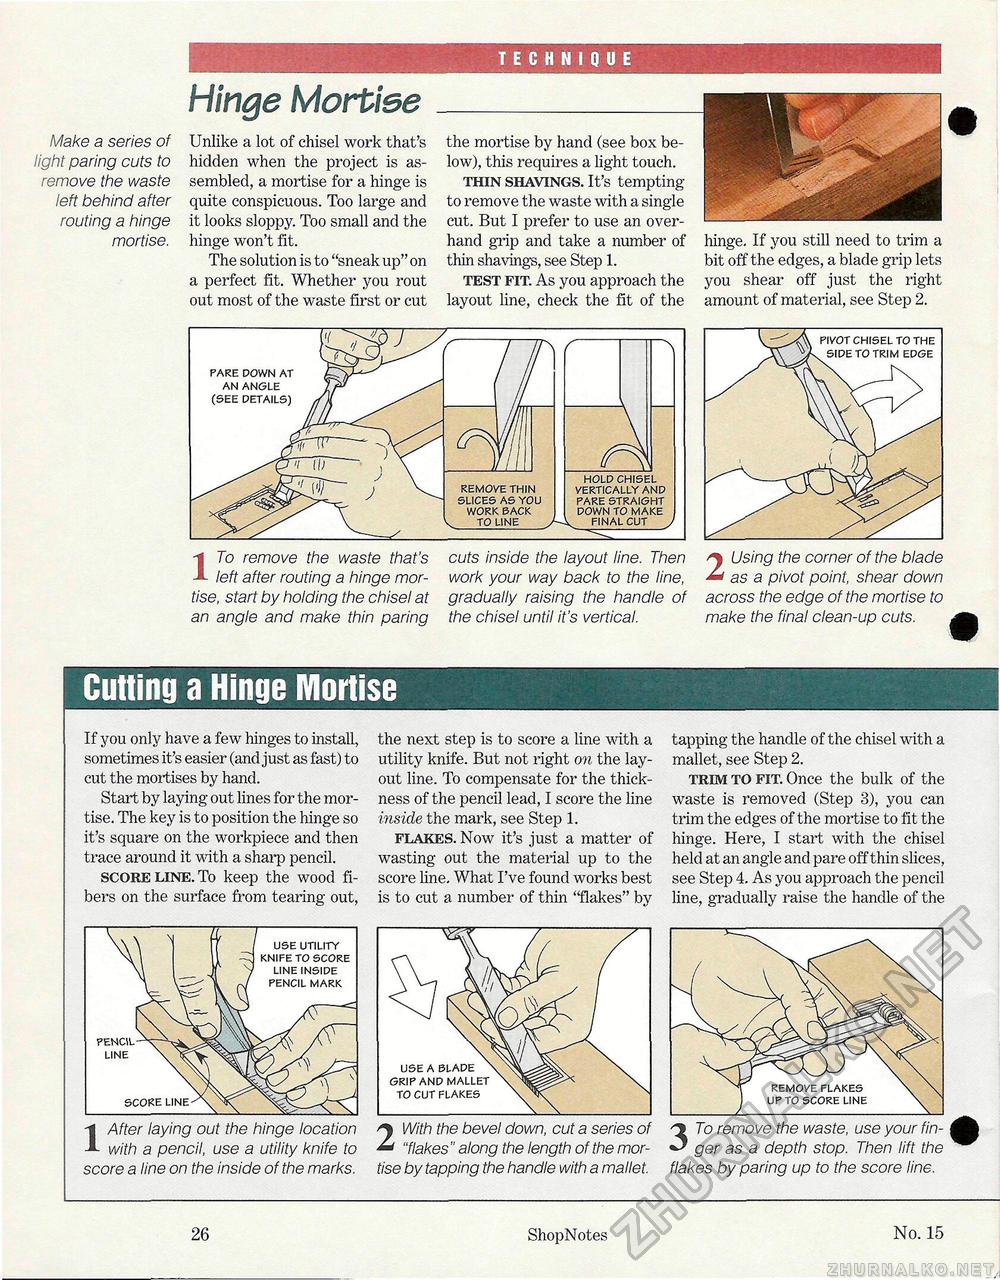
TECHNIQUE Make a series of light paring cuts to remove the waste left behind after routing a hinge mortise. Hinge Mortise Unlike a lot of chisel work that's hidden when the project is assembled, a mortise for a hinge is quite conspicuous. Too large and it looks sloppy. Too small and the hinge won't fit. The solution is to "sneak up" on a perfect fit. Whether you rout out most of the waste first or cut the mortise by hand (see box below), this requires a light touch. thin shavings. It's tempting to remove the waste with a single cut. But I prefer to use an overhand grip and take a number of thin shavings, see Step 1. test fit. As you approach the layout line, check the fit of the hinge. If you still need to trim a bit off the edges, a blade grip lets you shear off just the right amount of material, see Step 2. A left after routing a hinge mortise, start by holding the chisel at an angle and make thin paring cuts inside the layout line. Then work your way back to the line, gradually raising the handle of the chisel until it's vertical. 2 Using the corner of the blade as a pivot point, shear down across the edge of the mortise to make the final clean-up cuts. Cutting a Hinge Mortise If you only have a few hinges to install, sometimes it's easier (and just as fast) to cut the mortises by hand. Start by laying out lines for the mortise. The key is to position the hinge so it's square on the workpiece and then trace around it with a sharp pencil. score line. To keep the wood fibers on the surface from tearing out, USE UTILITY KNIFE TO SCORE LINE INSIDE PENCIL MARK 1 After laying out the hinge location with a pencil, use a utility knife to score a line on the inside of the marks. the next step is to score a line with a utility knife. But not right on the layout line. To compensate for the thickness of the pencil lead, I score the line inside the mark, see Step 1. flakes. Now it's just a matter of wasting out the material up to the score line. What I've found works best is to cut a number of thin "flakes" by tapping the handle of the chisel with a mallet, see Step 2. trim to fit. Once the bulk of the waste is removed (Step 3), you can trim the edges of the mortise to fit the hinge. Here, I start with the chisel held at an angle and pare off thin slices, see Step 4. As you approach the pencil line, gradually raise the handle of the USE A BLADE GRIP AND MALLET TO CUT FLAKES 2 With the bevel down, cut a series of "flakes" along the length of the mortise by tapping the handle with a mallet. 3 To remove the waste, use your fin-ger as a depth stop. Then lift the ^^ flakes by paring up to the score line. 26 ShopNotes No. 15 |


