15 - Sliding Table, страница 23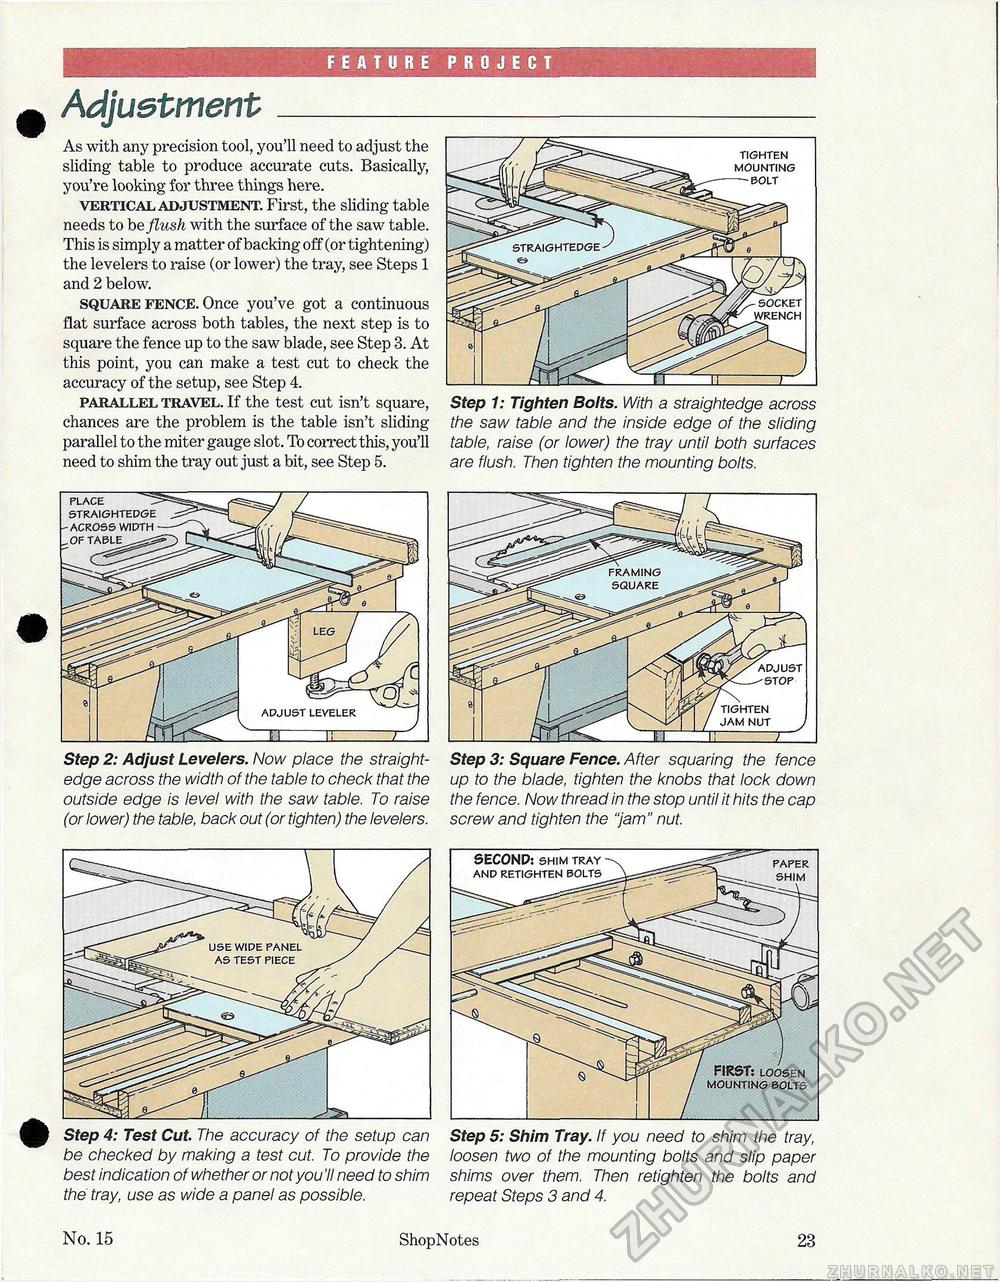
FEATURE PROJECT AdjustmentAs with any precision tool, you'll need to adjust the sliding table to produce accurate cuts. Basically, you're looking for three things here. vertical adjustment. First, the sliding table needs to he flush with the surface of the saw table. This is simply a matter of backing off (or tightening) the levelers to raise (or lower) the tray, see Steps 1 and 2 below. square fence. Once you've got a continuous flat surface across both tables, the next step is to square the fence up to the saw blade, see Step 3. At this point, you can make a test cut to check the accuracy of the setup, see Step 4. parallel travel. If the test cut isn't square, chances are the problem is the table isn't sliding parallel to the miter gauge slot. To correct this, you'll need to shim the tray out just a bit, see Step 5. Step 1: Tighten Bolts. With a straightedge across the saw table and the inside edge of the sliding table, raise (or lower) the tray until both surfaces are flush. Then tighten the mounting bolts. TIGHTEN MOUNTING BOLT SOCKET PLACE STRAIGHTEDGE -ACROSS WIDTH _OF TABLE TIGHTEN JAM NUT ADJUST Step 2: Adjust Levelers. Now place the straightedge across the width of the table to check that the outside edge is level with the saw table. To raise (or lower) the table, back out (or tighten) the levelers. Step 3: Square Fence. After squaring the fence up to the blade, tighten the knobs that lock down the fence. Now thread in the stop until it hits the cap screw and tighten the "jam" nut. Step 4: Test Cut. The accuracy of the setup can be checked by making a test cut. To provide the best indication of whether or not you 'II need to shim the tray, use as wide a panel as possible. Step 5: Shim Tray. If you need to shim the tray, loosen two of the mounting bolts and slip paper shims over them. Then retighten the bolts and repeat Steps 3 and 4. USE WIDE PANEL AS TEST PIECE No. 15 ShopNotes 23 |


