15 - Sliding Table, страница 22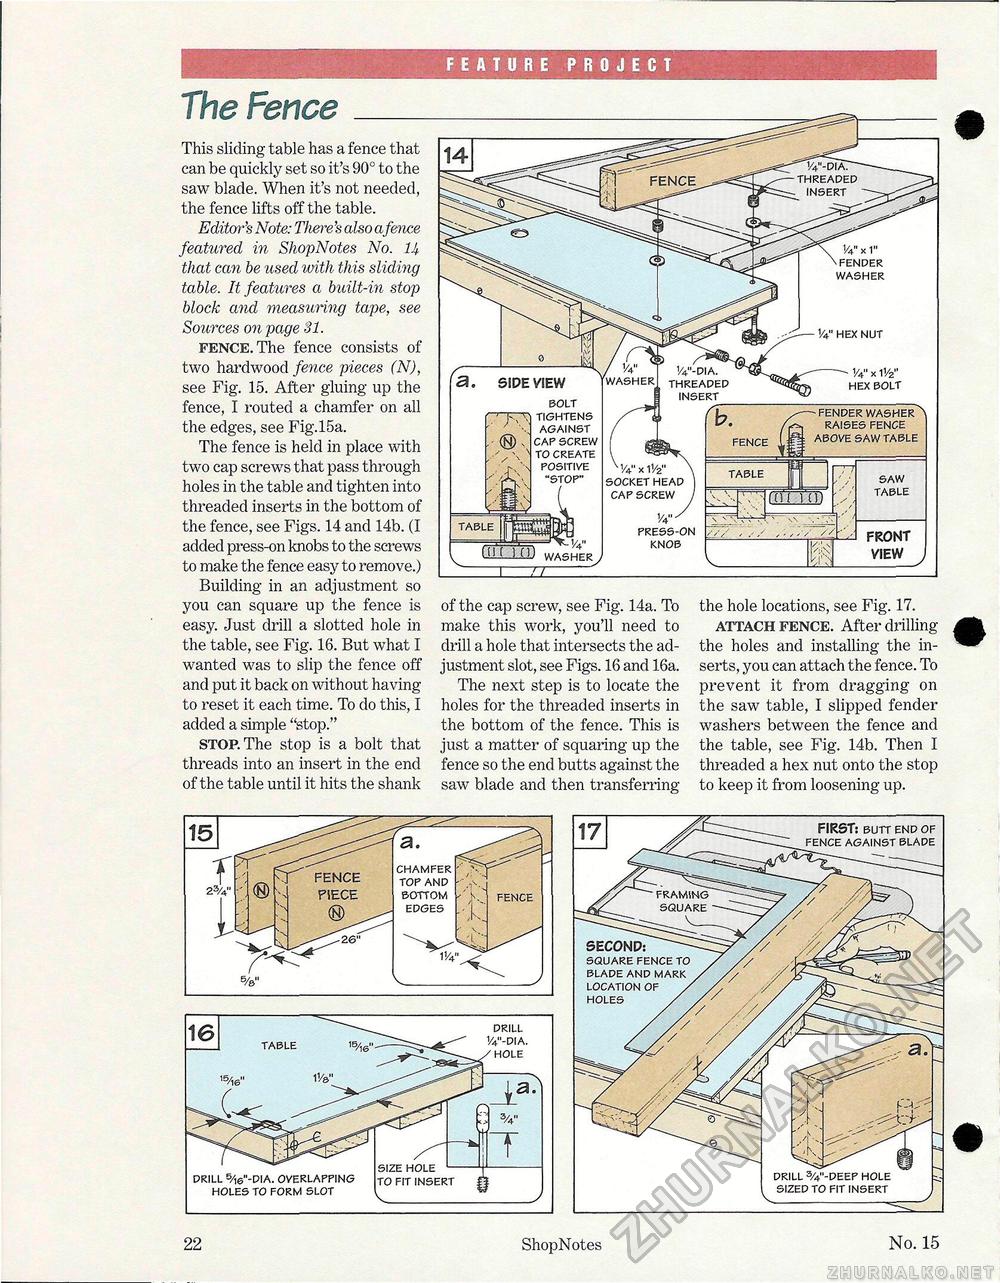
FEATURE PROJECT The FenceThis sliding table has a fence that can be quickly set so it's 90° to the saw blade. When it's not needed, the fence lifts off the table. Editor's Note: There's also a fence featured in ShopNotes No. U that can be used 'with this sliding table. It features a built-in stop block ctnd measuring tape, see Sources on page 31. fence. The fence consists of two hardwood fence pieces (N), see Fig. 15. After gluing up the fence, I routed a chamfer on all the edges, see Fig. 15a. The fence is held in place with two cap screws that pass through holes in the table and tighten into threaded inserts in the bottom of the fence, see Figs. 14 and 14b. (I added press-on knobs to the screws to make the fence easy to remove.) Building in an adjustment so you can square up the fence is easy. Just drill a slotted hole in the table, see Fig. 16. But what I wanted was to slip the fence off and put it back on without having to reset it each time. To do this, I added a simple "stop." stop. The stop is a bolt that threads into an insert in the end of the table until it hits the shank of the cap screw, see Fig. 14a. To make this work, you'll need to drill a hole that intersects the adjustment slot, see Figs. 16 and 16a. The next step is to locate the holes for the threaded inserts in the bottom of the fence. This is just a matter of squaring up the fence so the end butts against the saw blade and then transferring the hole locations, see Fig. 17. attach fence. After drilling the holes and installing the inserts, you can attach the fence. To prevent it from dragging on the saw table, I slipped fender washers between the fence and the table, see Fig. 14b. Then I threaded a hex nut onto the stop to keep it from loosening up. Va." x 1" FENDER WASHER FENDER WASHER^ RAISES FENCE FENCE IH ABOVE SAW TABLE 1/4" HEX NUT TABLE SAW TABLE FRONT VIEW V4" X 11/2" HEX BOLT BOLT TIGHTENS AGAINST CAP SCREW TO CREATE POSITIVE "STOP" SOCKET HEAD CAP SCREW 1/4" PRESS-ON KNOB a. SIDE VIEW WASHERJ I n CHAMFER TOP AND BOTTOM -'jO EDGES . - FENCE FENCE PiECE TO FIT INSERT V_ TABLE 15/ie" DRILL 5/i6"-DIA. OVERLAPPING HOLES TO FORM SLOT DRILL 1/4"-DIA. HOLE FIRST: BUTT END OF FENCE AGAINST BLADE FRAMING SQUARE SECOND: SQUARE FENCE TO BLADE AND MARK LOCATION OF / HOLES / DRILL 3/4"-DEEP HOLE SIZED TO FIT INSERT 22 ShopNotes No. 15 |


