16 - Custonize Your Radial Arm Saw, страница 14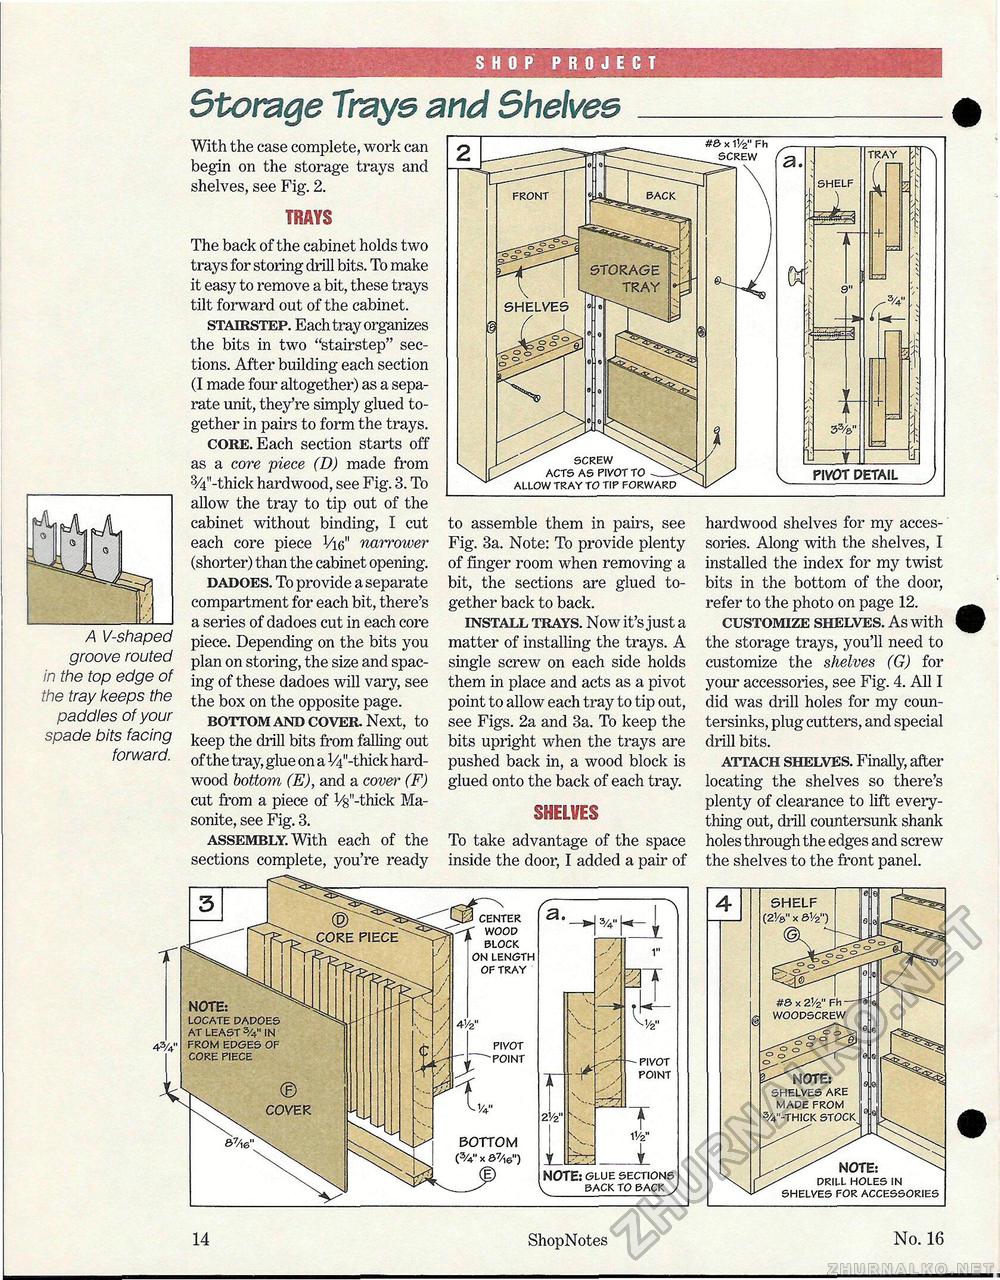
SHOP PROJECT Storage Traye and 6he\vee A V-shaped groove routed in the top edge of the tray keeps the paddles of your spade bits facing forward. With the case complete, work can begin on the storage trays and shelves, see Fig. 2. TRAYS The back of the cabinet holds two trays for storing drill bits. To make it easy to remove a bit, these trays tilt forward out of the cabinet. stairstep. Each tray organizes the bits in two "stairstep" sections. After building each section (I made four altogether) as a separate unit, they're simply glued together in pairs to form the trays. core. Each section starts off as a core piece (D) made from 3/4"-thick hardwood, see Fig. 3. To allow the tray to tip out of the cabinet without binding, I cut each core piece Vie" narrower (shorter) than the cabinet opening. dadoes. To provide a separate compartment for each bit, there's a series of dadoes cut in each core piece. Depending on the bits you plan on storing, the size and spacing of these dadoes will vary, see the box on the opposite page. bottom and cover. Next, to keep the drill bits from falling out of the tray, glue on a V4"-thick hardwood bottom (E), and a cover (F) cut from a piece of V^'-thick Ma-sonite, see Fig. 3. assembly. With each of the sections complete, you're ready to assemble them in pairs, see Fig. 3a. Note: To provide plenty of finger room when removing a bit, the sections are glued together back to back. install trays. Now it's just a matter of installing the trays. A single screw on each side holds them in place and acts as a pivot point to allow each tray to tip out, see Figs. 2a and 3a. To keep the bits upright when the trays are pushed back in, a wood block is glued onto the back of each tray. SHELVES To take advantage of the space inside the door, I added a pair of hardwood shelves for my accessories. Along with the shelves, I installed the index for my twist bits in the bottom of the door, refer to the photo on page 12. customize shelves. As with the storage trays, you'll need to customize the shelves (G) for your accessories, see Fig. 4. All I did was drill holes for my countersinks, plug cutters, and special drill bits. attach shelves. Finally, after locating the shelves so there's plenty of clearance to lift everything out, drill countersunk shank holes through the edges and screw the shelves to the front panel. NOTE: GLUE SECTIONS v SACK TO BACK J CENTER WOOD BLOCK ON LENGTH OF TRAY PIVOT POINT BOTTOM (3/4" x a7/,©") NOTE: LOCATE AT LEAST 3/4" IN FROM EDGES PIVOT POINT SHELF (2V x &V2") #& x 21/2" Fh 14 ShopNotes No. 16 |


