16 - Custonize Your Radial Arm Saw, страница 15
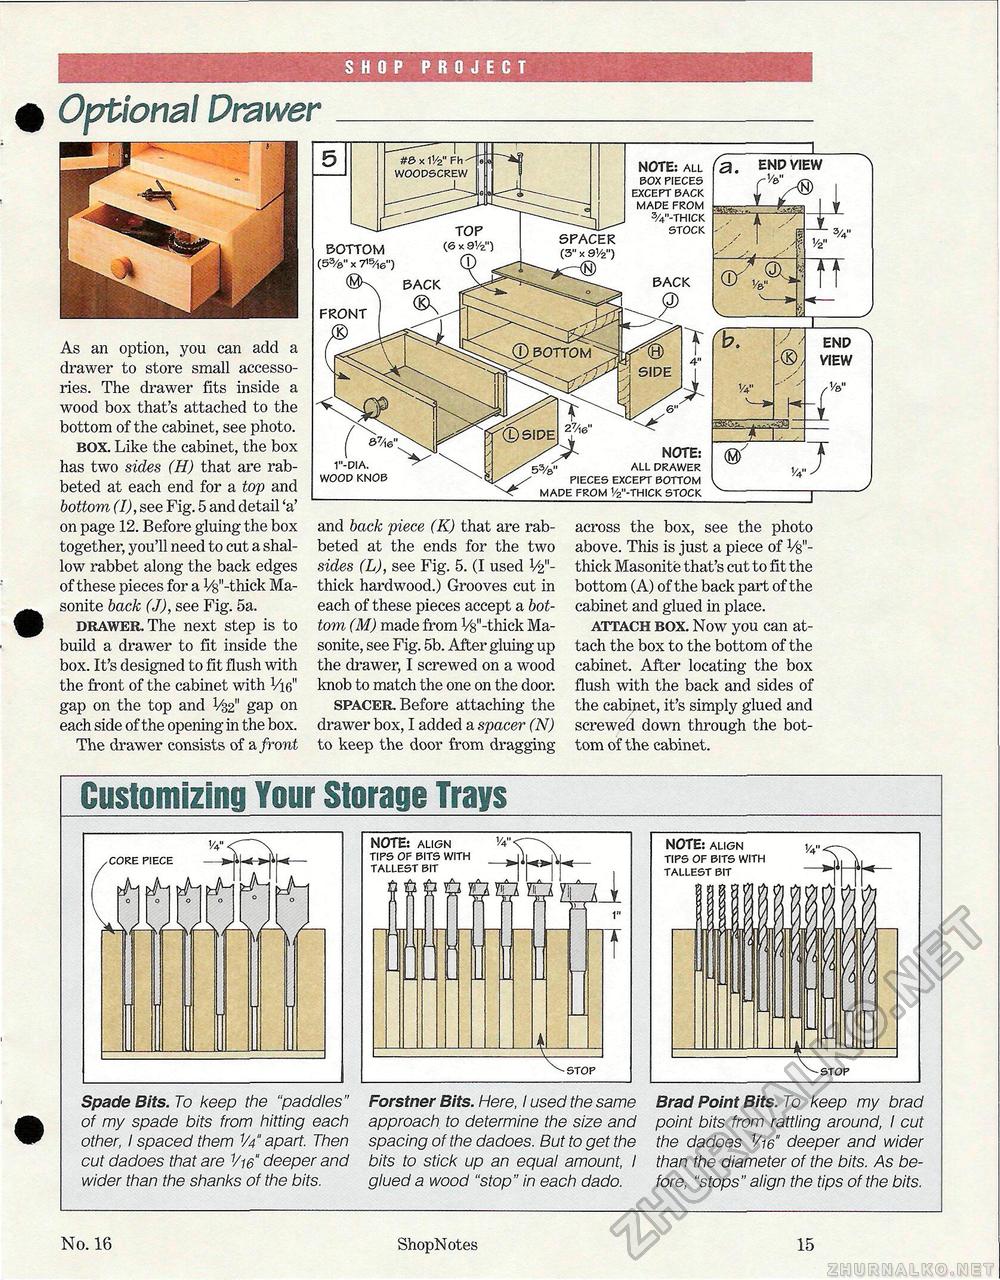
mkbb^SKBKSBKKBKKM Optional Drawer SHOP PROJECT As an option, you can add a drawer to store small accessories. The drawer fits inside a wood box that's attached to the bottom of the cabinet, see photo. box. Like the cabinet, the box has two sides (H) that are rabbeted at each end for a top and bottom (I), see Fig. 5 and detail 'a' on page 12. Before gluing the box together, you'll need to cut a shallow rabbet along the back edges of these pieces for a V^'-thick Ma-sonite back (J), see Fig. 5a. drawer. The next step is to build a drawer to fit inside the box. It's designed to fit flush with the front of the cabinet with Vie" gap on the top and V32" gap on each side of the opening in the box. The drawer consists of a front BOX pieces except back made from 3/4"-thick stock NOTE: all 3. END VIEW _-_ v2" TT b. 14" END VIEW NOTE: all drawer pieces except bottom made from v2"-thick stock (w ,7 and back piece (K) that are rabbeted at the ends for the two sides (L), see Fig. 5. (I used V2"-thick hardwood.) Grooves cut in each of these pieces accept a bottom (M) made from Vfe'-thick Ma-sonite, see Fig. 5b. After gluing up the drawer, I screwed on a wood knob to match the one on the door. spacer. Before attaching the drawer box, I added a spacer (N) to keep the door from dragging across the box, see the photo above. This is just a piece of V$"~ thick Masonite that's cut to fit the bottom (A) of the back part of the cabinet and glued in place. attach box. Now you can attach the box to the bottom of the cabinet. After locating the box flush with the back and sides of the cabinet, it's simply glued and screwed down through the bottom of the cabinet. Customizing Your Storage TraysSpade Bits. To keep the "paddles" of my spade bits from hitting each other, I spaced them V4" apart. Then cut dadoes that are Vw" deeper and wider than the shanks of the bits. NOTE: align tips of bits with tallest bit 1/4 IO 11 Js T •stop Forstner Bits. Here, I used the same approach to determine the size and spacing of the dadoes. But to get the bits to stick up an equal amount, I glued a wood "stop" in each dado. NOTE: align tips of bits with tallest bit stop Brad Point Bits. To keep my brad point bits from rattling around, I cut the dadoes Vw" deeper and wider than the diameter of the bits. /4s before, "stops" align the tips of the bits. No. 16 ShopNotes 15 |


