16 - Custonize Your Radial Arm Saw, страница 18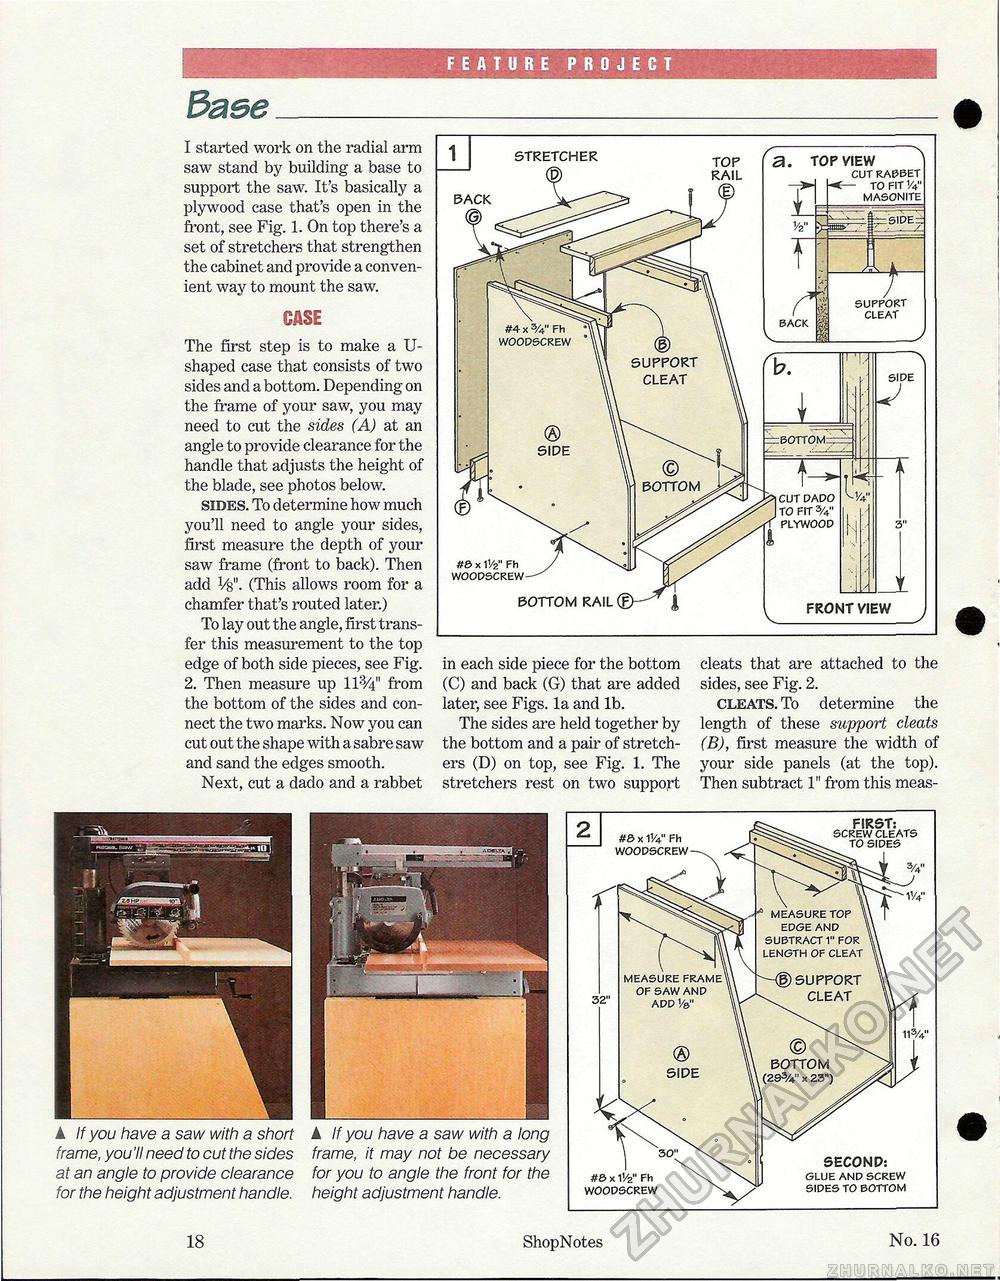
FEATURE PROJECT 3ase_ I started work on the radial arm saw stand by building a base to support the saw. It's basically a plywood case that's open in the front, see Fig. 1. On top there's a set of stretchers that strengthen the cabinet and provide a convenient way to mount the saw. case The first step is to make a U-shaped case that consists of two sides and a bottom. Depending on the frame of your saw, you may need to cut the sides (A) at an angle to provide clearance for the handle that adjusts the height of the blade, see photos below. sides. To determine how much you'll need to angle your sides, first measure the depth of your saw frame (front to back). Then add Vs". (This allows room for a chamfer that's routed later.) To lay out the angle, first transfer this measurement to the top edge of both side pieces, see Fig. 2. Then measure up 11from the bottom of the sides and connect the two marks. Now you can cut out the shape with a sabre saw and sand the edges smooth. Next, cut a dado and a rabbet in each side piece for the bottom (C) and back (G) that are added later, see Figs, la and lb. The sides are held together by the bottom and a pair of stretchers (D) on top, see Fig. 1. The stretchers rest on two support cleats that are attached to the sides, see Fig. 2. cleats. To determine the length of these support cleats (B), first measure the width of your side panels (at the top). Then subtract 1" from this meas- ▲ If you have a saw with a short frame, you'll need to cut the sides at an angle to provide clearance for the height adjustment handle. A If you have a saw with a long frame, it may not be necessary for you to angle the front for the height adjustment handle. 18 ShopNotes No. 16 II ><-inn. 1 MEASURE TOP ^ EDGE AND SUBTRACT 1" FOR LENGTH OF CLEAT MD SUPPORT ^ CLEAT BOTTOM (29ZA" x 23") #& x 11/4" Fh WOODSCREW- MEASURE FRAME < OF SAW AND ADD Va" FIRST: SCREW CLEATS TO SIDES SECOND: glue and screw sides to bottom |


