16 - Custonize Your Radial Arm Saw, страница 19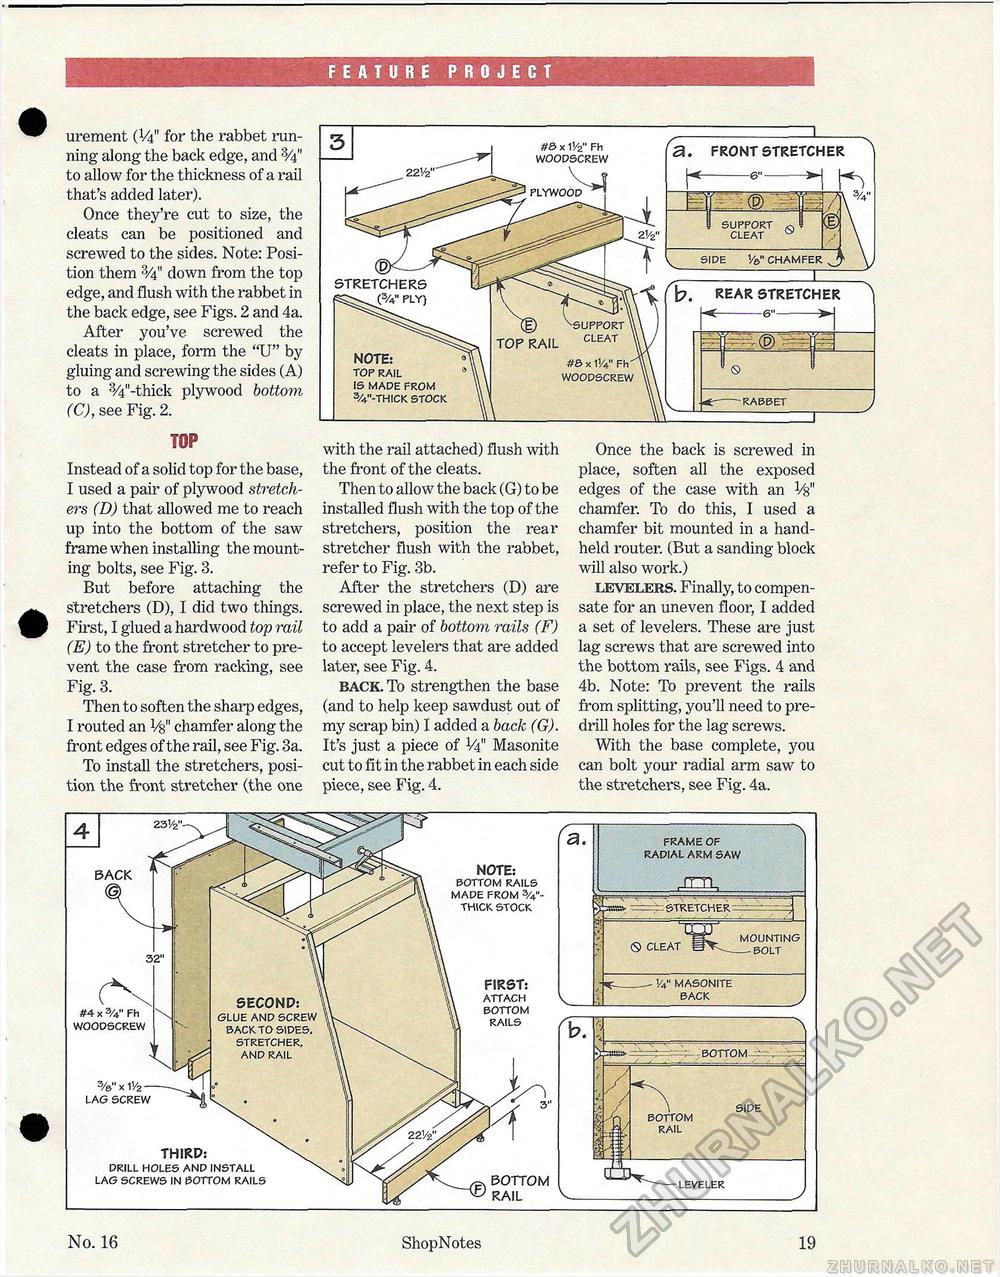
FEATURE PROJECT urement (V4" for the rabbet ran-ning along the back edge, and 'V4" to allow for the thickness of a rail that's added later). Once they're cut to size, the cleats can be positioned and screwed to the sides. Note: Position them 3/4" down from the top edge, and flush with the rabbet in the back edge, see Figs. 2 and 4a. After you've screwed the cleats in place, form the "U" by gluing and screwing the sides (A) to a 3/4H-thick plywood bottom (C), see Fig. 2. TOP Instead of a solid top for the base, I used a pair of plywood stretchers (D) that allowed me to reach up into the bottom of the saw frame when installing the mounting bolts, see Fig. 3. But before attaching the stretchers (D), I did two things. First, I glued a hardwood top rail (E) to the front stretcher to prevent the case from racking, see Fig. 3. Then to soften the sharp edges, I routed an Vg" chamfer along the front edges of the rail, see Fig. 3a. To install the stretchers, position the front stretcher (the one with the rail attached) flush with the front of the cleats. Then to allow the back (G) to be installed flush with the top of the stretchers, position the rear stretcher flush with the rabbet, refer to Fig. 3b. After the stretchers (D) are screwed in place, the next step is to add a pair of bottom rails (F) to accept levelers that are added later, see Fig. 4. back. To strengthen the base (and to help keep sawdust out of my scrap bin) 1 added a back (G). It's just a piece of ¥4" Masonite cut to fit in the rabbet in each side piece, see Fig. 4. Once the back is screwed in place, soften all the exposed edges of the case with an Vs" chamfer. To do this, I used a chamfer bit mounted in a handheld router. (But a sanding block will also work.) levelers. Finally, to compensate for an uneven floor, I added a set of levelers. These are just lag screws that are screwed into the bottom rails, see Figs. 4 and 4b. Note: To prevent the rails from splitting, you'll need to pre-drill holes for the lag screws. With the base complete, you can bolt your radial arm saw to the stretchers, see Fig. 4a. STRETCHERS (3/4" PLY) #& x 11/2" FH WOODSCREW a. FRONT STRETCHER b. REAR STRETCHER NOTE: TOP RAIL IS MADE FROM 3/4"-THICK STOCK TOP RAIL #& x 11/4" Fh WOODSCREW FRAME OF RADIAL ARM SAW 1/4" MASONITE BACK ■ •■--;; - BOTTOM—: =, - •. THIRD: DRILL HOLES AND INSTALL LAG SCREWS IN BOTTOM RAILS NOTE: BOTTOM RAILS MADE FROM %"-THICK STOCK BOTTOM RAIL BACK FIRST: ATTACH BOTTOM RAILS #4 x 3/4" Fh WOODSCREW SECOND: GLUE AND BACK TO SIDES, STRETCHER. AND RAIL No. 16 ShopNotes 19 |


