16 - Custonize Your Radial Arm Saw, страница 22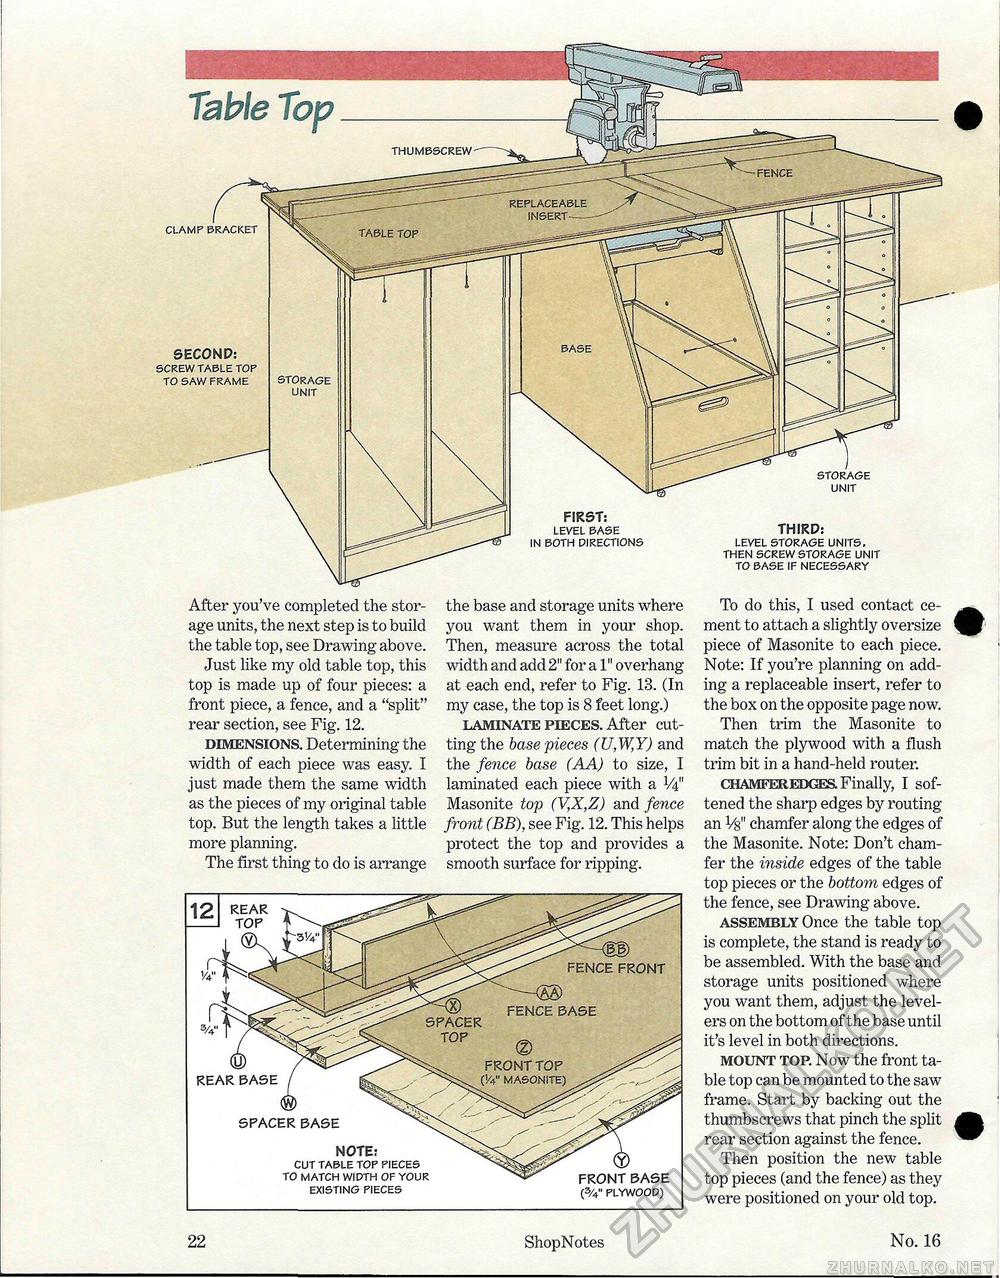
Table Top THUMBSCREW CLAMP BRACKET FIRST: LEVEL BASE IN BOTH DIRECTIONS SECOND: SCREW TABLE TOP TO SAW FRAME STORAGE UNIT THIRD: LEVEL STORAGE UNITS. THEN SCREW STORAGE UNIT TO BASE IF NECESSARY STORAGE UNIT After you've completed the storage units, the next step is to build the table top, see Drawing above. Just like my old table top, this top is made up of four pieces: a front piece, a fence, and a "split" rear section, see Fig. 12. dimensions. Determining the width of each piece was easy. I just made them the same width as the pieces of my original table top. But the length takes a little more planning. The first thing to do is arrange the base and storage units where you want them in your shop. Then, measure across the total width and add 2" for a 1" overhang at each end, refer to Fig. 13. (In my case, the top is 8 feet long.) laminate pieces. After cutting the base pieces (U,W,Y) and the fence base (AA) to size, I laminated each piece with a V4" Masonite top (V,X,Z) and fence front (BB), see Fig. 12. This helps protect the top and provides a smooth surface for ripping. To do this, I used contact cement to attach a slightly oversize piece of Masonite to each piece. Note: If you're planning on adding a replaceable insert, refer to the box on the opposite page now. Then trim the Masonite to match the plywood with a flush trim bit in a hand-held router. chamferedges. Finally, I softened the sharp edges by routing an Vs" chamfer along the edges of the Masonite. Note: Don't chamfer the inside edges of the table top pieces or the bottom edges of the fence, see Drawing above. assembly Once the table top is complete, the stand is ready to be assembled. With the base and storage units positioned where you want them, adjust the levelers on the bottom of the base until it's level in both directions. mount top. Now the front table top can be mounted to the saw frame. Start by backing out the thumbscrews that pinch the split rear section against the fence. Then position the new table top pieces (and the fence) as they were positioned on your old top. REAR BASE SPACER BASE NOTE: CUT TABLE TOP PIECES TO MATCH WIDTH OF YOUR EXISTING PIECES FRONT BASE (3/4" PLYWOOD) FENCE FRONT SPACER FENCE BASE 22 ShopNotes No. 16 |


