16 - Custonize Your Radial Arm Saw, страница 13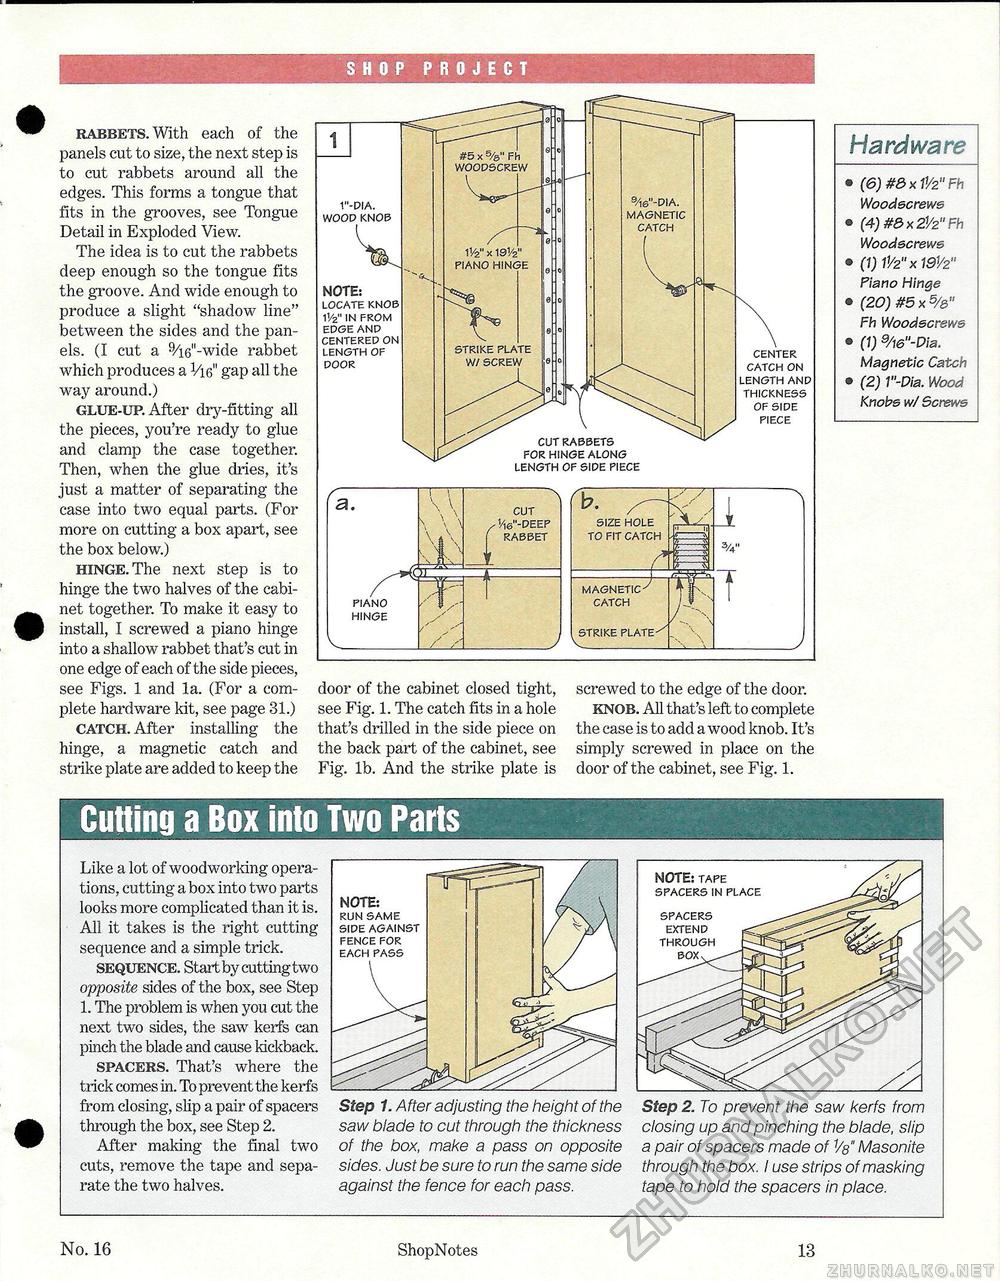
SHOP PROJECT rabbets. With each of the panels cut to size, the next step is to cut rabbets around all the edges. This forms a tongue that fits in the grooves, see Tongue Detail in Exploded View. The idea is to cut the rabbets deep enough so the tongue fits the groove. And wide enough to produce a slight "shadow line" between the sides and the panels. (I cut a 9/i6"-wide rabbet which produces a Vie" gap all the way around.) glue-up. After dry-fitting all the pieces, you're ready to glue and clamp the case together. Then, when the glue dries, it's just a matter of separating the case into two equal parts. (For more on cutting a box apart, see the box below.) hinge. The next step is to hinge the two halves of the cabinet together. To make it easy to install, I screwed a piano hinge into a shallow rabbet that's cut in one edge of each of the side pieces, see Figs. 1 and la. (For a complete hardware kit, see page 31.) catch. After installing the hinge, a magnetic catch and strike plate are added to keep the NOTE: LOCATE KNOB 11/2" IN FROM EDGE AND CENTERED ON LENGTH OF DOOR center catch on length and thickness of side piece cut rabbets for hinge along length of side piece a. v f\ \ \i \n \ PL I cut !/16"-deep rabbet piano hinge door of the cabinet closed tight, see Fig. 1. The catch fits in a hole that's drilled in the side piece on the back part of the cabinet, see Fig. lb. And the strike plate is screwed to the edge of the door. knob. All that's left to complete the case is to add a wood knob. It's simply screwed in place on the door of the cabinet, see Fig. 1. Hardware (6) #8> x 11/2" Fh Woodscrews (4) #£> x 2V2" Fh Woodscrews (1) IV2" x 19V2" Piano Hinge (20) #5 x 5/&" Fh Woodscrewe (1) 9/ie"-Pia. Magnetic Catch (2) V'-Dia. Wood Knobs w/ Screws Cutting a Box into Two PartsLike a lot of woodworking operations, cutting a box into two parts looks more complicated than it is. All it takes is the right cutting sequence and a simple trick. sequence. Start, by cutting two opposite sides of the box, see Step 1. The problem is when you cut the next two sides, the saw kerfs can pinch the blade and cause kickback. spacers. That's where the trick comes in. To prevent the kerfs from closing, slip a pair of spacers through the box, see Step 2. After making the final two cuts, remove the tape and separate the two halves. Step 1. After adjusting the height of the saw blade to cut through the thickness of the box, make a pass on opposite sides. Just be sure to run the same side against the fence for each pass. Step 2. To prevent the saw kerfs from closing up and pinching the blade, slip a pair of spacers made of Vs" Masonite through the box. I use strips of masking tape to hold the spacers in place. No. 16 ShopNotes 13 |


