16 - Custonize Your Radial Arm Saw, страница 5
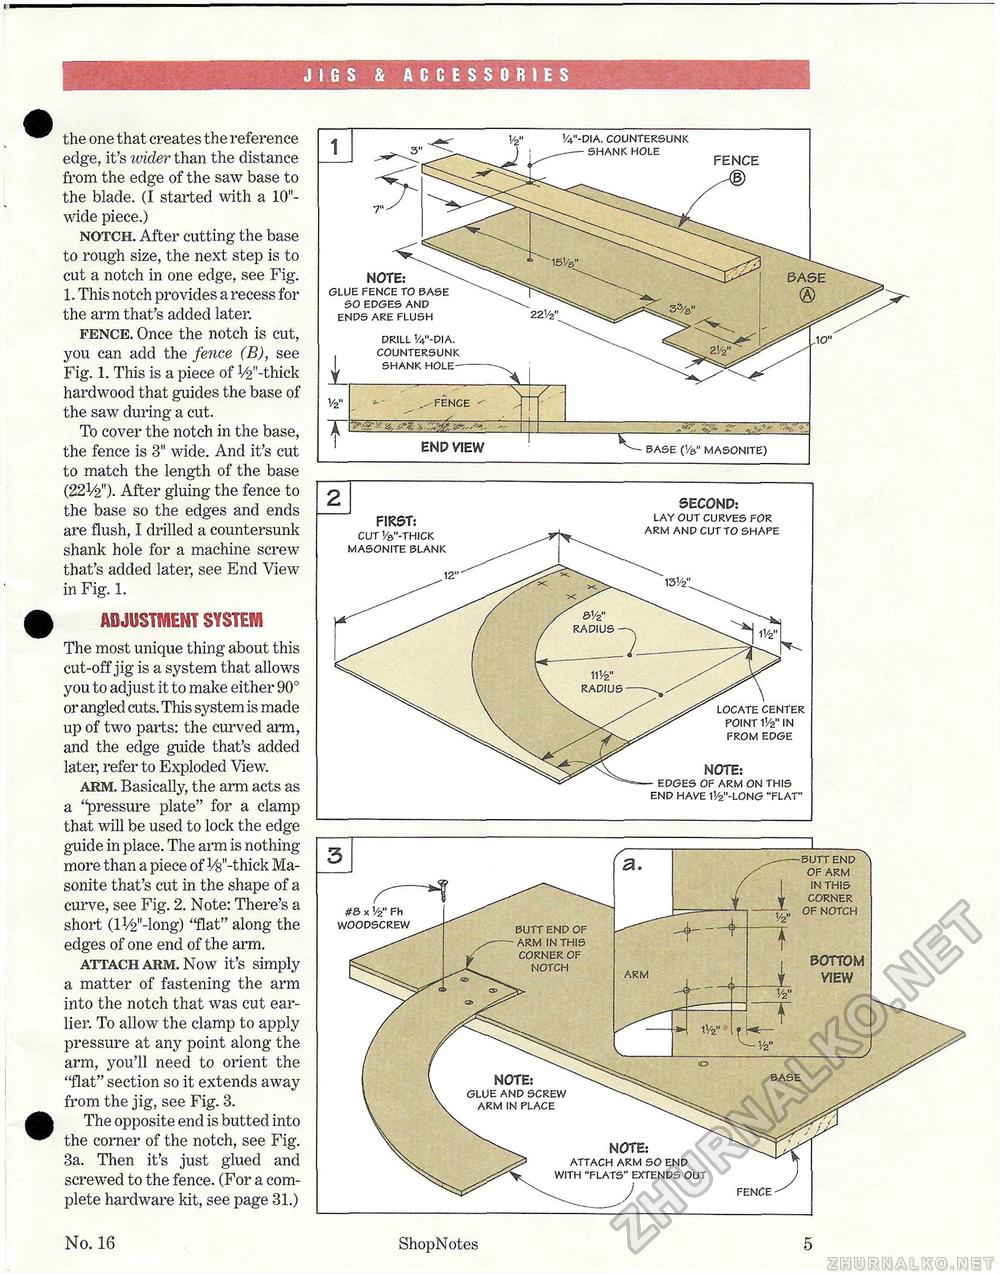
JIGS & ACCESSORIES the one that creates the reference edge, it's wider than the distance from the edge of the saw base to the blade. (I started with a 10"-wide piece.) notch. After cutting the base to rough size, the next step is to cut a notch in one edge, see Fig. 1. This notch provides a recess for the arm that's added later. fence. Once the notch is cut, you can add the fence (B), see Fig. 1. This is a piece of V2 "-thick hardwood that guides the base of the saw during a cut. To cover the notch in the base, the fence is 3" wide. And it's cut to match the length of the base (22V2"). After gluing the fence to the base so the edges and ends are flush, I drilled a countersunk shank hole for a machine screw that's added later, see End View in Fig. 1. ADJUSTMENT SYSTES1 The most unique thing about this cut-off jig is a system that allows you to adjust it to make either 90° or angled cuts. This system is made up of two parts: the curved arm, and the edge guide that's added later, refer to Exploded View. arm. Basically, the arm acts as a "pressure plate" for a clamp that will be used to lock the edge guide in place. The arm is nothing more than a piece of W-thick Ma-sonite that's cut in the shape of a curve, see Fig. 2. Note: There's a short (lV2"-long) "flat" along the edges of one end of the arm. attach arm. Now it's simply a matter of fastening the arm into the notch that was cut earlier. To allow the clamp to apply pressure at any point along the arm, you'll need to orient the "flat" section so it extends away from the jig, see Fig. 3. The opposite end is butted into the corner of the notch, see Fig. 3a. Then it's just glued and screwed to the fence. (For a complete hardware kit, see page 31.) NOTE: GLUE AND SCREW ARM IN PLACE NOTE: ATTACH ARM SO END WITH "FLATS" EXTENDS OUT FENCE BUTT END OF ARM IN THIS CORNER OF NOTCH BUTT END OF ARM IN THIS CORNER OF NOTCH BOTTOM VIEW ARM #& x V2" Fh WOODSCREW No. 16 ShopNotes 5 |


