16 - Custonize Your Radial Arm Saw, страница 6
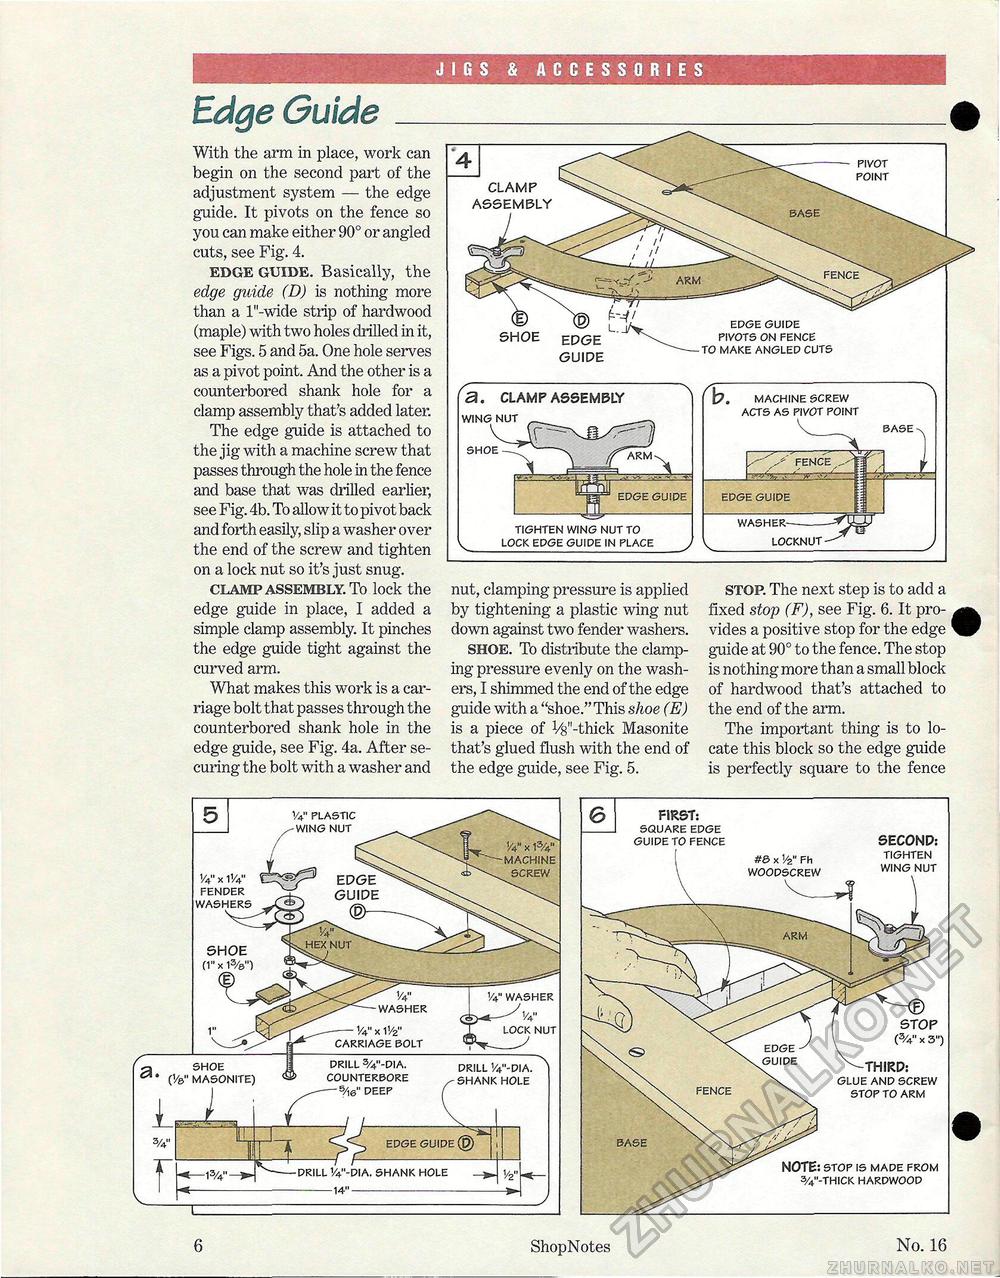
JIGS & ACCESSORIES Edge Guide With the arm in place, work can begin on the second part of the adjustment system — the edge guide. It pivots on the fence so you can make either 90° or angled cuts, see Fig. 4. edge guide. Basically, the edge guide (D) is nothing more than a l"-wide strip of hardwood (maple) with two holes drilled in it, see Figs. 5 and 5a. One hole serves as a pivot point. And the other is a counterbored shank hole for a clamp assembly that's added later. The edge guide is attached to the jig with a machine screw that passes through the hole in the fence and base that was drilled earlier, see Fig. 4b. To allow it to pivot back and forth easily, slip a washer over the end of the screw and tighten on a lock nut so it's just snug. clamp assembly. To lock the edge guide in place, I added a simple clamp assembly. It pinches the edge guide tight against the curved arm. What makes this work is a carriage bolt that passes through the counterbored shank hole in the edge guide, see Fig. 4a. After securing the bolt with a washer and nut, clamping pressure is applied by tightening a plastic wing nut down against two fender washers. shoe. To distribute the clamping pressure evenly on the washers, I shimmed the end of the edge guide with a "shoe." This shoe (E) is a piece of V^'-thick Masonite that's glued flush with the end of the edge guide, see Fig. 5. stop. The next step is to add a fixed stop (F), see Fig. 6. It pro-vides a positive stop for the edge guide at 90° to the fence. The stop is nothing more than a small block of hardwood that's attached to the end of the arm. The important thing is to locate this block so the edge guide is perfectly square to the fence SHOE EDGE GUIDE edge guide pivots on fence to make angled cuts A CLAMP ASSEMBLY pivot point edge guide tighten wing nut to lock edge guide in place shoe a. CLAMP ASSEMBLY wing nut machine screw acts as pivot point edge guide FIRST: square edge guide to fence SECOND: tighten wing nut STOP (%" x 3") THIRD: glue and screw stop to arm base NOTE: stop is made from 3/4"-thick hardwood 6 ShopNotes No. 16 |


