25 - Special Table Saw Issue, страница 20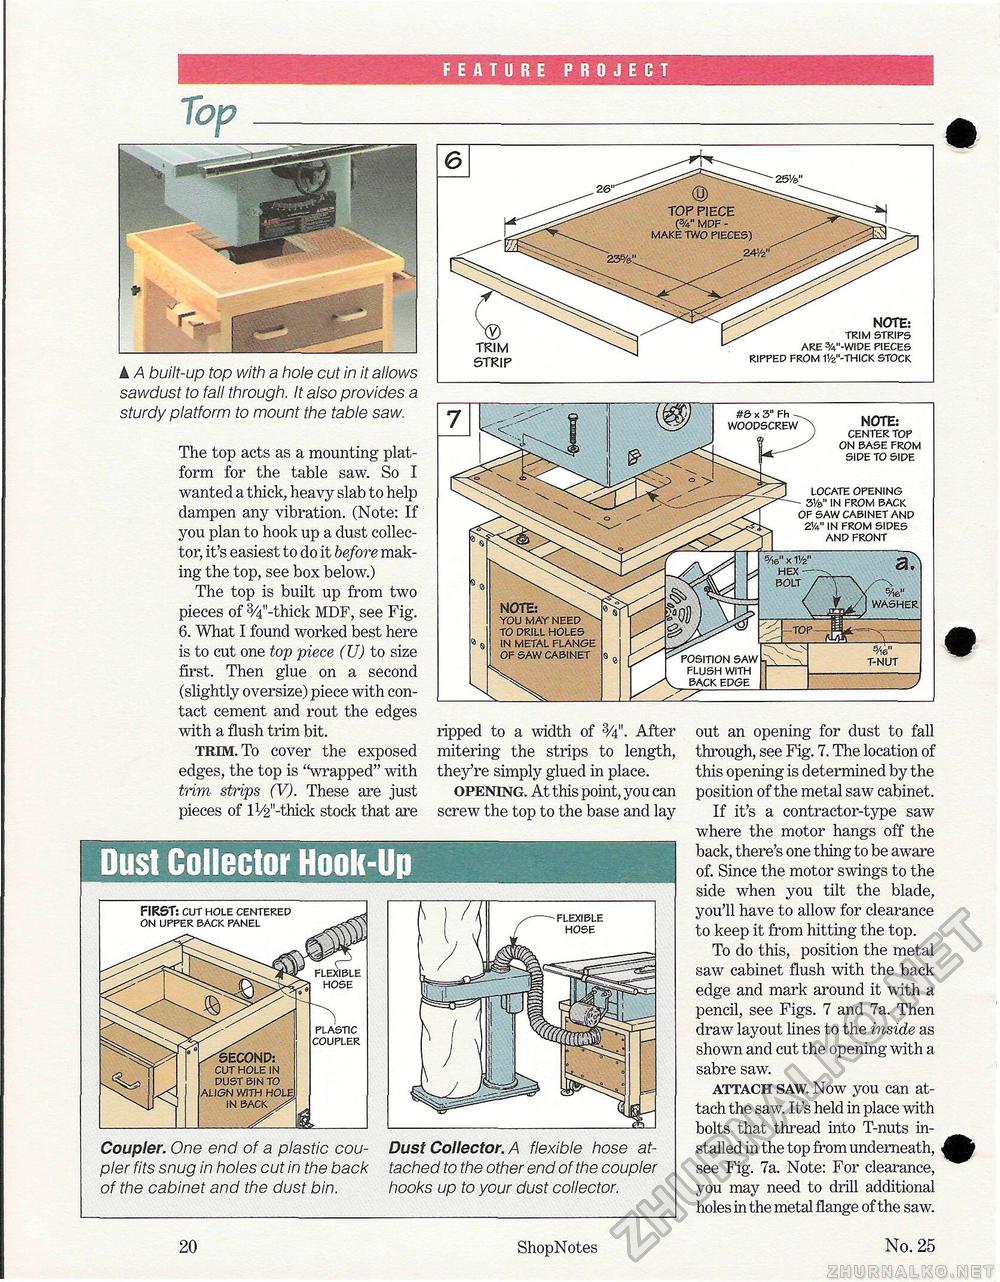
FEATURE PROJECT A A built-up top with a hole cut in it allows sawdust to fall through. It also provides a sturdy platform to mount the table saw. The top acts as a mounting platform for the table saw. So I wanted a thick, heavy slab to help dampen any vibration. (Note: If you plan to hook up a dust collector, it's easiest to do it before making the top, see box below.) The top is built up from two pieces of 3/4"-thick MDF, see Fig. 6. What I found worked best here is to cut one top piece (U) to size first. Then glue on a second (slightly oversize) piece with contact cement and rout the edges with a flush trim bit. trim. To cover the exposed edges, the top is "wrapped" with trim strips (V). These are just pieces of l1/2ll-thick stock that are trim strip NOTE: trim strips are 3/4m-wide pieces ripped from 11/2"-thick stock ripped to a width of 3/4M. After mitering the strips to length, they're simply glued in place. opening. At this point, you can screw the top to the base and lay out an opening for dust to fall through, see Fig. 7. The location of this opening is determined by the position of the metal saw cabinet. If it's a contractor-type saw where the motor hangs off the back, there's one thing to be aware of. Since the motor swings to the side when you tilt the blade, you'll have to allow for clearance to keep it from hitting the top. To do this, position the metal saw cabinet flush with the back edge and mark around it with a pencil, see Figs. 7 and 7a. Then draw layout lines to the inside as shown and cut the opening with a sabre saw. attach saw. Now you can attach the saw. It's held in place with bolts that thread into T-nuts installed in the top from underneath, see Fig. 7a. Note: For clearance, you may need to drill additional holes in the metal flange of the saw. jro x o rn WOODSCREW N, WASHER NOTE: YOU MAY NEED ^ TO DRILL HOLES IN METAL FLANGE OF SAW CABINET S/l6 x V/z" bolt POSITION SAW FLUSH WITH BACK EDGE t-nut NOTE: CENTER TOP ON BASE FROM SIDE TO SIDE LOCATE OPENING 3V&" IN FROM BACK OF SAW CABINET AND 21/4" IN FROM SIDES AND FRONT /SECOND: CUT HOLE IN DUST BIN TO ALIGN WITH HOLE IN BACK Dust Collector Hook-UpDust Collector. A flexible hose attached to the other end of the coupler hooks up to your dust collector. FIRST: cut hole centered on upper back panel plastic coupler Coupler. One end of a plastic coupler fits snug in holes cut in the back of the cabinet and the dust bin. 20 ShopNotes No. 25 |


