25 - Special Table Saw Issue, страница 4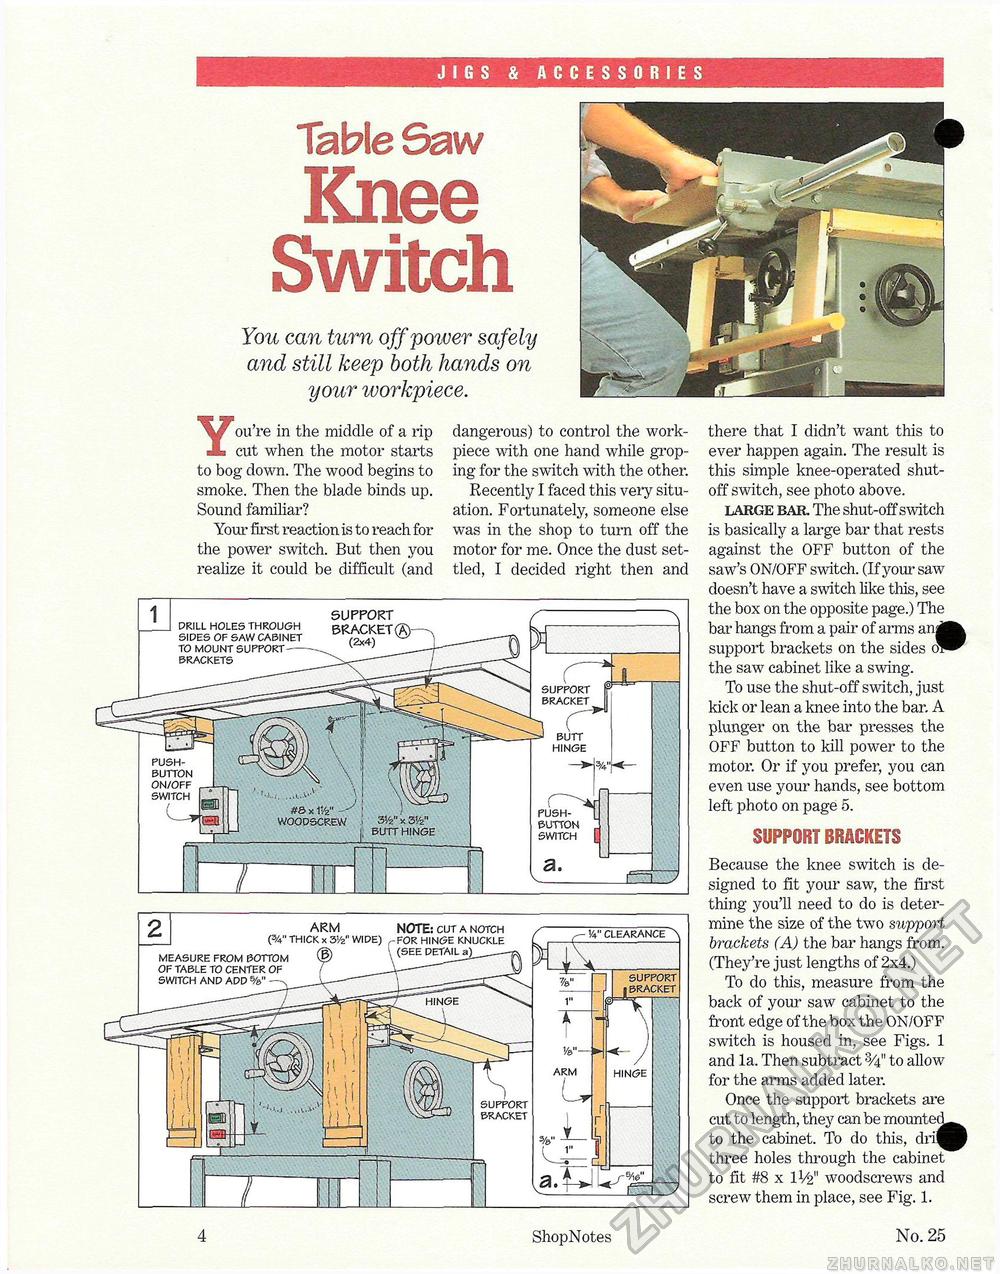
JIGS & ACCESSORIES Table Saw Knee Switchthere that I didn't want this to ever happen again. The result is this simple knee-operated shut-off switch, see photo above. large bar. The shut-off switch is basically a large bar that rests against the OFF button of the saw's ON/OFF switch. (If your saw doesn't have a switch like this, see the box on the opposite page.) The bar hangs from a pair of arms an|^ support brackets on the sides mW the saw cabinet like a swing. To use the shut-off switch, just kick or lean a knee into the bar. A plunger 011 the bar presses the OFF button to kill power to the motor. Or if you prefer, you can even use your hands, see bottom left photo on page 5. SUPPORT BRACKETS Because the knee switch is designed to fit your saw, the first thing you'll need to do is determine the size of the two support brackets (A) the bar hangs from. (They're just lengths of 2x4.) To do this, measure from the back of your saw cabinet to the front edge of the box the ON/OFF switch is housed in, see Figs. 1 and la. Then subtract 3Ai" to allow for the arms added later. Once the support brackets are cut to length, they can be mountet^^ to the cabinet. To do this, dri^B three holes through the cabinet to fit #8 x IV2" woodscrews and screw them in place, see Fig. 1. You can turn off power safely and still keep both hands on your workpiece. You're in the middle of a rip cut when the motor starts to bog down. The wood begins to smoke. Then the blade binds up. Sound familiar? Your first reaction is to reach for the power switch. But then you realize it could be difficult (and dangerous) to control the work-piece with one hand while groping for the switch with the other. Recently I faced this very situation. Fortunately, someone else was in the shop to turn off the motor for me. Once the dust settled, I decided right then and pushbutton on/off switch 1 drill holes through sides of saw cabinet to mount support brackets support bracket I butt hinge pushbutton switch support bracket^ 'a" clearance 7/„ 1 support i -bracket --1- r1 I BKfl 1" arm (%" thick x 3Vz" wide) measure from bottom of table to center of switch and add %" NOTE: cut a notch for hinge knuckle support bracket hinge Ve"-arm 4 ShopNotes No. 25 |


