25 - Special Table Saw Issue, страница 7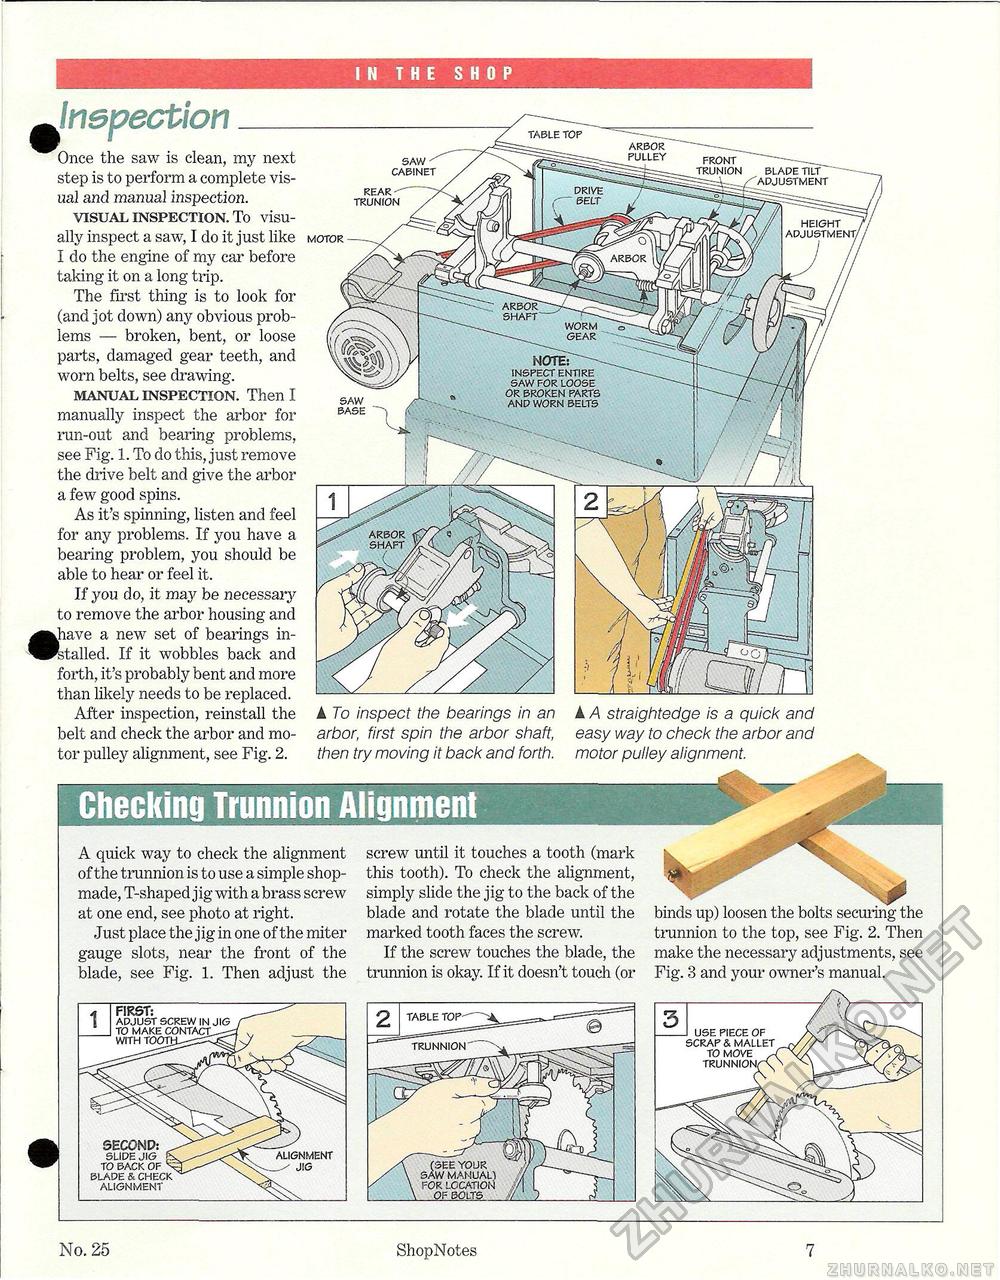
IN THE SHOP arbor pulley front - trunion blade tilt /^adjustment saw ^ cabinet drive belt rear trunion height adjustment/ arbor arbor shaft" worm gear NOTE: ^ ~ inspect entire saw for loose or broken parts and worn belts saw base arbor shaft jnepection_ Once the saw is clean, my next step is to perform a complete visual and inanual inspection. visual inspection. To visually inspect a saw, I do it just like I do the engine of my car before taking it on a long trip. The first thing is to look for (and jot down) any obvious problems — broken, bent, or loose parts, damaged gear teeth, and worn belts, see drawing. manual inspection. Then I manually inspect the arbor for run-out and bearing problems, see Fig. 1. To do this, just remove the drive belt and give the arbor a few good spins. As it's spinning, listen and feel for any problems. If you have a bearing problem, you should be able to hear or feel it. If you do, it may be necessary to remove the arbor housing and |have a new set of bearings installed. If it wobbles back and forth, it's probably bent and more than likely needs to be replaced. After inspection, reinstall the belt and check the arbor and motor pulley alignment, see Fig. 2. A To inspect the bearings in an arbor, first spin the arbor shaft, then try moving it back and forth. A A straightedge is a quick and easy way to check the arbor and motor pulley alignment. Checking Trunnion Alignment A quick way to check the alignment of the trunnion is to use a simple shop-made, T-shaped jig with a brass screw at one end, see photo at right. Just place the jig in one of the miter gauge slots, near the front of the blade, see Fig. 1. Then adjust the screw until it touches a tooth (mark this tooth). To check the alignment, simply slide the jig to the back of the blade and rotate the blade until the marked tooth faces the screw. If the screw touches the blade, the trunnion is okay. If it doesn't touch (or binds up) loosen the bolts securing the trunnion to the top, see Fig. 2. Then make the necessary adjustments, see Fig. 3 and your owner's manual. No. 25 ShopNotes 7 first: apjust screw in jig to make contact--with tooto^scgc j use piece of scrap & mallet to move alignment __^ jig trunnion second: ^ slide jig f. to back of ^ blade & check alignment |


