36 - Miter Trimmer, страница 29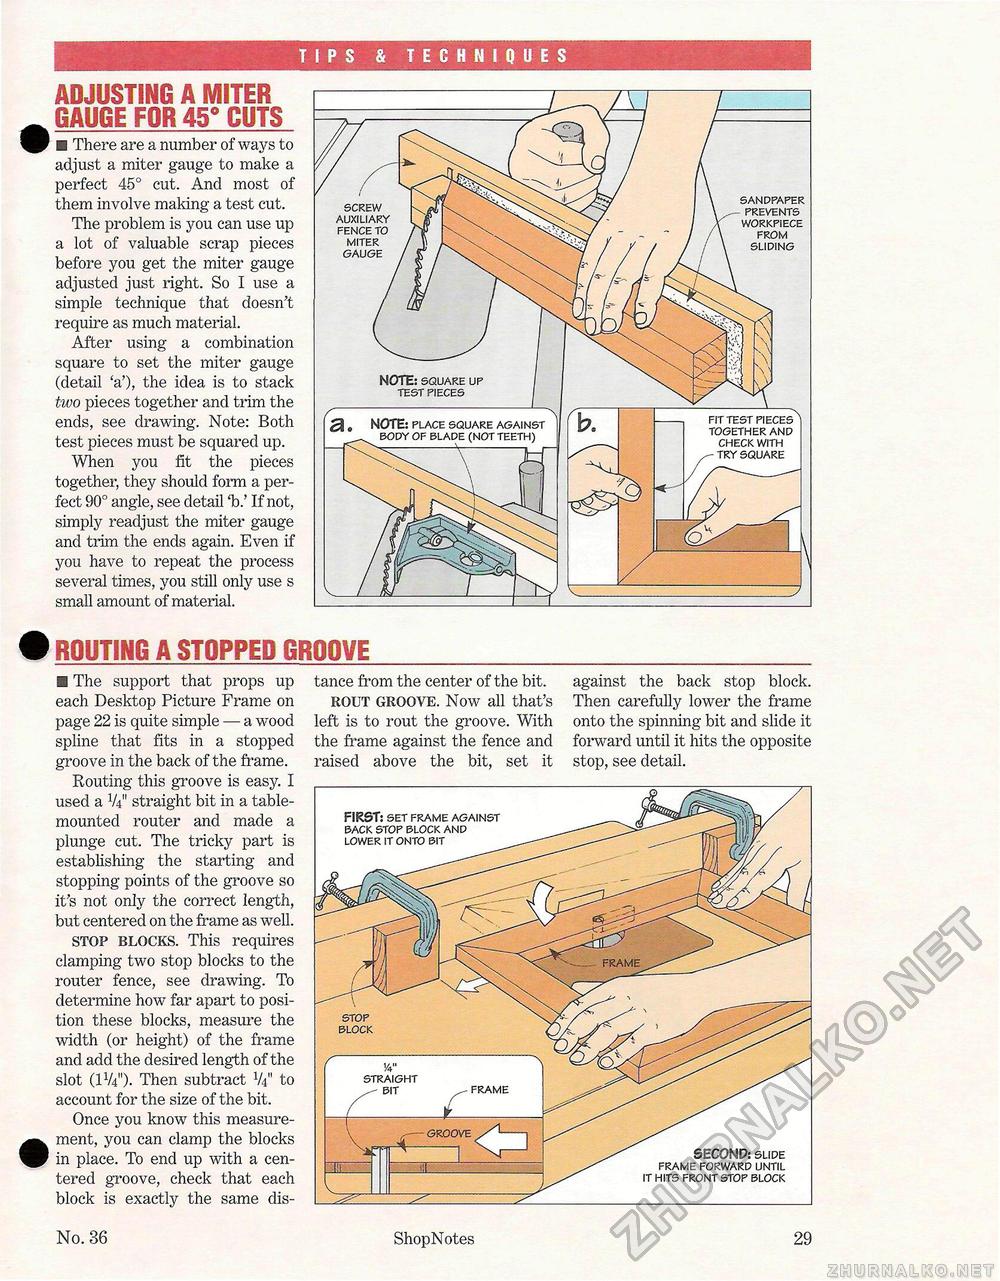
TIPS & TECHNIQUES ADJUSTING A MITER GAUGE FOR 45° CUTS m There are a number of ways to adjust a miter gauge to make a perfect 45° cut. And most of them involve making a test cut. The problem is you can use up a lot of valuable scrap pieces before you get the miter gauge adjusted just right. So I use a simple technique that doesn't require as much material. After using a combination square to set the miter gauge (detail 'a'), the idea is to stack two pieces together and trim the ends, see drawing. Note: Both test pieces must be squared up. When you fit the pieces together, they should form a perfect 90° angle, see detail 'b.' If not, simply readjust the miter gauge and trim the ends again. Even if you have to repeat the process several times, you still only use s small amount of material. ROUTING A STOPPED GROOVE ■ The support that props up tance from the center of the bit. against the back stop block, each Desktop Picture Frame on rout groove. Now all that's Then carefully lower the frame page 22 is quite simple — a wood left is to rout the groove. With onto the spinning bit and slide it spline that fits in a stopped the frame against the fence and forward until it hits the opposite groove in the back of the frame. raised above the bit, set it stop, see detail. Routing this groove is easy. I used a V4" straight bit in a table-mounted router and made a plunge cut. The tricky part is establishing the starting and stopping points of the groove so it's not only the correct length, but centered on the frame as well. stop blocks. This requires clamping two stop blocks to the router fence, see drawing. To determine how far apart to position these blocks, measure the width (or height) of the frame and add the desired length of the slot (1V4"). Then subtract V4" to account for the size of the bit. Once you know this measurement, you can clamp the blocks in place. To end up with a centered groove, check that each block is exactly the same dis- screw auxiliary fence to miter gauge sandpaper prevents workpiece from sliding NOTE: square up test pieces r e NOTE: place square against body of blade (not teeth) together and check with try square 1A" straight bit frame £ o groove FIRST: set frame against back stop block and lower it onto bit stop block SECOND: slide frame forward until it hits front stop block No. 36 ShopNotes 29 |


