38 - Ring Boxes, страница 6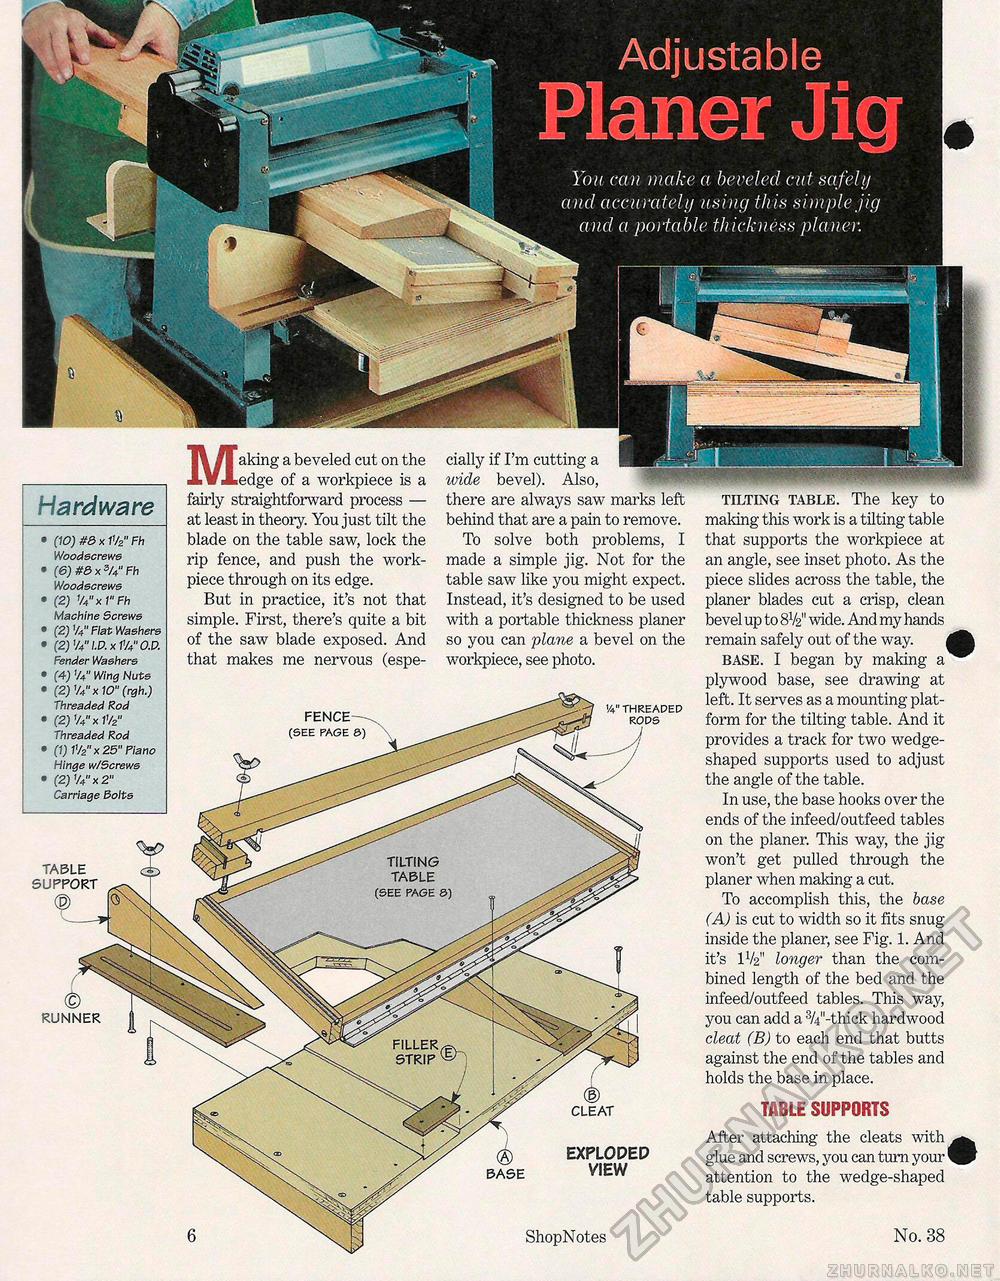
Adjustable Planer Jig You can make a beveled cut safely and accurately using this simple jig and a portable thickness planer. Hardware • (10) #e> x V/2" Fh Woodscrews • (6)#&x3/4"Fh Woodscrews • (2) %" x 1" Fh Machine Screws • (2) %" Flat Washers • (2) V4" ID. x V/4" O.D. Fender Washers • (4) %" Wing Nuts • (2) %" x 10" (rgh.) Threaded Rod • (2) 1/4"x1'/z" Threaded Rod • (1) V/2" x 25" Piano Hinge w/Screws • (2) 1U" x 2" Carriage Bolts daily if I'm cutting a ivide bevel). Also, there are always saw marks left behind that are a pain to remove. To solve both problems, I made a simple jig. Not for the table saw like you might expect. Instead, it's designed to be used with a portable thickness planer so you can plane a bevel on the workpiece, see photo. V4" THREADED RODS CLEAT tilting table. The key to making this work is a tilting table that supports the workpiece at an angle, see inset photo. As the piece slides across the table, the planer blades cut a crisp, clean bevel up to 8V2" wide. And my hands remain safely out of the way. | base. I began by making a plywood base, see drawing at left. It serves as a mounting platform for the tilting table. And it provides a track for two wedge-shaped supports used to adjust the angle of the table. In use, the base hooks over the ends of the infeed/outfeed tables 011 the planer. This way, the jig won't get pulled through the planer when making a cut. To accomplish this, the base (A) is cut to width so it fits snug inside the planer, see Fig. 1. And it's IV2" longer than the combined length of the bed and the infeed/outfeed tables. This way, you can add a 3/4M-thick hardwood cleat (B) to each end that butts against the end of the tables and holds the base in place. TABLE SUPPORTSAfter attaching the cleats with ^^ glue and screws, you can turn your attention to the wedge-shaped table supports. No. 38 RUNNER Making a beveled cut on the edge of a workpiece is a fairly straightforward process — at least in theory. You just tilt the blade on the table saw, lock the rip fence, and push the work-piece through on its edge. But in practice, it's not that simple. First, there's quite a bit of the saw blade exposed. And that makes me nervous (espe- FENCE (SEE PAGE &) EXPLODED VIEW 6 ShopNotes |


