38 - Ring Boxes, страница 8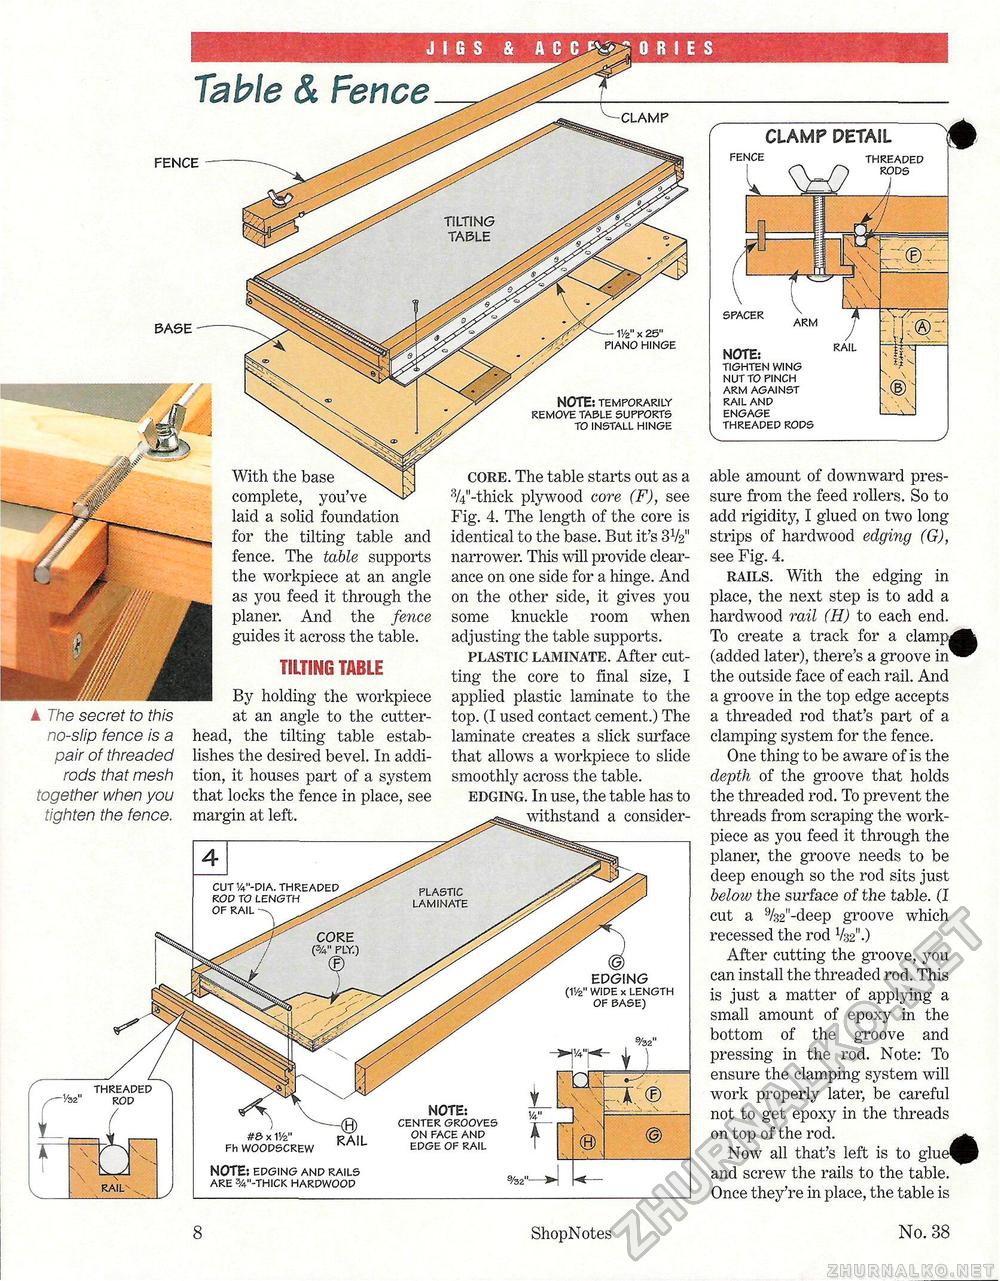
JIGS & ACCESSORIES '--CLAMP CLAMP DETAIL THREADED RODS TILTING TABLE — V/z" x 25" PIANO HINGE NOTE: TIGHTEN WING NUT TO PINCH ARM AGAINST RAIL AND ENGAGE THREADED RODS NOTE: TEMPORARILY REMOVE TABLE SUPPORTS TO INSTALL HINGE able amount of downward pressure from the feed rollers. So to add rigidity, I glued on two long strips of hardwood edging (G), see Fig. 4. rails. With the edging in place, the next step is to add a hardwood rail (H) to each end. To create a track for a clampj (added later), there's a groove in the outside face of each rail. And a groove in the top edge accepts a threaded rod that's part of a clamping system for the fence. One thing to be aware of is the depth of the groove that holds the threaded rod. To prevent the threads from scraping the work-piece as you feed it through the planer, the groove needs to be deep enough so the rod sits just below the surface of the table. (I cut a %2"-deep groove which recessed the rod V32".) After cutting the groove, you can install the threaded rod. This is just a matter of applying a small amount of epoxy in the bottom of the groove and pressing in the rod. Note: To ensure the clamping system will work properly later, be careful not to get epoxy in the threads on top of the rod. Now all that's left is to glue' and screw the rails to the table. Once they're in place, the table is With the base \j complete, you've ^^ laid a solid foundation ^ for the tilting table and fence. The table supports the workpiece at an angle ■ as you feed it through the planer. And the fence guides it across the table. TILTING TABLEBy holding the workpiece at an angle to the cutter-head, the tilting table establishes the desired bevel. In addition, it houses part of a system that locks the fence in place, see margin at left. core. The table starts out as a %"-thick plywood core (F), see Fig. 4. The length of the core is identical to the base. But it's 3V2" narrower. This will provide clearance on one side for a hinge. And on the other side, it gives you some knuckle room when adjusting the table supports. plastic laminate. After cutting the core to final size, I applied plastic laminate to the top. (I used contact cement.) The laminate creates a slick surface that allows a workpiece to slide smoothly across the table. edging. In use, the table has to -eg^ withstand a consider- A The secret to this no-slip fence is a pair of threaded rods that mesh together when you tighten the fence. CUT V-DIA. THREADED ROD TO LENGTH OF RAIL -v PLASTIC LAMINATE EDGING (V/2" WIDE x LENGTH OF BASE) THREADED ROD #3 x V/z" Fh WOODSCREW NOTE: EDGING AND RAILS ARE %"-THICK HARDWOOD 8 ShopNotes No. 38 |


