38 - Ring Boxes, страница 9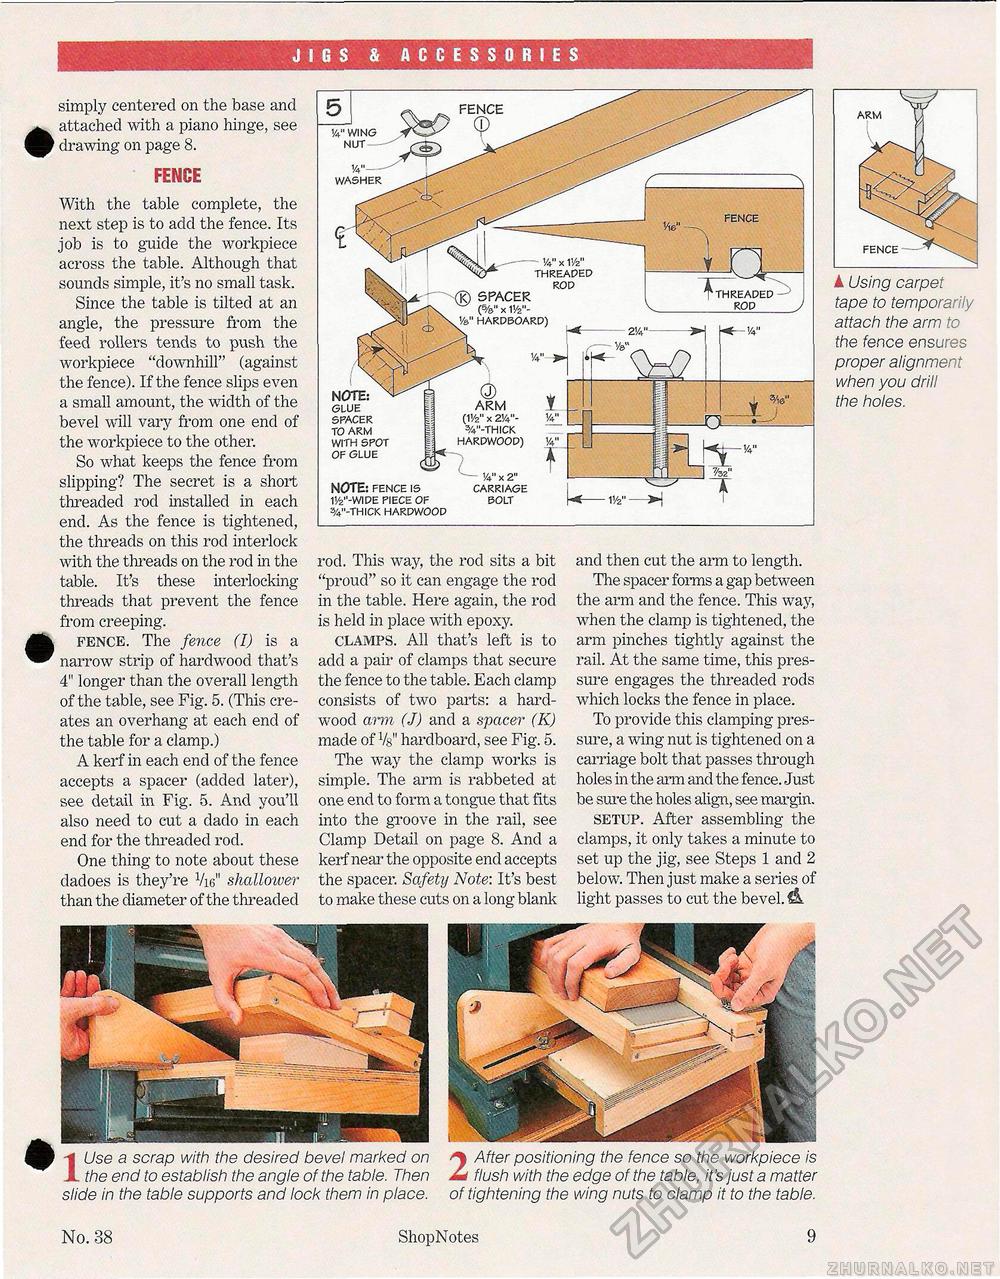
JIGS & ACCESSORIES simply centered on the base and attached with a piano hinge, see drawing on page 8. FENCEWith the table complete, the next step is to add the fence. Its job is to guide the workpiece across the table. Although that sounds simple, it's no small task. Since the table is tilted at an angle, the pressure from the feed rollers tends to push the workpiece "downhill" (against the fence). If the fence slips even a small amount, the width of the bevel will vary from one end of the workpiece to the other. So what keeps the fence from slipping? The secret is a. short threaded rod installed in each end. As the fence is tightened, the threads on this rod interlock with the threads on the rod in the table. It's these interlocking threads that prevent the fence from creeping. i fence. The fence (I) is a narrow strip of hardwood that's 4" longer than the overall length of the table, see Fig. 5. (This creates an overhang at each end of the table for a clamp.) A kerf in each end of the fence accepts a spacer (added later), see detail in Fig. 5. And you'll also need to cut a dado in each end for the threaded rod. One thing to note about these dadoes is they're Vic" shallower than the diameter of the threaded rod. This way, the rod sits a bit "proud" so it can engage the rod in the table. Here again, the rod is held in place with epoxy. clamps. All that's left is to add a pair of clamps that secure the fence to the table. Each clamp consists of two parts: a hardwood arm (J) and a spacer (K) made of Vg" hardboard, see Fig. 5. The way the clamp works is simple. The arm is rabbeted at one end to form a tongue that fits into the groove in the rail, see Clamp Detail on page 8. And a kerf near the opposite end accepts the spacer. Safety Note: It's best to make these cuts on a long blank and then cut the arm to length. The spacer forms a gap between the arm and the fence. This way, when the clamp is tightened, the arm pinches tightly against the rail. At the same time, this pressure engages the threaded rods which locks the fence in place. To provide this clamping pressure, a wing nut is tightened on a carriage bolt that passes through holes in the arm and the fence. Just be sure the holes align, see margin. setup. After assembling the clamps, it only takes a minute to set up the jig, see Steps 1 and 2 below. Then just make a series of light passes to cut the bevel. A Using carpet tape to temporarily attach the arm to the fence ensures proper alignment when you drill the holes. IUse a scrap with the desired bevel marked on the end to establish the angle of the table. Then slide in the table supports and lock them in place. 2 After positioning the fence so the workpiece is flush with the edge of the table, it's just a matter of tightening the wing nuts to clamp it to the table. 1/4" WING NUT WASHER ------ V4"x 1V2" ^O*- THREADED ROD SPACER (%" x V/z"-Va" HARDBOARD) FENCE THREADED ROD K- w NOTE: GLUE SPACER TO ARM WITH SPOT OF GLUE NOTE: FENCE IS 11/2"-WIDE PIECE OF -THICK HARDWOOD 1/4" x 2" CARRIAGE BOLT U- V/z" - (11/2" x 2V4"-3/4"-THICK HARDWOOD) ARM No. 38 ShopNotes 9 |


