44 - Grinding Station, страница 8
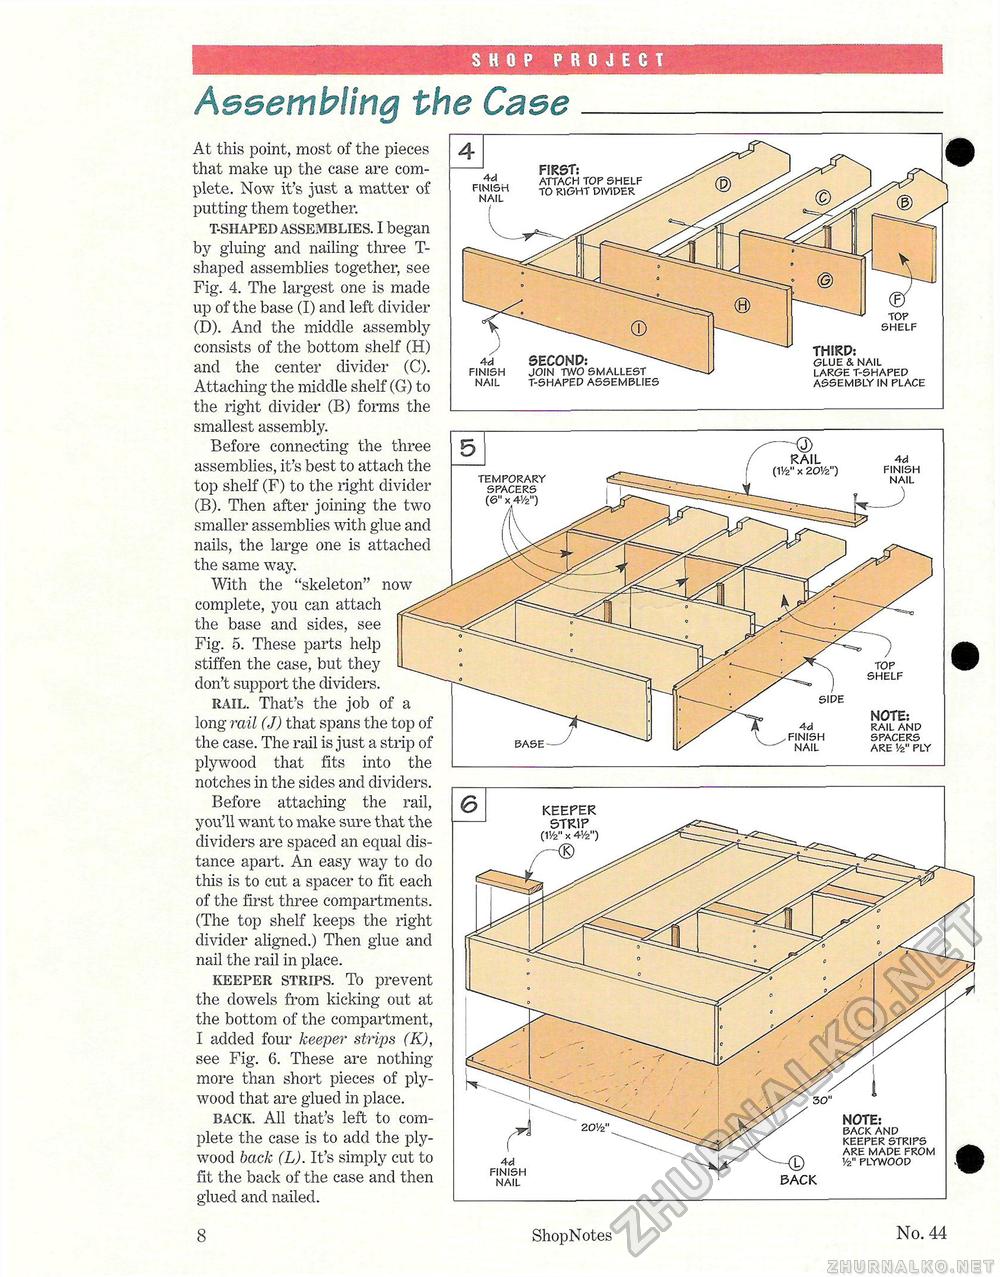
SHOP PROJECT Assembling the Case At this point, most of the pieces that make up the case are complete. Now it's just a matter of putting them together. t-shaped assemblies. I began by gluing and nailing three T-shaped assemblies together, see Fig. 4. The largest one is made up of the base (I) and left divider (D). And the middle assembly consists of the bottom shelf (H) and the center divider (C). Attaching the middle shelf (G) to the right divider (B) forms the smallest assembly. Before connecting the three assemblies, it's best to attach the top shelf (F) to the right divider (B). Then after joining the two smaller assemblies with glue and nails, the large one is attached the same way. With the "skeleton" now complete, you can attach the base and sides, see Fig. 5. These parts help stiffen the case, but they don't support the dividers. rail. That's the job of a long rail (J) that spans the top of the case. The rail is just a strip of plywood that fits into the notches in the sides and dividers. Before attaching the rail, you'll want to make sure that the dividers are spaced an equal distance apart. An easy way to do this is to cut a spacer to fit each of the first three compartments. (The top shelf keeps the right divider aligned.) Then glue and nail the rail in place. keeper strips. To prevent the dowels from kicking out at the bottom of the compartment, I added four keeper strips (K), see Fig. 6. These are nothing-more than short pieces of plywood that are glued in place. back. All that's left to complete the case is to add the plywood back (L). It's simply cut to fit the back of the case and then glued and nailed. TEMPORARY SPACERS (6" x AVz") TOP SHELF SIDE NOTE: Ad RAIL AND FINISH SPACERS NAIL ARE Vz" PLY ShopNotes No. 44 4 d FINISH JOIN TWO SMALLEST NAIL T-SHAPED ASSEMBLIES TOP SHELF THIRD: GLUE & NAIL LARGE T-SHAPED ASSEMBLY IN PLACE Ad FINISH NAIL FIRST: ATTACH TOP SHELF TO RIGHT DIVIDER Ad FINISH NAIL 2 OVz" BACK NOTE: BACK AND KEEPER STRIPS ARE MADE FROM 1/2" PLYWOOD |


