44 - Grinding Station, страница 9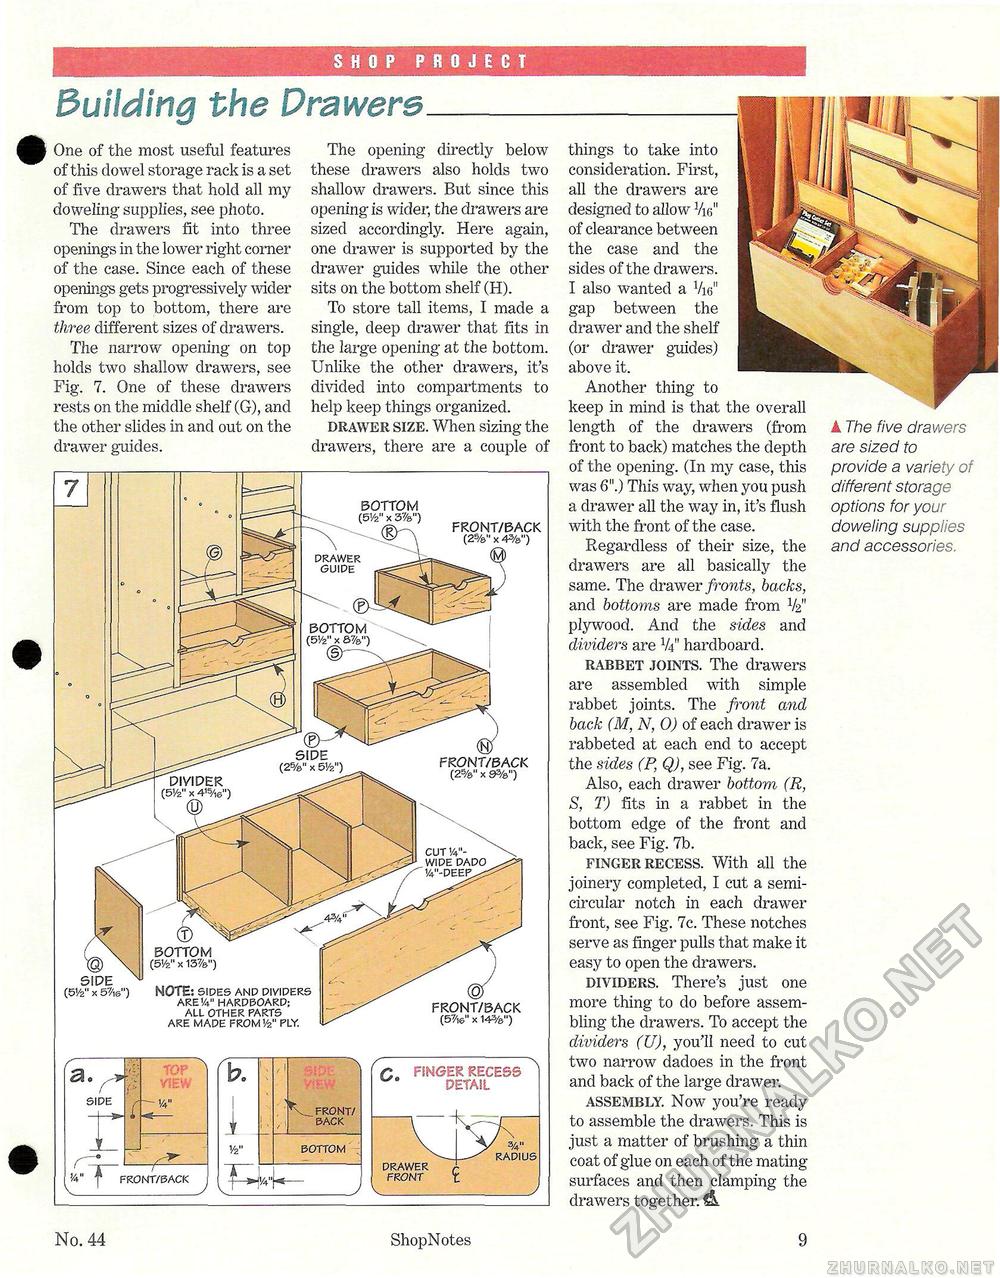
SHOP PROJECT Building the Drawers One of the most useful features of this dowel storage rack is a set of five drawers that hold all my doweling supplies, see photo. The drawers fit into three openings in the lower right corner of the case. Since each of these openings gets progressively wider from top to bottom, there are three different sizes of drawers. The narrow opening on top holds two shallow drawers, see Fig. 7. One of these drawers rests on the middle shelf (G), and the other slides in and out on the drawer guides. The opening directly below these drawers also holds two shallow drawers. But since this opening* is wider, the drawers are sized accordingly. Here again, one drawer is supported by the drawer guides while the other sits on the bottom shelf (H). To store tall items, I made a single, deep drawer that fits in the large opening at the bottom. Unlike the other drawers, it's divided into compartments to help keep things organized. drawer size. When sizing the drawers, there are a couple of things to take into consideration. First, all the drawers are designed to allow Vie" of clearance between the case and the sides of the drawers. I also wanted a Vie" gap between the drawer and the shelf (or drawer guides) above it. Another thing to keep in mind is that length of the drawers (from front to back) matches the depth of the opening. (In my case, this was 6".) This way, when you push a drawer all the way in, it's flush with the front of the case. Regardless of their size, the drawers are all basically the same. The drawer fronts, backs, and bottoms are made from V2" plywood. And the sides and dividers are V4" hardboard. rabbet joints. The drawers are assembled "with simple rabbet joints. The front and back (M, N, 0) of each drawer is rabbeted at each end to accept the sides (P,Q), see Fig. 7a. Also, each drawer bottom (R, S, T) fits in a rabbet in the bottom edge of the front and back, see Fig. 7b. finger recess. With all the joinery completed, I cut a semicircular notch in each drawer front, see Fig. 7c. These notches serve as finger pulls that make it easy to open the drawers. dividers. There's just one more thing to do before assembling the drawers. To accept the dividers (U), you'll need to cut two narrow dadoes in the front and back of the large drawer. assembly. Now you're ready to assemble the drawers. This is just a matter of brushing a thin coat of glue on each of the mating surfaces and then clamping the drawers together. d k The five drawers are sized to provide a variety of different storage options for your doweling supplies and accessories. No. 44 ShopNotes 9 |


