44 - Grinding Station, страница 11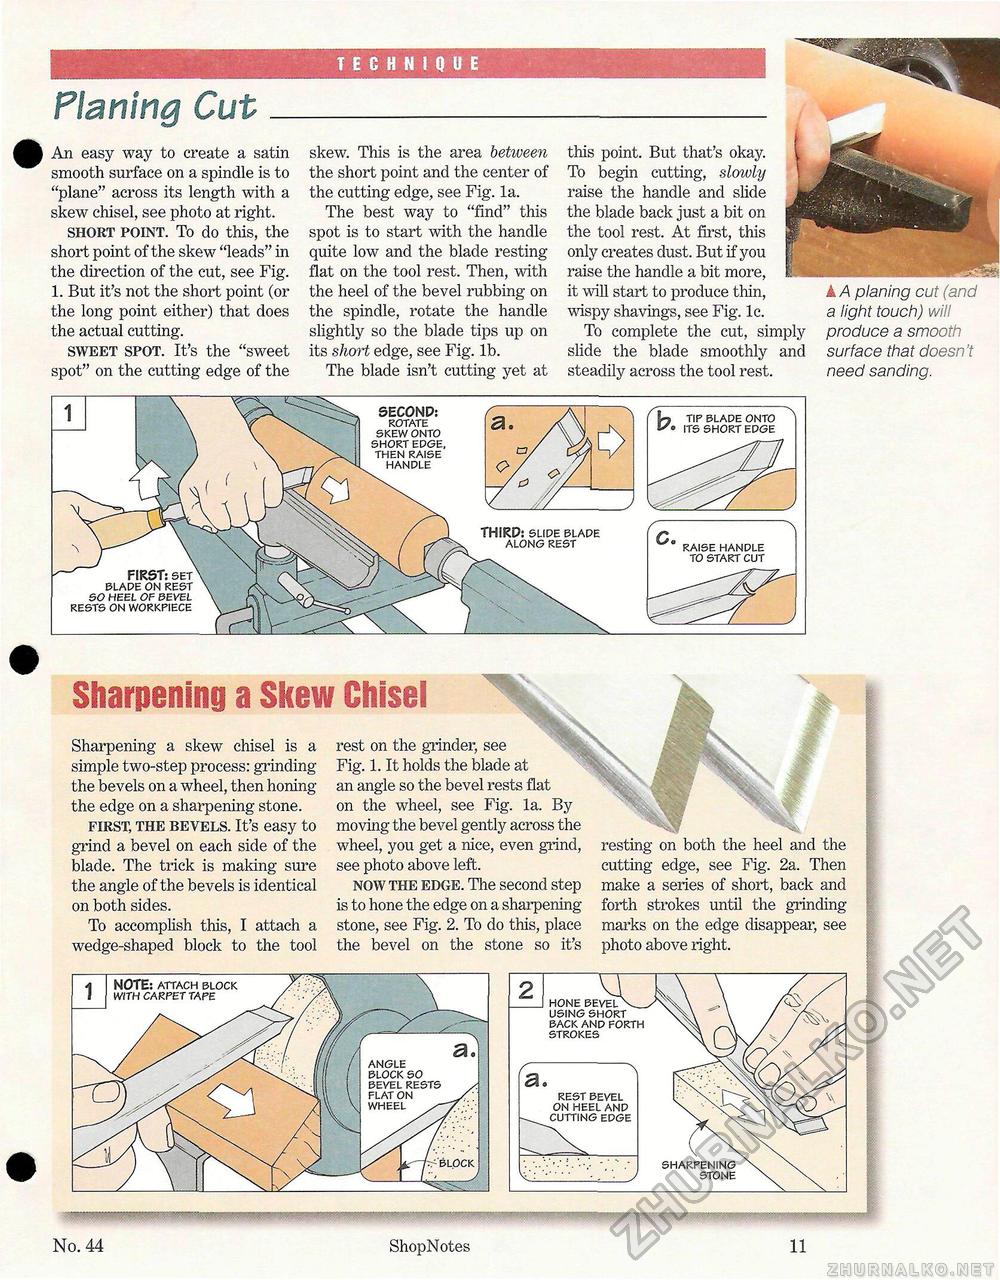
TECHNIQUE Planing CutAn easy way to create a satin smooth surface on a spindle is to "plane" across its length with a skew chisel, see photo at right. short point. To do this, the short point of the skew "leads" in the direction of the cut, see Fig. 1. But it's not the short point (or the long point either) that does the actual cutting. sweet spot. It's the "sweet spot" on the cutting edge of the skew. This is the area between the short point and the center of the cutting edge, see Fig. la. The best way to "find" this spot is to start with the handle quite low and the blade resting flat on the tool rest. Then, with the heel of the bevel rubbing on the spindle, rotate the handle slightly so the blade tips up on its short edge, see Fig. lb. The blade isn't cutting yet at this point. But that's okay. To begin cutting, slowly raise the handle and slide the blade back just a bit on the tool rest. At first, this only creates dust. But if you raise the handle a bit more, it will start to produce thin, wispy shavings, see Fig. lc. To complete the cut, simply slide the blade smoothly and steadily across the tool rest. A A planing cut (and a light touch) will produce a smooth surface that doesn't need sanding. THIRD: slipe blade along rest bla eo heel of bevel rests on workpiece SECOND: rotate skew onto short epge, then raise hanple Sharpening a Skew Chisel Sharpening a skew chisel is a simple two-step process: grinding the bevels on a wheel, then honing the edge on a sharpening stone. first, the bevels. It's easy to grind a bevel on each side of the blade. The trick is making sure the angle of the bevels is identical on both sides. To accomplish this, I attach a wedge-shaped block to the tool using short back anp forth strokes rest on the grinder, see Fig. 1. It holds the blade at an angle so the bevel rests flat on the wheel, see Fig. la. By moving the bevel gently across the wheel, you get a nice, even grind, see photo above left. now the edge. The second step is to hone the edge on a sharpening stone, see Fig. 2. To do this, place the bevel on the stone so it's rest bevel on heel anp epge sharpening stone resting on both the heel and the cutting edge, see Fig. 2a. Then make a series of short, back and forth strokes until the grinding marks on the edge disappear, see photo above right. No. 44 ShopNotes 11 |


