44 - Grinding Station, страница 13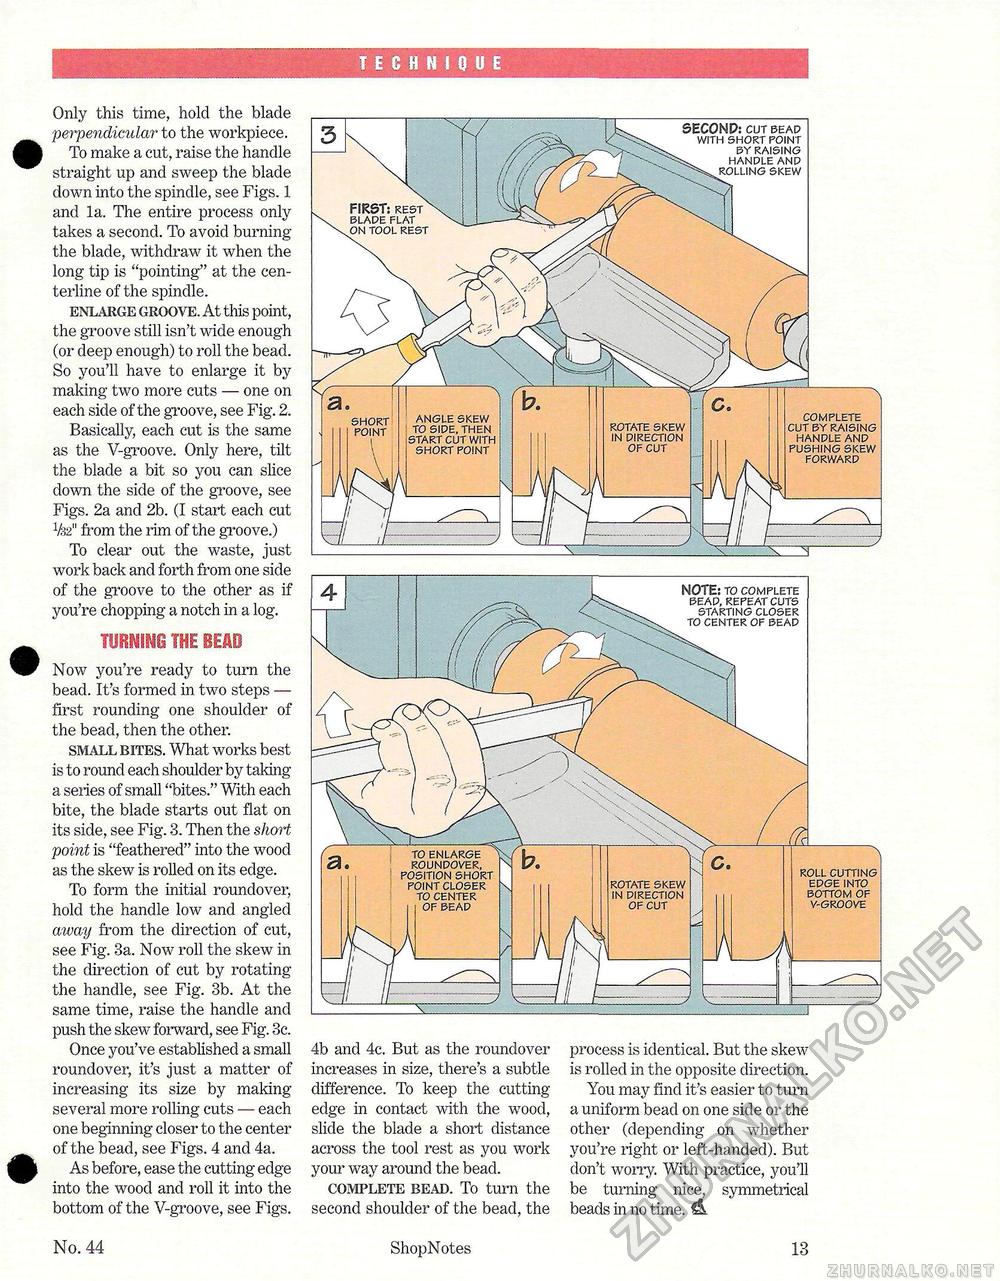
TECHNIQUE Only this time, hold the blade perpendicular to the workpiece. To make a cut, raise the handle straight up and sweep the blade down into the spindle, see Figs. 1 and la. The entire process only takes a second. To avoid burning the blade, withdraw it when the long tip is "pointing" at the centerline of the spindle. enlarge groove. At this point, the groove still isn't wide enough (or deep enough) to roll the bead. So you'll have to enlarge it by making two more cuts — one on each side of the groove, see Fig. 2. Basically, each cut is the same as the V-groove. Only here, tilt the blade a bit so you can slice down the side of the groove, see Figs. 2a and 2b. (I start each cut lk2" from the rim of the groove.) To clear out the waste, just work back and forth from one side of the groove to the other as if you're chopping a notch in a log. mmm the bead Now you're ready to turn the bead. It's formed in two steps — first rounding one shoulder of the bead, then the other. small bites. What works best is to round each shoulder by taking a series of small "bites." With each bite, the blade starts out flat on its side, see Fig. 3. Then the short point is "feathered" into the wood as the skew is rolled on its edge. To form the initial roundover, hold the handle low and angled away from the direction of cut, see Fig. 3a. Now roll the skew in the direction of cut by rotating the handle, see Fig. 3b. At the same time, raise the handle and push the skew forward, see Fig. 3c. Once you've established a small roundover, it's just a matter of increasing its size by making several more rolling cuts — each one beginning closer to the center of the bead, see Figs. 4 and 4a. As before, ease the cutting edge into the wood and roll it into the bottom of the V-groove, see Figs. SECOND: cut bead with short point by raising handle and rolling skew FIRST: rest blade flat on tool rest complete cut by raising handle and pushing skew forward angle skew to side, then start cut with short point short point rotate skew in direction of cut roll cutting edge into bottom of v-groove NOTE: to complete bead, repeat cuts starting closer to center of bead 4b and 4c. But as the roundover increases in size, there's a subtle difference. To keep the cutting-edge in contact with the wood, slide the blade a short distance across the tool rest as you work your way around the bead. complete bead. To turn the second shoulder of the bead, the process is identical. But the skew is rolled in the opposite direction. You may find it's easier to turn a uniform bead on one side or the other (depending on whether you're right or left-handed). But don't worry. With practice, you'll be turning nice, symmetrical beads in no time. & No. 44 ShopNotes 13 |


