49 - Cabinet Maker's Tool Chest, страница 19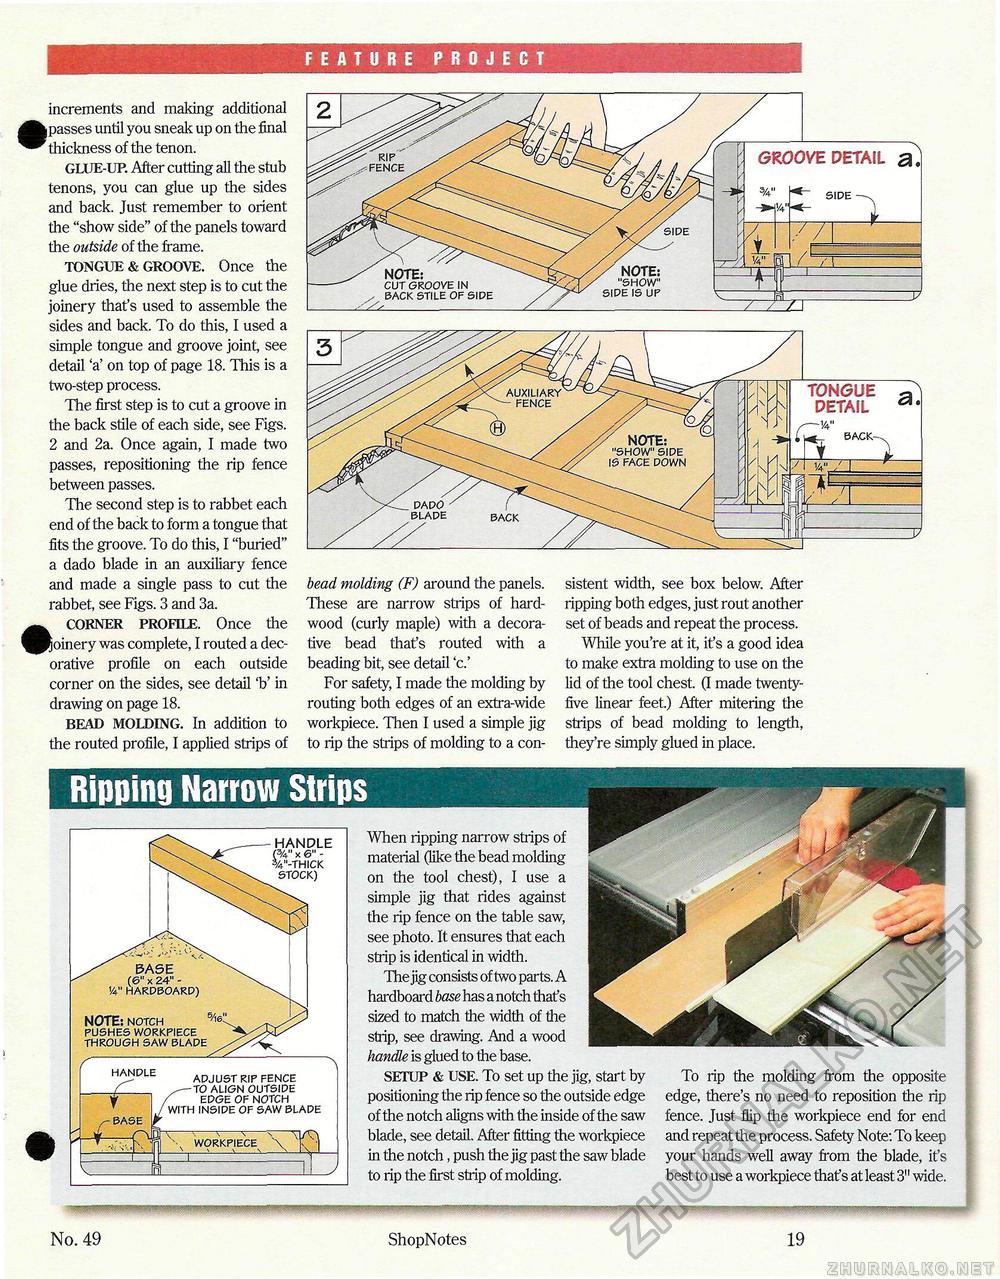
FEATURE PROJECT increments and making additional | passes until you sneak up on the final thickness of the tenon. GLUE-UP. After cutting all the stub tenons, you can glue up the sides and back. Just remember to orient the "show side" of the panels toward the outside of the frame. TONGUE & GROOVE. Once the glue dries, the next step is to cut the joinery that's used to assemble the sides and back. To do this, I used a simple tongue and groove joint, see detail 'a' on top of page 18. This is a two-step process. The first step is to cut a groove in the back stile of each side, see Figs. 2 and 2a. Once again, I made two passes, repositioning the rip fence between passes. The second step is to rabbet each end of the back to form a tongue that fits the groove. To do this, I "buried" a dado blade in an auxiliary fence and made a single pass to cut the rabbet, see Figs. 3 and 3a. CORNER PROFILE. Once the [joinery was complete, I routed a decorative profile on each outside corner on the sides, see detail 'b' in drawing on page 18. BEAD MOLDING. In addition to the routed profile, I applied strips of MmnMBMMMMHMI bead molding (F) around the panels. These are narrow strips of hardwood (curly maple) with a decorative bead that's routed with a beading bit, see detail 'c.' For safety, I made the molding by routing both edges of an extra-wide workpiece. Then I used a simple jig to rip the strips of molding to a con sistent width, see box below. After ripping both edges, just rout another set of beads and repeat the process. While you're at it, it's a good idea to make extra molding to use on the lid of the tool chest. (I made twenty-five linear feet.) After mitering the strips of bead molding to length, they're simply glued in place. TONGUE ~ DETAIL When ripping narrow strips of material (like the bead molding on the tool chest), I use a simple jig that rides against the rip fence on the table saw, see photo. It ensures that each strip is identical in width. The jig consists of two parts. A hardboard base has a notch thaf s sized to match the width of the strip, see drawing. And a wood handle is glued to the base. SETUP & USE. To set up the jig, start by positioning the rip fence so the outside edge of the notch aligns with the inside of the saw blade, see detail. After fitting the workpiece in the notch, push the jig past the saw blade to rip the first strip of molding. To rip the molding from the opposite edge, there's no need to reposition the rip fence. Just flip the workpiece end for end and repeat the process. Safety Note: To keep your hands well away from the blade, it's best to use a workpiece thaf s at least 3" wide. HANPLE adjust rip fence to align outside edge of notch with inside of saw blade Va" hardboard) NOTE: notch pushes workpiece through saw blade HANDLE (V y. 6" -%"-thick stock) No. 49 ShopNotes 19 |


